This topic includes:
The user interface is what you see of the software.
You will immediately see it when starting MADRIX for the first time. This graphical user interface [abbr.: GUI] provides visual feedback, controls, and information for you.
The GUI is one of the most important parts of MADRIX. We designed it with you–the user–in mind and to provide great usability, easy to use controls, and the most efficient ways to operate the software. The following topics will help you get to know the different parts and individual elements of the layout.
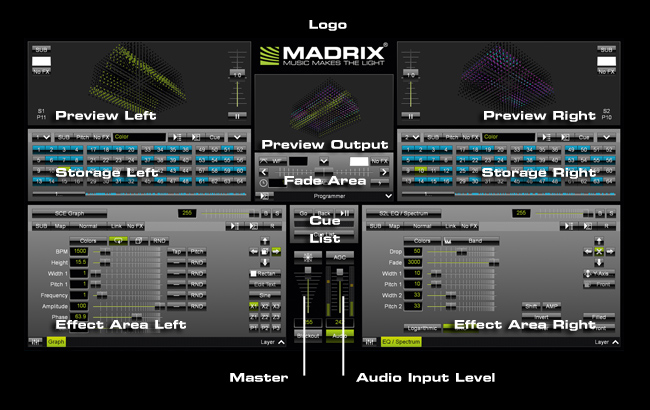
The GUI of MADRIX is divided into different parts. The following image provides a short overview.

| ▪ | »Menu This topic introduces the menu bar of the software found at the top of the screen. |
| ▪ | »Work Areas [Left/Right] MADRIX is a software that allows you to switch between two work areas, Left and Right. |
| ▪ | »3 Previews 3 Preview Windows [Preview Left, Preview Right, and Preview Output] will show you a preview of your lighting effects. They are explained in detail here. |
| ▪ | »Crossfader And Main Output Learn how to use the Crossfader, Fade Types, the Color Filter, and more in the Fade Area. |
| ▪ | »Controls [Left/Right] Quickly set up the global speed. |
| ▪ | »Storages A brief overview will introduce all the controls of Storage Left and Storage Right. |
| ▪ | »Storage Places [256 x 256] Learn how to manage and organize your visuals. |
| ▪ | »Effect Areas [Left/Right] How can I use Effects? Effect Area Left and Right will be explained here. |
| ▪ | »Cue List Section These buttons are used to control the automatic playlist feature of MADRIX. |
| ▪ | »Master / Audio Input Level How do these two buttons and faders work? It is explained in this topic. |
| ▪ | »Full Screen Mode You can use the full size of your monitor to display the user interface of MADRIX. |
| ▪ | »Touch Screen An additional touch screen interface is built right into MADRIX. Learn more about it in this topic. |