This topic includes:
The user interface of MADRIX is arranged in a specific way.

While there seem to be a lot of different areas, the GUI can be divided into 3 main sections:
| ▪ | Left [Effect Pipeline Left] |
| ▪ | Middle Section [Main Output] |
| ▪ | Right [Effect Pipeline Right] |
This screenshot clarifies the layout of the 2 pipelines [Effect Pipeline Left is shown in yellow / Effect Pipeline Right is shown in green] and the middle section:
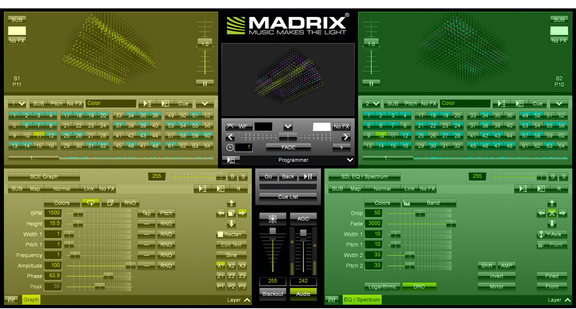
That means you can work independently on the left side or on the right side of MADRIX. You could compare this workflow with the A/B setup of a DJ.
Furthermore, you can find a distinct visual and logical hierarchy for each effect pipeline:

Left |
Middle Section |
Right |
Preview [Preview Left, |
Logo Preview Main Output |
Preview [Preview Right, |
Storages [Storage banks 1 to 256, |
Crossfader [Fade Area] |
Storages [Storage banks 1 to 256, |
Layers [Effect Area Left including Layers] |
Cue List Master And Audio Input Level |
Layers [Effect Area Right including Layers] |
| ▪ | Your visuals are customized and set up in Layers. |
| ▪ | A Storage Place can contain one or multiple Layers. |
| ▪ | To use a variety of effects, you can use many Storage Places to store your visuals. |
| ▪ | Storage Places are organized in Storages. |
| ▪ | A Preview shows what current Storage Place is selected on the current Storage to preview an effect. |
| ▪ | The Crossfader and Master define the final output towards your LEDs. |
In the following chapters, the different parts will be explained in more detail:
| ▪ | A Preview provides a live display of the currently used effects and lighting visuals. Learn more »3 Previews |
| ▪ | Different controls allow you to change visuals on demand for a whole pipeline. Learn more »Controls [Left/Right] |
| ▪ | A Storage contains Storage Places to help you organize, manage, and store your effects. Learn more »Storages |
| ▪ | An Effect Area offers all the controls to choose and customize effects. Learn more »Effect Areas [Left/Right] |
Thanks to the features of MADRIX, you can flexibly work in many ways.
A possible live work-flow could look like this, for example:
| ▪ | Select an effect on the left side and put it out onto the LEDs. |
| ▪ | Prepare the next effect on the right side. |
| ▪ | Switch to the right side [using the Crossfader]. |
| ▪ | Prepare the next effect on the left side. |
| ▪ | Etc. |