This topic includes:
▪Restoring The Default Settings
▪Audio Tracks / Sound Playback
▪Using Videos In Your MADRIX 5 Setup
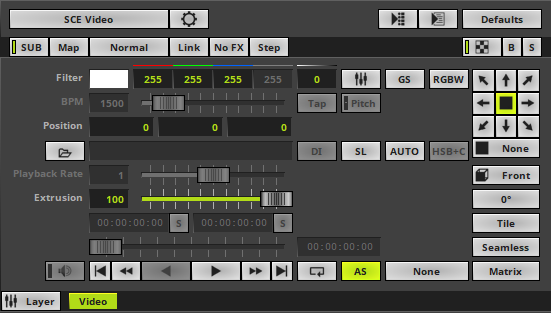
SCE Video allows you to load a video file into MADRIX 5 and display it on your LEDs.
|
|
 Default Settings |
 Customized Example |
▪This MADRIX Effects supports Effect Options for advanced workflows.
Learn more »Effect Options
▪Various buttons and controls have universal functions. They are available for each MADRIX 5 Effect / Layer.
Learn more »Effect Areas [Deck A / Deck B]
Learn more »Layers
This MADRIX 5 Effect uses the following, individual controls:
▪Filter - Applies a multiplicative color filter to the image. The default value is White.
- GS - Activates grayscale mode to show the input only in gray shades. The Filter is independent of this mode.
- RGBW - Converts the input into RGBW. This is useful when using RGBW fixtures to convert from the standard RGB color values of the input. If the option is disabled when using RGBW fixtures, the input will appear darker since the White channel is not used. The W color channel of the Filter only works if RGBW is activated.
Learn more »[Global] Colors And Intensity
▪BPM - Defines the speed [when using a direction/movement]. The default value is 1500. Valid values range from 0 to 9999.
Learn more »Using BPM Control
▪Position - Defines the position of the image in X, Y, and Z [in %]. The default values are 0, 0, 0. Valid values range from -1000 to 1000.
▪Playback Rate - Defines the speed of the video.
- The default value is 1, which is the regular playback speed. A rate of 2 doubles the speed and cuts the Duration in half, for example.
- Is only available for compatible video codecs [such as, QuickTime].
▪Dynam. Range - Defines the dynamic range of the output. Valid values range from 0 to 255.
- The default value range is 0 to 255, which means that all available color values of the input will be displayed.
- Adjusting the left value cuts of lower color values and defines a new black level; therefore eliminating unwanted [gray] noise and achieving a uniform black.
[Setting the left value to 255 will render the input completely black.]
- Lowering the right value highlights the colors; therefore achieving purer color values.
[Setting the right value to 0 will render black/gray values completely white.]
|
Extrusion - Adds depth to the input; i.e. duplicates the input image [in %]. This is mainly relevant for 3D. The default value is 100. Valid values range from 0.01 to 100. |
|
Open - Allows you to load a video into MADRIX 5. Select the file on your computer or another source. |
|
Volume - Is only available for videos with an audio track/sound. Allows you to define the audio output level for the loaded video. Valid values range from 0 to 100. The default setting is 0 [Off]. |
|
Start Time - Displays the Start Time of the video. The time format is hours:minutes:seconds [HH:MM:SS]. Left Mouse Click And Hold + Move Mouse Up/Down - Move the mouse up or down within the edit field to increase or decrease the value. Spacebar - Resets to the default value. |
|
Set Start Time - Allows you to define an individual Start Time to begin the video at a different position. First, please enter a different Start Time. |
|
End Time - Displays the End Time of the video. The time format is hours:minutes:seconds [HH:MM:SS]. Left Mouse Click And Hold + Move Mouse Up/Down - Move the mouse up or down within the edit field to increase or decrease the value. Spacebar - Resets to the default value. |
|
Set End Time - Allows you to define an individual End Time to let the video end/stop at a different position. First, please enter a different End Time. |
|
Playback Position Slider - This slider shows the current position of the video. |
|
Current Playback Position - Displays the current position of the video. The time format is hours:minutes:seconds [HH:MM:SS]. |
|
Skip To Start - Instantly skips to the Start Time of the video. |
|
Play - Starts the video playback. |
|
Pause - Allows you to pause video playback. The video stops at the current position. |
|
Playback Mode - Allows you to define the playback behavior. Once - Plays back the video normally, one time, from start to end. The Position will remain at the End Time. Loop [Default] - Activates forward [or backwards] looping. The video file will be played back repeatedly in a loop. Bounce - Is only available for compatible video codecs. Activates changing the playback direction when reaching the video End Time or Start Time. |
|
Autostart - Automatically starts the video after it has been loaded into MADRIX 5 or after changing a Storage Place. It is activated by default. |
|
Filtering - Defines how input is processed and displayed. Mainly affects the visual outcome when the input is scaled up or down [e.g., when choosing a different mode for Stretching / Aspect Ratio]. Choose from 2 different modes. The default setting is None. None - Prioritizes processing speed over image quality. |


|
Deinterlace Mode - Allows you to choose from several Deinterlace Modes. Often digital cameras, digital broadcasting, or digital filming is done via interlacing. In order to get 25 frames per seconds, 50 pictures are shot and merged/mixed with one another. You receive 25 odd frames [frame set 1] and 25 even frames [frame set 2] that contain different picture information [alternating pixel lines]. In order to get an undisturbed picture, proper deinterlacing is necessary. None - Deactivates deinterlacing. Bob - Uses one set of 25 frames [even or odd] and copies missing information from the pictures provided. Pixel lines are copied to create a full image. Activate Top Field First in order to process the frame set with the first pixel line first. Bob Linear - This is the recommended deinterlace mode. It uses one set of 25 frames, but builds an average for the missing pixel lines. Activate Top Field First in order to process the frame set with the first pixel line first. Blend - Renders an average image from frame set 1 and frame set 2. Discard - Simply dismisses missing information. Thereby, pixel lines are excluded. This results in half of the original resolution for the final image. Activate Top Field First in order to process the frame set with the first pixel line first. |
|
Slices - Is a way to bring 2D content to 3D LED matrices by slicing the content into different parts and applying each slice to X-levels, Y-levels, or Z-levels as required. Learn more Slices |
|
Decoder - Allows you to choose from two decoders. When playing back video files, MADRIX 5 accesses certain decoders to convert the data back into imagery. Automatic - Automatically decides which decoder to use based on the video file. - to install the correct video codec and Media Foundation - Uses the Media Foundation video decoder. Direct Show - Uses the Direct Show video decoder. |
|
HSB+C - Opens the fader box to control s, Saturation, and Brightness, as well as Contrast. Learn more HSB+C |
|
Direction - Allows you to choose the direction. This includes all directions for 2D and 3D mode. The default setting is None. |
|
Look-At Type - Allows you to choose from which side you want to look at the effect. This is mainly relevant for 3D. The default setting is Front. Learn more »Using Directions |
|
Rotation - Allows you to rotate the input [0°, 90°, 180°, 270°]. The default setting is 0°. |
|
Tile - Allows you to tile and duplicate the input and thereby generating patterns. |
|
Seamless - Activates or deactivates a continuous stream of the video image. MADRIX 5 will automatically display the video image again to create a continuous display. |
|
Stretching / Aspect Ratio - Allows you to choose the aspect ratio of the video. The default setting is Matrix. None - Disables stretching. Matrix - Stretches to the current aspect ratio of the virtual LED matrix. Original - Stretches to the original aspect ratio of the source. 4:3 - Applies a 4:3 aspect ratio. 16:9 - Applies a 16:9 aspect ratio. |


Restoring The Default Settings
|
Restore Default Layer Settings - Restores the default settings of the Layer. |

 SL - Calls up Slice Settings
▪Slice Settings - Is a way to bring 2D content to 3D LED matrices by slicing the content into different parts and applying each slice to X-levels, Y-levels, or Z-levels as required. [You will get the most benefit out of this feature when using content that are made up of different parts and are especially created for this area of application.]
Example: Your virtual LED matrix is 10 x 8 x 4. Now, you have prepared a video and want to display it not only on the first Z-level or use Extrude, but on all 4 Z-levels. Then, you would let MADRIX 5 create 4 slices.
▪Slice Type - Defines the 3D orientation of how slices are applied to your LED matrix.
- X-Slices - Uses slices to fill the LED matrix; always starting from left to right.
- Y-Slices - Uses slices to fill the LED matrix; always starting from top to bottom.
- Z-Slices - Uses slices to fill the LED matrix; always starting from front to back.
▪Slice Order - Defines how your source content is processed.
- Left To Right - MADRIX 5 slices the content starting left.
[The first, left slice will then be applied to the left for X-Slices, to the top for Y-Slices, and to the front for Z-Slices.]
- Right To Left - MADRIX 5 slices the content starting right.
[The first, right slice will then be applied to the left for X-Slices, to the top for Y-Slices, and to the front for Z-Slices.]
- Top To Bottom - MADRIX 5 slices the content starting top.
[The first, top slice will then be applied to the left for X-Slices, to the top for Y-Slices, and to the front for Z-Slices.]
- Bottom To Top - MADRIX 5 slices the content starting bottom.
[The first, bottom slice will then be applied to the left for X-Slices, to the top for Y-Slices, and to the front for Z-Slices.]
▪Slice Count - Defines in how many slices the content is divided. A value of 1 means that no slices are created and that the video is used as one. [A value of 4, for example, will create 4 slices that each make up 25% of the source content.]
▪The settings with the highest performance are Z-Slices and Top To Bottom
▪Confirm with OK, restore the default settings via Defaults, or abort the process using Cancel
▪Learn more »SCE Image
 HSB+C - Calls up the Fader Box for Hue, Saturation, and Brightness, as well as Contrast.
Note: This feature is not not available for MADRIX 5 Record files [of the file type *.mrec] and might not be available for unofficially supported video file formats.
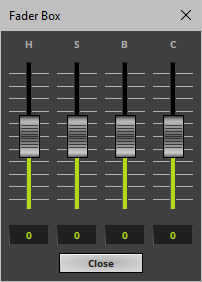
▪H - Controls the hue, and thus influences the overall tint of the colors of the video.
Valid values range from -1.00 to 1.00. The default value is 0.
Hue will be deactivated and not available, if GS [Grayscale mode] is enabled.
▪S - Controls the saturation, and thus influences the richness of the colors of the video.
Valid values range from -1.00 to 1.00. The default value is 0.
Saturation will be deactivated and not available, if GS [Grayscale mode] is enabled.
▪B - Controls the brightness, and thus influences the overall intensity of colors of the video [from very dark and black to very light and white].
Valid values range from -1.00 to 1.00. The default value is 0.
▪C - Controls the contrast, and thus influences the difference between colors of the video and black.
Valid values range from -1.00 to 1.00. The default value is 0.
MADRIX 5 can play back the audio track / sound of a video file.
▪Make sure to configure audio output first.
Learn more »Audio And Sound
▪Make sure to set up the audio volume for the video.
Learn more Volume
▪If you are experiencing issues with your video, please make sure:
- to install the correct video codec and
- to manually select a different decoder as explained above.
▪To play back video, a video codec is required. Each video file format requires a special video codec.
▪Windows already provides a number of codecs, but often additional codecs are necessary.
▪If some features described above are not available, the video codec might simply not support this feature.
▪Learn more below.
Overview
▪All video codecs that are installed on your computer are automatically supported by MADRIX 5.
▪If you are experiencing problems, read below.
Solving Codec Problems
▪If MADRIX 5 is not able to play back a video file, make sure to install the appropriate video codec on your computer.
▪Collections of video codecs are available in so-called video codec packs.
▪If you install a new codec pack, make sure to uninstall a previously installed codec pack first. Often, it also makes no sense to install multiple codec packs since similar codecs may not work correctly anymore.
▪The following codec packs can be recommended for download:
- Web Link: »K-Lite Codec Pack
- Web Link: »LAV Filters
Codecs That Are Not Supported
▪MADRIX 5 does not support the following video codecs:
- Apple ProRes
Using Videos In Your MADRIX 5 Setup
▪When using video files, MADRIX 5 will automatically locate these files on your harddisk. It also saves the folder location internally to access the video file.
▪But MADRIX 5 will not save the videos in your MADRIX 5 Setup File!
▪In order to play the setup on a different computer, you will need to copy your videos, too. Make sure that they are placed in the same folder location.
▪The SCE Video effect is also able to play back MADRIX 5 Record Files [of the file type *.mrec].
Learn more »Recording
| MADRIX 5.7. |
| [Ctrl & +/-] = Zoom In/Out | [Ctrl & 0] = 100% |
|
Previous Next
|
|
Enable Automatic Translation | Activer La Traduction Automatique | 启用自动翻译 |