This topic includes:

▪MADRIX Effects and Layers are closely related.
▪Layers can be used to combine visuals and to create completely new effects.
▪By default, only 1 Layer is created and shown.
▪You can choose to use only 1 Layer or multiple Layers. Using multiple Layers can alter the displayed visuals immensely.
▪MADRIX 5 supports an unlimited number of Layers.
[The actual number of Layers available for use depends on your computer performance and Matrix Size.]
▪This chapter describes ways to work with Layers in particular.
- A general overview about the controls for Layers and MADRIX Effects is provided in a previous chapter. Learn more »Effect Areas [Deck A / Deck B]
|
▪ Every Layer is represented by a Layer Tab. |
|
▪Layer Order ▪Copy And Paste ▪Cut And Paste ▪Shift + Left Mouse Click And Hold And Move - You can perform a Cut and Paste with the mouse. ▪Keyboard Shortcuts |
|
▪Layer Name - You can change the Layer's label. ▪Right Mouse Click > Rename or Double-Click on Layer Tab - Allows you to rename the description label of the Layer tab. Simply enter a new name and click OK |


A context menu offers various options when working with Layers.
You can access the Layer context menu in 3 ways:
▪Right Mouse Click on Layer
▪Or Right Mouse Click on a Layer Tab

▪Layer > New - Creates a new Layer.
▪Layer > Duplicate - Creates an exact copy of the currently selected Layer.
▪Layer > Copy - Copies the Layer into the clipboard of the computer.
▪Layer > Cut - Copies the Layer into the clipboard and removes the Layer.
▪Layer > Paste - Applies all settings of the Layer in the clipboard to the currently selected Layer.
▪Layer > Insert - Creates a new Layer and applies all settings of the Layer in the clipboard to the currently selected Layer.
▪Layer > Rename - Allows you to change the label of the Layer.
▪Layer > Remove - Removes the currently selected Layer entirely.
Overview
Various buttons and controls have universal functions. They are available for each MADRIX Effect / Layer:

▪Link
|
Effect Parameter Chaser - Controls the Effect Parameter Chaser to add playlist functionality to the Layer. Learn more »Chaser |
|
Effect Macro Editor - Controls the Effect Macro Editor to add scripting functionality to the Layer. Learn more »Macros And Scripts |

|
Restore Default Layer Settings - Restores the default settings of the Layer. |

|
Submaster - Regulates the intensity of an effect. ▪Click SUB and the button extends into a fader. ▪Make sure to click and continue to hold the mouse button at the same time. ▪Afterwards, simply move the fader with the help of your mouse. ▪Release the mouse button to set up the specific value [The fader will disappear automatically]. ▪A value of 255 means full intensity. ▪A value of 0 means no intensity and will render the effect completely black. A value of 0 is shown in red in order to make its severe affect on the visual outcome clear. The button itself and the Layer tab pulsate in red as well. ▪The tooltip shows the currently set value. The Submaster allows you to solely adjust the intensity of the running effect or Layer. To adjust the intensity of all running effects you have to use the Master. |


Modifying the Map Setting allows to freely resize, reposition, and further modify every MADRIX Effect.
Learn more »Mapping / Tiling / Rotation
Overview
Just like an image-editing software, you can use different Mix Modes to mix Layers with each other. This results in diverse color combinations and often completely new effects. These can also be referred to as blend modes.
How Mix Modes Work
▪Mix Modes are based on basic mathematical calculations.
▪As such, Mix Modes combine the color values [tonal values] of 2 Layers in different ways. A foreground Layer and a background Layer are used.
▪All Mix Modes, except for Mask, work pixel by pixel and color channel by color channel.
- Each single pixel of the foreground Layer is combined with the corresponding pixel of the background Layer.
- Each color channel of a single pixel is combined with the equivalent color channel of the corresponding pixel.
Applying A Mix Mode
▪You can use Mix Modes if you have at least 2 Layers [foreground and background]. Then, you can apply the Mix Mode to the second Layer.
▪In MADRIX 5, the second Layer is positioned to the right. It is the foreground Layer. In MADRIX 5, the last Layer is on top.
▪If you apply the Mix Mode to the first Layer, nothing will happen.
▪You can decrease [or increase] the impact that each Layer has on the visual result by using the Opacity slider.
▪In the example below, Mix Mode Mask is selected.

▪By default, Normal is selected.
▪Right Mouse Click - Resets the filter to its default value [Normal].

List Of Mix Modes
|
|
Normal - Is the default setting. |
|
Darken - Compares both Layers and only uses the darkest color value for each color channel per pixel [this will be the lower color value]. The result will look the same if you change the position of one Layer with the position of the other Layer. |
|
|
Multiply - Multiplies the color values of each pixel of Layer 2 with the color values of each pixel of Layer 1. The result will look the same if you change the position of one Layer with the position of the other Layer. |
|
|
Color Burn - Is the inversion of Color Dodge. If you change the position of one Layer with the position of the other Layer, the result will not look the same. |
|
|
Linear Burn - Is subtractive color mixing. The result will look the same if you change the position of one Layer with the position of the other Layer. |
|
|
Lighten (HTP) - Is the inversion of Darken. Is at the same time the Mix Mode HTP, applying the Highest Takes Precedence principle for DMX values. The result will look the same if you change the position of one Layer with the position of the other Layer. |
|
|
Screen - Is the inversion of Multiply. The result will look the same if you change the position of one Layer with the position of the other Layer. |
|
|
Color Dodge - The brighter Layer 2, the brighter will be Layer 1. If you change the position of one Layer with the position of the other Layer, the result will not look the same. |
|
|
Linear Dodge - Will simply add up the color values of both Layers. The result will look the same if you change the position of one Layer with the position of the other Layer. |
|
|
Overlay - Is a combination of Multiply and Screen. If you change the position of one Layer with the position of the other Layer, the result will not look the same. |
|
|
Soft Light - Layer 2 will modulate the color values of Layer 1 and create soft mixtures in areas of highlights and shadows. If you change the position of one Layer with the position of the other Layer, the result will not look the same. |
|
|
Hard Light - Creates the result of Overlay, when changing the position of Layer 2 with the position of Layer 1. If you change the position of one Layer with the position of the other Layer, the result will not look the same. |
|
|
Vivid Light - Will mainly increase the contrast of highlights and shadows. If you change the position of one Layer with the position of the other Layer, the result will not look the same. |
|
|
Linear Light - Increases the contrast. If you change the position of one Layer with the position of the other Layer, the result will not look the same. |
|
|
Pin Light - Is like a combination of Darken and Lighten. Or the result can be twice the brightness of Layer 2 if Layer 1 is brighter than that. If you change the position of one Layer with the position of the other Layer, the result will not look the same. |
|
|
Hard Mix - Only uses the six primary colors red, green, blue, yellow, cyan, magenta, or black, or white. The result will look the same if you change the position of one Layer with the position of the other Layer. |
|
|
Difference - Will calculate the difference between color values for each pixel. The result will look the same if you change the position of one Layer with the position of the other Layer. |
|
|
Exclusion - Bright color areas will invert the color values of the corresponding area of the other Layer. The result will look the same if you change the position of one Layer with the position of the other Layer. |
|
|
Subtract - If you change the position of one Layer with the position of the other Layer, the result will not look the same. |
|
|
Divide - If you change the position of one Layer with the position of the other Layer, the result will not look the same. |
|
|
Mask - Uses the alpha channel of Layers. The result will look the same if you change the position of one Layer with the position of the other Layer. |
|
|
Negative Mask - If you change the position of one Layer with the position of the other Layer, the result will not look the same. |


Overview

▪Link - Combines 2 Layers with each other.
▪If you activate Link mode, the currently selected Layer will be linked to the Layer underneath. It means that it will be linked to the Layer left to it.
Example 1
1] Select a Storage Place and create 2 Layers . Choose SCE Ticker / Scrolling Text for Layer 1. Choose SCE Plasma for Layer 2.

adsda
2] As a first result, you will see the following image in the Previews. Because of the standard settings, the Layer order, and the 2 Layers, only SCE Plasma is visible.

Without Link Mode
3] Activate Link Mode. The button glows green.

4] As a result, both Layers will be merged and the preview looks completely different. The text will be filled with the Plasma effect and in this way, both Layers are used to create a new effect.

With Link Mode
Example 2
▪You could describe Link Mode differently.
▪As previously described, effects may be build out of several Layers. Each Layer can contain a different MADRIX Effect.
▪All Layers of that effect will be used to render the visual outcome. When rendering the visuals, Mix Modes, Opacity, position of Layers, etc. will all be included in the render process.
▪Because of this, Link Mode can also be very useful when using more than two Layers.
▪Use Link Mode and MADRIX 5 will handle two linked Layers like one Layer in the render process.
1] Select a Storage Place and create 3 Layers. Choose SCE Metaballs for Layer 1. Choose SCE Ticker / Scrolling Text for Layer 2. Choose SCE Plasma for Layer 3 and activate Link Mode for Layer 3.

2] As a result, you can see that the Plasma effect of Layer 3 is only visible on the text of Layer 2. The Metaballs effect [Layer 1] has not been affected at all.

3] If we now add a fourth Layer [SCE Gradient at Layer position 2] and activate Link Mode for this Layer, we will see that the text looks still the same. But the Metaballs effect [Layer 1] now has the colors of the Color Gradient.


|
Filters - Special filters can be applied to Layers in order to quickly change your visuals. Learn more »Filters [FX] |

|
Stepped Rendering - Is only available for specific MADRIX Effects. It only applies to any movement of the input, i.e. when a Direction other than Stop is activated. Instead of creating a smooth transition for the movement from one voxel to the next voxel [sub-pixel rendering], MADRIX 5 will move the input from voxel to voxel and from step to step without this transition. This might create a rougher overall movement, but it can produce a visually better outcome on the LEDs in certain cases [such as slow movement of large text]. |

|
Layer Opacity - Makes the Layer transparent. This is mainly useful when using at least 2 Layers or more. |


Blind Mode and Solo Mode are 2 modes to quickly hide or show Layers. You can quickly include or exclude them from the visual end result of your effect.
|
Blind - Hides the currently selected Layer. |
|
Solo - Hides every Layer except the currently selected Layer. Hence, this Layer is the only one that will be displayed. |


Overview
You can switch between 2 views.
▪By default, the regular Effect Area is shown.
Learn more »Effect Areas [Deck A / Deck B]

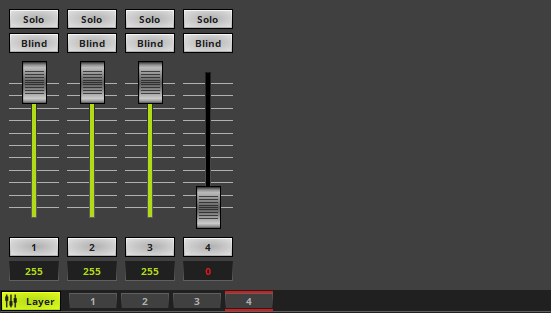
▪Layer View - Activates the second view available for Layers.
- The user interfaces changes as shown below [4 Layers are currently active in this example].
▪When switching between Storage Places, the last used view will be remembered by the software.
Solo And Blind
▪Solo - Activates Solo Mode for the corresponding Layer.
▪Blind - Activates Blind Mode for the corresponding Layer.
Faders
▪Each fader regulates the Opacity of a single Layer.
- You can set the fader to a specific position.
- You can enter a value in the input field.
- You can flash the fader.
- A value of 0 is shown in red in order to make its severe affect on the visual outcome clear. The Layer tab itself pulsates in red as well.
Mouse Control And Keyboard Shortcuts
▪Single Selection
- A single fader regulates the Opacity of the corresponding Layer.
- Left Arrow / Right Arrow - Quickly switch between faders by using the left or right arrow key.
▪Multiselection
- Use Ctrl + Left Mouse Click to select multiple faders at the same time. A green outline will show that a Layer is selected. When multiple faders are selected, you can control them at the same time.
- Use Shift + Left Mouse Click to select multiple faders at the same time. A green outline will show that a Layer is selected. When multiple faders are selected, you can control them at the same time.
- Ctrl+A - Selects all faders of all Layers.
- Ctrl+D - Deselects the current fader selection.
▪ Flash
- Use the button showing the Layer's Name or the keyboard shortcut Spacebar
- It instantly sets the intensity to 255 as long as you hold the button/key down.
- To use this feature, the fader needs to be set to a lower value than 255 first.
▪Restoring The Default Value
- Left Mouse Double-Click - Perform a double-click with your left mouse button directly on a single or multiple faders to restore the Default Value
- Right Mouse Click - Perform a click with your right mouse button directly on a single or multiple faders to restore the Default Value
| MADRIX 5.7. |
| [Ctrl & +/-] = Zoom In/Out | [Ctrl & 0] = 100% |
|
Previous Next
|
|
Enable Automatic Translation | Activer La Traduction Automatique | 启用自动翻译 |