This topic includes:
The Cue List is an automated playlist.
It offers the possibility to precisely manage the automatic playback of effects. Once the Cue List is started, MADRIX will automatically play back your visuals according to your configuration and schedule. That means MADRIX switches from Storage Place to Storage Place [i.e. from effect to effect].
You can open the Cue List in 4 ways:
| ▪ | Go to Window > Cue List... |
| ▪ | Press F7 |
| ▪ | Or click Programmer > Cue List on the user interface. |
| ▪ | Or click Cue List on the user interface. |
To close the Cue List and change back to the original MADRIX user interface:
| ▪ | Go to Window > Cue List... |
| ▪ | Press F7 |
| ▪ | Or click Cue List > Programmer on the user interface. |
The main user interface offers 4 control buttons for the Cue List.

|
Go - Skips to the next Cue. |
|
Back - Returns to the previous Cue. |
|
Play/Pause - Starts or holds playback. |
|
Cue List - Opens the actual Cue List window. This is the Cue List itself. Use it to set up your Cue List configuration. |
Cue List Window
The Cue List window can be used in 2 modes:
| ▪ | A] The Cue List is part of the MADRIX user interface. You can switch between different views [e.g., Programmer View, Cue List View, Group Control view]. |
| ▪ | B] The Cue List can be undocked and used freely as a separate window. |
A] Cue List Docked |
|
|
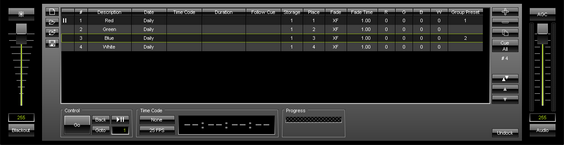
B] Cue List Undocked |
|

|
New - Creates a new Cue List. It also clears all entries from the current Cue List! Open - Loads an already existing Cue List [of the file type *.mclx or *.csv]. Choose the file from your harddisk. Open And Attach - Loads an already existing Cue List [of the file type *.mclx or *.csv] and adds it to the current Cue List. Save - Stores your Cue List in an external file. You can choose to save in standard *.mclx file format; or to save in *.csv file format in order to easily edit the file with a text editor, for example. |
|
Add Cue - Adds a new cue to the Cue List. When a Time Code is received, MADRIX will also automatically add the currently received Time Code to the cue [by filling in the column Time Code]. Remove cues - Removes all currently selected cues from the list. Duplicate cues - Copies the currently selected cues and adds them as new cues to the list. Cue All - Adds new Cue List entries for all Storage Places that have a MADRIX Effect customized and stored. # 4 - Displays the total number of cues in the Cue List. |
|
Swap Position - Swaps the position of cues in the list when several cues are selected first. Position Up - Changes the order, and positions currently selected cues one item higher up in the list. Position Down- Changes the order, and positions currently selected cues one item lower down in the list. |
|
Go - Skips to the next cue. Back - Returns to the previous cue. Goto - Jumps to the specified cue. Make sure to enter the correct number in the nearby input field. Play/Pause - Starts or holds playback. |
|
Progress - Shows you the relative time progression of the current cue in a progress bar. |
|
Undock - Allows you to undock the Cue List and use in a separate window. Dock - Allows you to integrate the Cue List back into the user interface of MADRIX when undocked. |
|
Double-Click / Right Mouse Click - Perform a double-click or right click with the mouse onto an entry into the specific column and you will be able to enter and change the values. Multiple Selection - The list allows you to select and modify more than one entry at a time. Select several entries by using Shift + Left Mouse or Ctrl + Left Mouse or Shift + Arrow Keys. Then, right click into the column you want to change. Spacebar or value of -1 - Removes all values or restores the default values. |
|
Double-Click - Perform a double-click on the very first column of the Cue List in order to start playing from this cue [thus performing a Goto]. Make sure to only double-click in the first column. You can even jump to specific cues during Cue List playback in this way. |


1] Add new cues to the Cue List by using
A] Cue on the user interface,
B] + in the Cue List window, or
C] Cue All in the Cue List window.
2] Change each cue as explained in the list below.
- Change values as described above in the section Controls
- You can even edit the Cue List while it is playing.
- Make sure to change the settings for each cue according to your requirements!
|
|
||||||||
# |
|
||||||||
Description |
|
||||||||
Date |
|
||||||||
Time Code |
Example
|
||||||||
Duration |
|
||||||||
Follow Cue |
|
||||||||
Storage |
|
||||||||
Place |
|
||||||||
Fade |
|
||||||||
Fade Time |
|
||||||||
R |
|
||||||||
G |
|
||||||||
B |
|
||||||||
W |
|
||||||||
Group Preset |
|
Overview

Time Code is a useful option to trigger effects at certain times of the day or at certain points in time. For example, you might want to trigger Storage Place S1 P1 at 10:00 a.m. or when 3 minutes have passed after the start. Time Code is a convenient way to synchronize independent equipment of your LED installation with each other. This could be external audio equipment, other MADRIX computers, or even the same computer. You might want to set up a time-controlled show in sync with timelines of lighting effects of MADRIX and sound.
Receiving Time Code is possible with all MADRIX software license versions [including all MADRIX KEYs, MADRIX NEO, and MADRIX PLEXUS].
Configuration
|
|
||
|
|
||
00:00:00:00 |
|

Learn more »Time Code [MIDI / Art-Net / SMPTE / System Time]
Stop
According to your configuration, you may have to set the Time Code Source to None to fully stop the Cue List.
| ▪ | Do not forget to save your Cue List or the complete MADRIX Setup file. |
| ▪ | When you are using Date, Time Code, and/or Duration, logical routines are implemented to determine which cue should be currently active. These routines are explained in more detail below. |

If you are setting up a Date for a cue, 3 options are available to you:
| ▪ | Daily, |
| ▪ | A specific weekday, |
| ▪ | Or an explicit date. |
If you are using a mixture of those three options, a cue will be favored and activated according to the following hierarchy if applicable:
An explicit date overrides a weekday entry. And a weekday entry overrides a daily entry.
For example, daily will activate a cue every single day. But on Mondays, another cue should be activated and it will be. But 2010/04/19 is also a Monday and this cue will be activated this day instead of the daily cue and instead of the Monday cue.
Time Code Without Duration
| ▪ | If you are using the column Time Code without the column Duration, a cue will only be activated if the Time Code passes this predefined time. |
| ▪ | If the Time Code of a cue [without Duration] has already passed that deadline, the cue will not be activated. |
Time Code With Duration
A] If you are using the column Time Code and the column Duration, a cue will be activated when the current Time Code falls into this time window.
| ▪ | A cue using Time Code and Duration will be activated if it falls into the time window. |
| ▪ | In addition, the logical routine will check if the Date needs to be considered according to the information above [Date]. For example, if your daily cue should start at 8 o'clock for 8 hours and the current Time Code says 10 o'clock, the cue will be activated. |
B] When using Time Code and Duration, you should be aware of what should happen when the Duration is over. A cue with a Time Code and Duration will expire eventually.
| ▪ | When a cue with Time Code and Duration is over or has expired, MADRIX will automatically select the next cue; regardless of what the next cue is. |
| ▪ | MADRIX will not check if the next cue is valid or logic. If you do not want MADRIX to select the next cue, use Follow cues for example or make sure the next cue is set up correctly! |
Loop Function
| ▪ | If all cues have been assigned a Duration, the Cue List will automatically start from the beginning again after the last cue. |
| ▪ | If a cue inside the Cue List does not have a pre-defined duration, the Cue List will stop at this cue. |
| ▪ | If you want to stop the Cue List with the last entry, you only have to remove the duration for the last cue in your Cue List. |
You can choose how MADRIX manages the user interface when playing back the Cue List.
| ▪ | Go to Preferences > Options... > User Interface [Keyboard shortcut: Ctrl+Alt+O > User Interface] |

| ▪ | Playback Side - Defines which sides are used during Cue List playback. Choose from 2 modes: Alternating - MADRIX automatically switches from side to side between the Left Side and the Right Side. - Example: The first Cue will be played on the Left Side of the user interface, the second Cue on the Right Side, the third Cue on the Left Side again, and so on. By Storage ID Parity - MADRIX will decide which side to use depending on the Storage ID. - Cues that refer to an odd Storage ID [e.g., Storage 1 or Storage 3] will be played back on the Left Side only. - Cues that refer to an even Storage ID [e.g., Storage 2 or Storage 4] will be played back on the Right Side only. - [When using only Storage 1 and Storage 2, this behaviour closely resembles how MADRIX 2 played back the Cue List.] R - Restores the default settings. The default value is Alternating. |
| ▪ | Click Apply to confirm. |
| ▪ | Click OK to close the window. |
The majority of controls in MADRIX is disabled while the Cue List is running. The following control controls are available to you even during Cue List playback:
| ▪ | Cue List and Cue List controls |
| ▪ | Submaster Left/Right |
| ▪ | Color Filter Left/Right |
| ▪ | Filter Left/Right |
| ▪ | Speed Masters Left/Right, including Pause |
Learn more »Controls [Left/Right]
| ▪ | Crossfader |
| ▪ | Main Output Color Filter |
| ▪ | Main Output Filter |
| ▪ | Main Output Strobe |
Learn more »Crossfader And Main Output
| ▪ | Master, including Freeze and Blackout |
| ▪ | Audio Input Level, including AGC and Audio |
Learn more »Master / Audio Input Level
| ▪ | Group Control |
Learn more »Fixture Groups [Group Control]
File Watcher [Automatic Cue List Reloading]
MADRIX can automatically reload a Cue List within a predefined refresh time.
Learn more »General