This topic includes:
▪DVI Output And External Previews
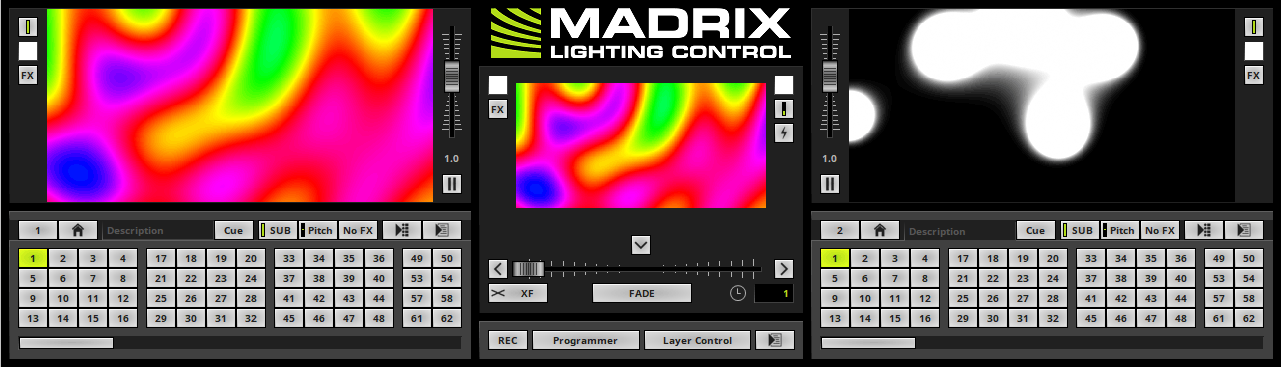
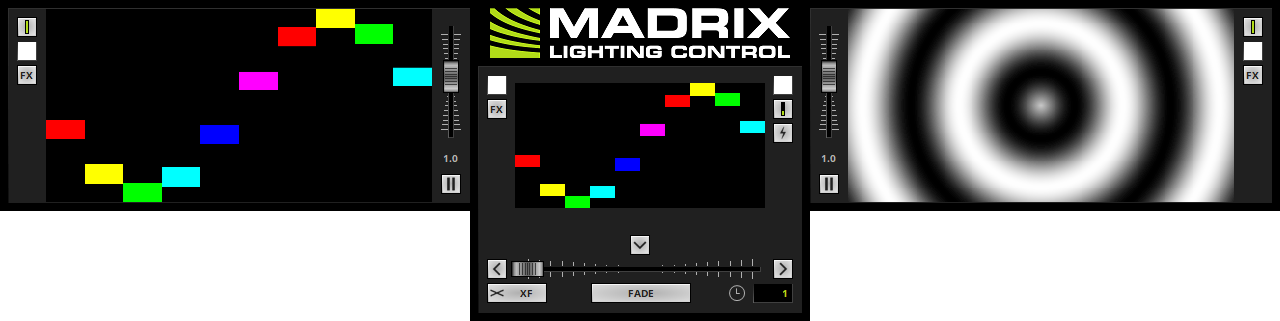
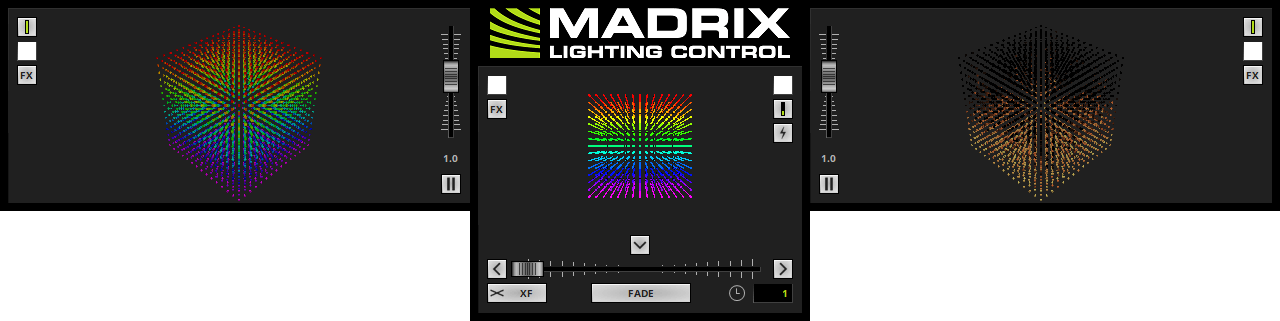
MADRIX 5 features 3 main Previews.
That means that you can have a look at your effects and visuals before they are displayed on your LED installation. These are live previews and they show everything in real time.
▪Preview Deck A
▪Preview Deck B
▪Preview Output
▪Preview Deck A / Preview Deck B - Located to the upper left and to the upper right of the user interface. They represent the two preview windows for the 2 Effect Pipelines.
▪Preview Output - Is located in the middle. This window is a preview of the actual data output that is sent to your interfaces/LEDs.
▪A MADRIX 5 Preview is a technical representation of your installation. You will see the individual pixels/voxels and how the effects will look on your LEDs, but not realistic renderings of your projects you may know from visualizers.
▪DVI output is explained at the end of this topic. Learn more DVI Output And External Previews
As explained earlier, you can use MADRIX 5 to control 2D and/or 3D projects. [Learn more »2D Or 3D [X, Y, Z]]
The 3 Previews support a 2D mode and a 3D mode to adequately represent your LED installation. In this way, they are an important part of your workflow when working with your project.
▪Go to the menu Previews > Preview Deck A/Deck B/Output > 2D Mode to choose 2D mode for the left/right/middle Preview.
▪Go to the menu Previews > Preview Deck A/Deck B/Output > 3D Mode to choose 3D mode for the left/right/middle Preview.
You can use the Previews in 3D Mode, even if your virtual LED matrix is only 2D.
And you can use the Previews in 2D Mode, even if your virtual LED matrix is in 3D.
Overview
You have different options of working with each Preview. It depends on 2D mode or 3D mode which options are available to you.
2D Mode
Using The Mouse
[Stretch Pixels needs to be deactivated.]
▪Left Mouse Click And Hold And Move - Click with your left mouse button on a Preview, continue to hold, and move your mouse in order to move and relocate the Preview.
▪Middle Mouse Click And Hold And Move - Click with your middle mouse button on a Preview, continue to hold, and move your mouse in order to move and relocate the Preview.
▪Right Mouse Click And Hold And Move - Click with your right mouse button on a Preview, continue to hold, and move your mouse in order to zoom in or to zoom out.
▪Left Mouse Double-Click - Perform a double-click with your left mouse button to reset the Preview to its default view. This removes any changes, such as zoom or relocation.
▪Right Mouse Click - Calls up the context menu as explained below.
▪Scroll Wheel - Click on a Preview to focus it. Then, use the scroll wheel of your mouse to zoom in or to zoom out.
Keyboard Shortcuts
▪Spacebar - Use the spacebar on your keyboard to reset the Preview to its default view. This removes any changes, such as zoom or relocation.
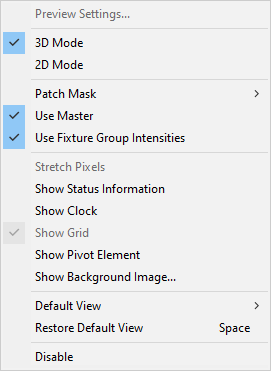
Context Menu
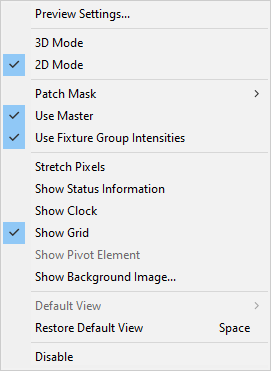
▪Preview Settings... - Is only available in 2D mode. Opens the Preview Settings for the associated preview. More Information
▪3D Mode - Switches to 3D mode.
▪2D Mode - Is activated in 2D mode.
▪Patch Mask - Is only available for Preview Output. More Information
▪Use Master - Is only available for Preview Output. Applies the Master to the Preview Output. Deactivate it if the middle Preview should not reflect the main brightness and instead is always shown at full intensity.
▪Use Fixture Group Intensities - Is only available for Preview Output. Applies the Fixture Groups to the Preview Output. Deactivate it if the middle Preview should not reflect the group brightness values and instead is always shown at full intensity.
▪Stretch Pixels - Extends the Preview to the full size. The content [i.e., the effects] will also be stretched.
▪Show Status Information - Provides further information and displays the name of the Preview, the current size of the virtual LED matrix, the current frames per second of this preview [FPS], and which Storage [e.g., S1] and which Storage Place [e.g., P1] are currently selected.
▪Show Clock - Will display the system time in the preview.
▪Show Grid - Activates an optical raster separating the single pixels. If the resolution or the zoom level is too high, the grid will not be visible anymore.
▪Show Background Image... - You may load various image files as background images for your Previews. They will replace the standard gray background color.
- Supported file formats include: Bitmap (*.bmp), GIF (*.gif), JPEG (*.jpg, *.jpeg, *.jpe, *.jfif), PBM (*.pbm), PGM (*.pgm), PNG (*.png), PPM (*.ppm), SVG (*.svg), TIFF (*.tif, *.tiff), TGA (*.tga), XBM (*.xbm), XPM (*.xpm)
▪Restore Default View - Resets the Preview to the default size and position. This removes any changes, such as zoom or relocation.
▪Disable - Deactivates a Preview. This can be helpful to save computer resources and increase performance.
3D Mode
Using The Mouse
▪Left Mouse Click And Hold And Move - Click with your left mouse button on a Preview, continue to hold, and move your mouse in order to rotate the 3D Preview. You can also add a spin and let the Preview rotate constantly.
▪Middle Mouse Click And Hold And Move - Click with your middle mouse button on a Preview, continue to hold, and move your mouse in order to move and relocate the Preview.
▪Right Mouse Click And Hold And Move - Click with your right mouse button on a Preview, continue to hold, and move your mouse in order to zoom in or to zoom out.
▪Left Mouse Double-Click - Perform a double-click with your left mouse button to reset the Preview to its default view. This removes any changes, such as zoom or relocation.
▪Right Mouse Click - Calls up the context menu as explained below.
▪Scroll Wheel - Click on a Preview to focus it. Then, use the scroll wheel of your mouse to zoom in or to zoom out.
Keyboard Shortcuts
▪Spacebar - Use the spacebar on your keyboard to reset the Preview to its default view. This removes any changes, such as zoom or relocation.
Context Menu
▪Preview Settings... - Is only available in 2D mode. Opens the Preview Settings for the associated preview. More Information
▪3D Mode - Is activated in 3D mode.
▪2D Mode - Switches to 2D mode.
▪Patch Mask - Is only available for Preview Output. More Information
▪Use Master - Applies the Master to the Preview Output. Deactivate it if the middle Preview should not reflect the main brightness and instead is always shown at full intensity.
▪Use Fixture Groups Intensity - Applies the Fixture Groups to the Preview Output. Deactivate it if the middle Preview should not reflect the group brightness values and instead is always shown at full intensity.
▪Show Status Information - Provides further information and displays the name of the Preview, the current size of the virtual LED matrix, the current frames per second of this preview [FPS], and which Storage [e.g., S1] and which Storage Place [e.g., P1] are currently selected.
▪Show Clock - Will display the system time in the Preview.
▪Show Pivot Element - Displays a helpful icon for visual guidance. Three arrows are always shown at position X=0, Y=0, Z=0 [not matter if the Preview is rotated]. The X-axis is red [horizontal; width], the Y-axis is green [vertical; height], and the Z-axis is blue [level; depth].
▪Show Background Image... - You may load various image files as background images for your Previews. They will replace the standard gray background color.
- Supported file formats include: Bitmap (*.bmp), GIF (*.gif), JPEG (*.jpg, *.jpeg, *.jpe, *.jfif), PBM (*.pbm), PGM (*.pgm), PNG (*.png), PPM (*.ppm), SVG (*.svg), TIFF (*.tif, *.tiff), TGA (*.tga), XBM (*.xbm), XPM (*.xpm)
▪Default View - Choose your point of view and the default view for this Preview.
▪Restore Default View - Resets the Preview to its Default View. This removes any changes, such as zoom or relocation.
▪Disable - Deactivates a Preview. This can be helpful to save computer resources and increase performance. Especially, 3D mode requires a lot of computer performance.
Overview
The Previews mainly show your effects and visuals. Depending on different settings and requirements they convey additional information.
Note: The different scenarios explained below can apply at the same time.
Preview Settings > Slice Alignment
▪Right Mouse Click on a Preview > Preview Settings... - Opens further settings for the associated preview. You can change the settings for each preview individually.
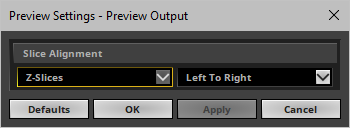
▪The following settings only apply when the preview is set to 2D Mode, but your Patch includes fixtures on multiple Z-layers [Z > 1]:
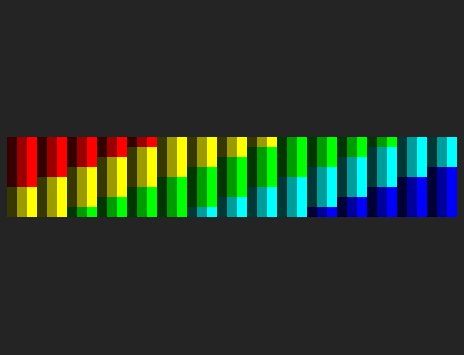
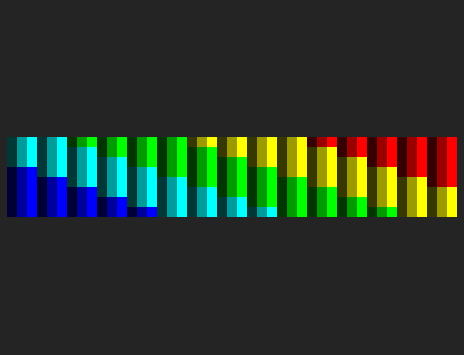
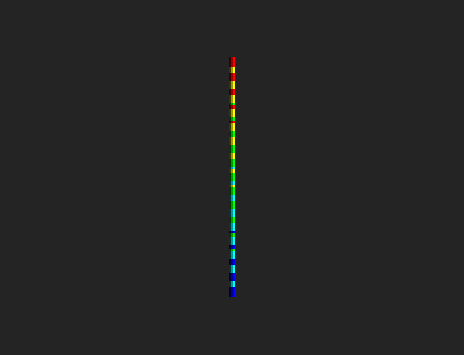
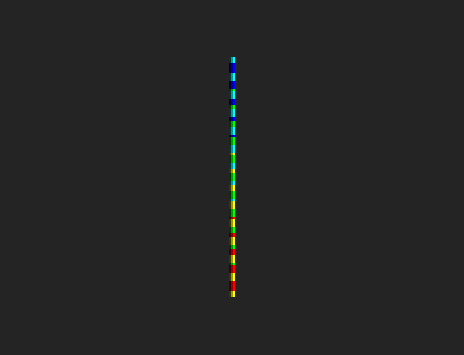
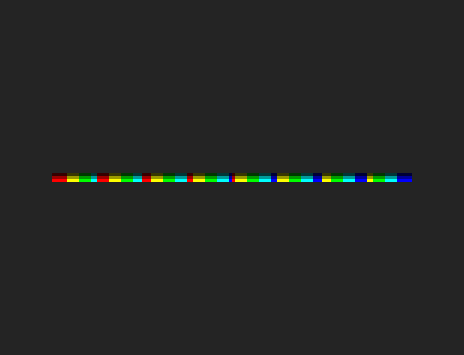
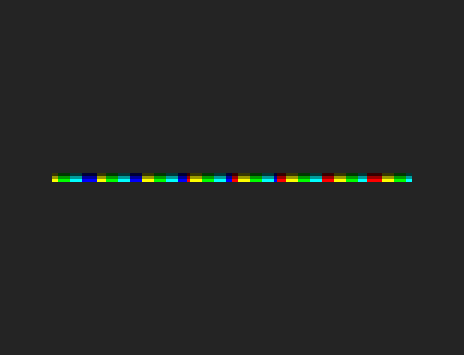
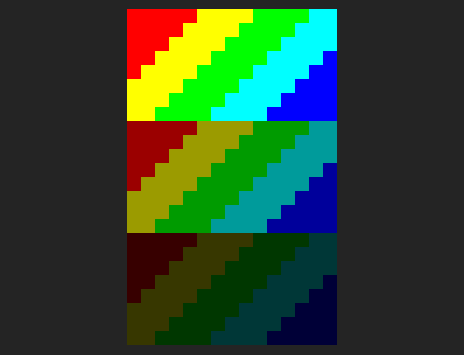
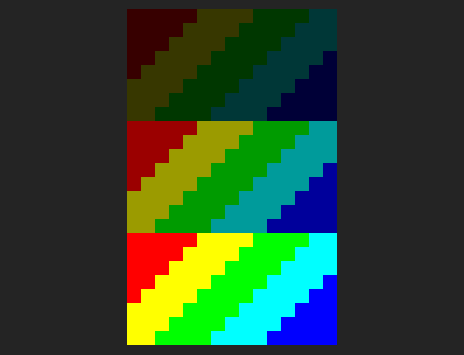
▪You can set up the Slice Type. Choose from X-Slices, Y-Slices, or Z-Slices
▪You can set up the Slice Order. Choose from Left To Right, Right To Left, Top To Bottom, or Bottom To Top
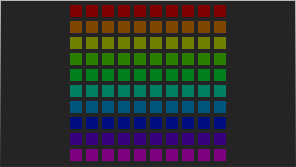
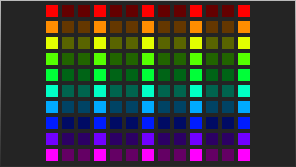
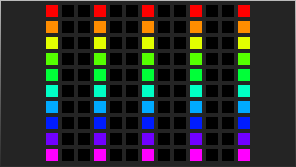
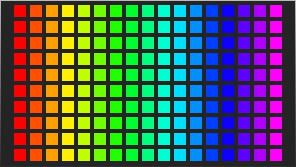
▪X-Slices - MADRIX 5 shows slices along the X-axis.
▪Y-Slices - MADRIX 5 shows slices along the Y-axis.
▪Z-Slices - MADRIX 5 shows slices along the Z-axis.
▪In this way, you can define, for example, how the different Z-layers are shown in the preview. This can be especially useful, when using Z-layers for different content and not necessarily 3D effects.
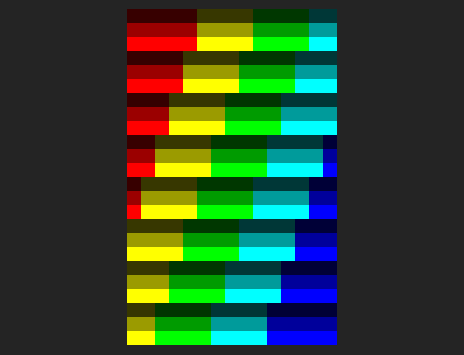
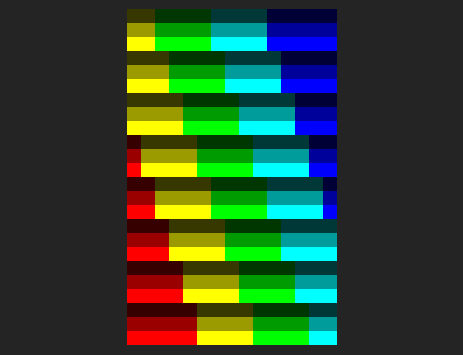
▪Z-Slices / Left To Right is the default setting.
▪Example:
|
Left To Right |
Right To Left |
Top To Bottom |
Bottom To Top |
X-Slices |
|
|
|
|
Y-Slices |
|
|
|
|
Z-Slices |
[Default] |
|
|
|
▪Note:
- You may change the Preview Settings when in Operator more or switch to Operator mode when the Preview Settings are still open.
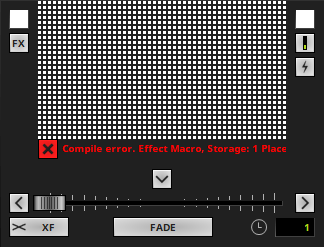
Messages
▪Clear Message - Only the Preview Output offers this option. MADRIX 5 may show information or error messages in the Preview Output.
- X - Discards any messages that MADRIX 5 shows. The messages will not be displayed anymore.
- Such a message could look like this:
Intensity
When controlling LED lighting, the intensity of the light output makes up a large factor of the light design. The Previews will represent your intensity settings.
There are many ways how to control the intensity in MADRIX 5. The main examples are:
▪Master, including Blackout
Learn more »Main Output / Master / Audio Levels
▪Storage Place Submaster
Learn more »Storages
▪Layer Submaster
Learn more »Effect Areas [Deck A / Deck B]
▪Layer Opacity
Learn more »Layers
▪Colors
Learn more »[Global] Colors And Intensity
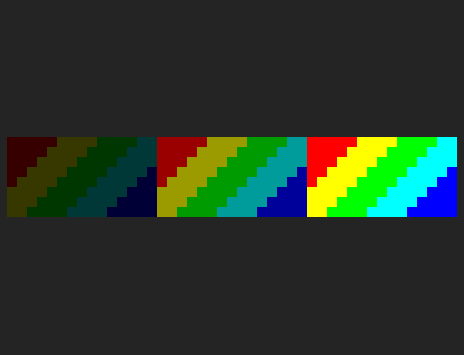
Master Set To 255 |
Master Set To 127 |
Master Set To 0 / Blackout |
|
|
|

Rendering
One of the main features of MADRIX 5 is that it renders visuals and effects live in real time. Regarding the overall performance, you can define a specific setting in the Options that will also influence the Previews. Depending on your settings, MADRIX 5 will include all voxels in the rendering process or only the ones that are patched.
Learn more »Performance
Included Voxels: All |
Included Voxels: Patched Only |
|
|
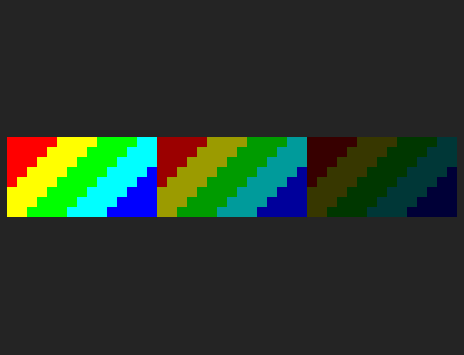
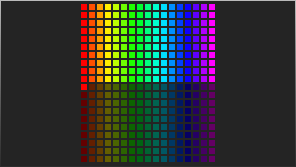
Patch Mask
When letting MADRIX 5 render all voxels, you can further decide how the Previews work. Voxels that are used [a fixture is set up at this position] are displayed brighter than voxels without LED fixtures. Compared to this, MADRIX 5 offers two choices in order to show or hide voxels that are not used. This will influence all 3 Previews. Positions without fixtures will be dark gray or they will not be shown and set to black.
Note: The Patch Mask will only fully apply, when your performance settings include all voxels, as explained above. If your performance options are set to only include patched voxels, the voxels will always be shown opaque. Changing the Patch Mask setting will not influence the Previews anymore.
Note: In demo mode, Patch Mask > Transparent is always automatically enabled and this setting cannot be changed in order to make sure that you see your effects and fixtures when not having a MADRIX KEY connected.
▪Right Mouse Click on the Preview Output > Patch Mask > Transparent/Opaque
▪Or go to the menu Previews > Preview Output > Patch Mask > Transparent/Opaque
Patch Mask: Transparent |
Patch Mask: Opaque |
|
|


The Previews will indicate if you are using a higher output [as set by the virtual LED matrix in the Matrix Generator or Patch Editor] than your MADRIX 5 License provides. Unlicensed areas will be shown darker.
Select Help > MADRIX KEY > License... to check your MADRIX 5 License and product serial numbers.
Output Fully Covered By License |
Output Not Fully Covered By License |
|
|
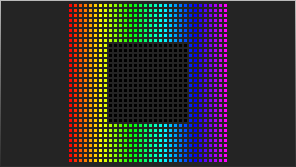
Individual Patch
When setting up an individual Patch in the Patch Editor, there might be areas where no fixtures are located according to your LED installation. These areas without any fixtures will automatically be displayed darker to indicate that this area is not in use.
Preview Example |
Corresponding Patch Example |
|
|
You can change further settings of the Previews.
Learn more »User Interface
Learn more »Performance
DVI Output And External Previews
The 3 Preview windows explained above are technical representations of the effects MADRIX 5 creates for you. But they are not pixel-perfect outputs.
DVI is another way to work with LED products which requires such a correctly sized output. To use DVI, MADRIX 5 offers other options.
The following MADRIX 5 KEYs support DVI output:
▪MADRIX 5 KEY start
▪MADRIX 5 KEY entry
▪MADRIX 5 KEY basic
▪MADRIX 5 KEY professional
▪MADRIX 5 KEY ultimate
▪MADRIX 5 KEY maximum
DVI output allows you to easily control large LED pixel walls or use screen-capturing, for example.
Learn more »DVI
Invalid OpenGL Version
MADRIX 5 might show the following error message:
▪Preview Disabled
Invalid OpenGL Version : 1.1
Minimum Required Version : 2.1
If the Previews show this error message, it means that there is a problem with the graphics card of the computer:
▪The graphics card might be too old and might not support OpenGL 2.1.
▪The driver of the graphics card for the Windows operating system might be outdated.
To solve the issue:
▪Check if your computer's graphics card supports OpenGL 2.1. If it is not supported, your computer/the graphics card does not meet the minimum requirements of MADRIX 5. Please upgrade to a newer graphics card, which supports OpenGL 2.1.
▪Download and install the latest driver version for your graphics card in order to update the driver. [You might need to restart the computer afterwards.]
| MADRIX 5.7. |
| [Ctrl & +/-] = Zoom In/Out | [Ctrl & 0] = 100% |
|
Previous Next
|
|
Enable Automatic Translation | Activer La Traduction Automatique | 启用自动翻译 |