This topic includes:
MADRIX 5 features 2 separate Storage Areas [on Deck A and Deck B]. They are positioned directly below Preview Deck A and Preview Deck B.
As will be explained in the next chapter, you can use so-called Storage Places to organize your lighting effects. In addition, all Storage Places and further options are managed with the help of Storages.
▪MADRIX 5 features a total of 256 Storages.
▪1 Storage includes 256 Storage Places.
|
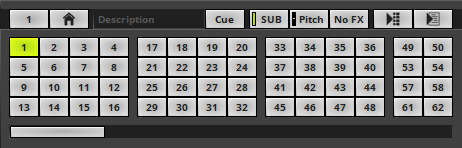
Storage Selection - Select which Storage you would like to use via Left Mouse Click. Learn more Selecting A Storage Storage Options - Calls up various options for Storages via Right Mouse Click. Learn more Storage Options |
|
Home - Instantly jumps back to your currently selected Storage Place and brings it into focus [Keyboard shortcut: Ctrl+F]. |
|
Storage-Place Description - Allows you to enter a description for each individual Storage Place. Enter any text. The label will also be used for other MADRIX 5 features, such as the Touch Screen, Cue Lists, or Timelines. |
|
Cue - Automatically adds the currently selected Storage Place to the current Cue List. The newly created Cue List entry will include all applied parameters, like the description or the fade duration and fade type of the crossfader. Learn more »Cue List Editor |
|
Submaster - Calls up the Submaster of the Storage Place to adjust the intensity of the complete effect including all of its Layers. It applies only to the currently selected Storage Place and can be set up for every Storage Place individually. Learn more Submaster |
|
Speed Pitch - Calls up the Pitch slider of the Storage Place to adjust the speed of the complete effect including all of its Layers. It applies only to the currently selected Storage Place and can be set up for every Storage Place individually. The tooltip shows the currently set value. A value of 0.0 is shown in red in order to make its severe affect on the visual outcome clear. The button itself pulsates in red as well. |
|
Filters/Effects FX - Special filters can be applied to a Storage Place including all of its Layers in order to quickly change your visuals. Learn more »Filters [FX] |
|
Storage Place Parameter Chaser - Controls the Storage Place Parameter Chaser for advanced customization of effects. It applies only to the currently selected Storage Place and can be set up for every Storage Place individually. Learn more »Chaser |
|
Storage Place Macro Editor - Controls the Storage Place Macro Editor to add macros to the effect. It applies only to the currently selected Storage Place and can be set up for every Storage Place individually. Learn more »Macros And Scripts |
|
Storage Place - Represents a single Storage Place. Learn more »Storage Places [256 x 256] |


▪You can freely choose which Storage to use on the left side or the right side of MADRIX 5.
▪Click on the Storage Selection Button and a submenu will open. Simply select which Storage you would like to use [Numbers 1 to 256].
▪The currently selected Storage is shown in green.
▪Occupied Storages [which include customized Storage Places] are shown in blue.
▪When switching to another Storage, MADRIX 5 will not automatically select a specific Storage Place for you. The currently selected Storage Place remains selected until you selected the next one.
|
▪Submaster - Defines intensity of a selected Storage Place including all of its Layers. It only works for the Storage Place you have currently selected. ▪Left Mouse Click And Hold - Select the required value by moving the fader with the help of your mouse. Release the mouse button to set up the specific value [The fader will disappear automatically]. ▪A value of 255 means full intensity. ▪A value of 0 means no intensity and will render the effect completely black. A value of 0 is shown in red in order to make its severe affect on the visual outcome clear. The button itself pulsates in red as well. ▪The tooltip shows the currently set value.
[The Storage Submaster does not control the main output brightness. If you want to adjust the overall intensity, you need to use the »Submaster Deck A/Deck B or the »Master] |


Overview
▪Right Mouse Click - Opens the context menu.

▪Open... - Loads a complete MADRIX 5 Storage from a previously saved, external file [of the file type *.mstz or *.mstx].
A new window opens for you to select the file on your harddisk.
▪Save... - Saves the current Storage including all of its Storage Places in an external file [of the file type *.mstz or *.mstx]. Simply enter a File name when the new window opens, choose a location, and click Save
▪Copy - Copies the current Storage into the clipboard as a duplicate.
▪Cut - Copies the current Storage into the clipboard and applies a Clear.
▪Paste - Inserts a copy of a Storage from the clipboard into the currently selected Storage.
▪1x1 - Selects a different layout with very large Storage Place buttons. See below.
▪2x2 - Selects a different layout with large Storage Place buttons. See below.
▪4x4 - Selects a different layout with normal-sized Storage Place buttons. This is the default view. See below.
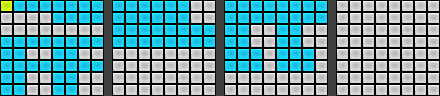
▪8x8 - Selects a different layout with small Storage Place buttons. Is the only layout that does not require horizontal scrolling, since all 256 Storage Places can be shown. However, no numbering or thumbnails can be shown. See below.
▪Custom - Selects a layout that you can customize in the Options. 8x5 is the default value. Using a custom layout is especially useful when using MIDI controllers and adjusting the software's layout to the button layout of the controller. See below.
▪Clear - Removes the current Storage including all of its Storage Places and restores the default, blank Storage.
Layout
Overview
The Storage Options allow you to select one of 5 different layouts.
1x1 |
|
2x2 |
|
4x4 [Default] |
|
8x8 |
|
Custom [Customizable] |
|


Options
You can change the custom layout of Storage Places in the options.
See »User Interface
| MADRIX 5.7. |
| [Ctrl & +/-] = Zoom In/Out | [Ctrl & 0] = 100% |
|
Previous Next
|
|
Enable Automatic Translation | Activer La Traduction Automatique | 启用自动翻译 |