This topic includes:
▪Using Fixture Groups As Map Settings Preset
▪Calling Group Presets Using A Cue List
Fixture groups allow you to organize fixtures that are included in your Patch in clusters and then to control them together as a group.
Note: Fixture groups are part of the Patch. Changing the Patch will likely result in changes to the Fixture Groups as well.
To work with fixture groups, follow these steps:
1] Manage your fixture groups.
2] Control your fixture groups.
Overview
Fixture Groups are managed in the Patch Editor.
▪Go to the menu Preferences > Patch Editor
[Keyboard shortcut: F3]
Menu
Within the Patch Editor, a dedicated menu is available.
▪Go to Fixture Groups
Toolbar
All items from the menu shown above are also available for quick access in the toolbar of the Patch Editor.

Creating Fixture Groups
A] Creating An Empty Fixture Group
|
1] Go to Fixture Groups > Create Empty Fixture Group |
|
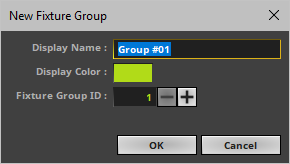
2] A new window opens. ▪Enter a Display Name ▪Set the Display Color ▪Set the Fixture Group ID |
|
▪The new fixture group will be created. The fixture group will not yet include any fixtures. |

B] Creating A Fixture Group From Currently Selected Fixtures
|
1] First, select all the fixtures you wish to include in the fixture group. |
|
2] Go to Fixture Groups > Create Fixture Group From Selected Fixtures |
|
3] A new window opens. ▪Enter a Display Name ▪Set the Display Color ▪Set the Fixture Group ID |
|
▪The new fixture group will be created. All previously selected fixtures will already be assigned to the fixture group. |

Working With The Fixture Group List
The Patch Editor will show your fixture groups in the bottom left. Use the following options to work with the list of fixture groups:
|
Expand List - Shows the fixture groups including the fixtures that are assigned to the fixture groups. |
|
Collapse List - Shows only the fixture groups. |
|
Expand Item - Shows the fixture group and extends the list to show the fixtures assigned to this particular fixture group. |
|
Collapse Item - Shows the fixture group but hides the fixture assigned to this particular fixture group. |
|
Fixture Group Selection - Shows the currently selected fixture group. |
|
Fixture Selection - Shows the currently selected fixtures of a fixture group. |
|
Left Mouse Double Click - Allows you to rename a single fixture group [and thereby editing General Fixture Group Settings > Display Name] or single fixture [and thereby editing General Fixture Settings > Display Name]. Right Mouse Click - Allows you to rename several fixture groups [and thereby editing General Fixture Group Settings > Display Name] or several fixtures [and thereby editing General Fixture Settings > Display Name] at once. First, select multiple list entries via Right Mouse Click or via Strg + Left Mouse Click. |


Assigning Fixtures To A Fixture Group
Follow these steps if you wish to assign fixtures to an empty fixture group or if you wish to add more fixture to a fixture group that already includes fixtures:
|
1] Select all fixtures you wish to assign to an existing fixture group. |
|
2] Select the fixture group or multiple fixture groups in the fixture group list in the bottom left of the Patch Editor. Both, fixtures and fixture groups, will now be selected in the Patch Editor. |
|
3] Go to Fixture Groups > Assign Selected Fixtures To Selected Fixture Groups |
▪The Patch Editor will assign all selected fixtures to the selected fixture groups. |

Releasing A Fixture From A Fixture Group
Follow these steps if you want to revoke the assignment of a fixture from a single fixture group or multiple fixture groups:
|
1] Select all fixtures you wish to release.
|
|
2] Select the fixture group or multiple fixture groups in the fixture group list in the bottom left of the Patch Editor. Both, fixtures and fixture groups, will now be selected in the Patch Editor.
|
|
3] Go to Fixture Groups > Release Selected Fixtures From Selected Fixture Groups |
▪The Patch Editor will release all selected fixtures from all selected fixture groups. |

Releasing A Fixture From A Fixture Group
Follow these steps if you want to revoke the assignment of a fixture from a single fixture group or multiple fixture groups:
|
1] Select all fixtures you wish to release. |
|
2] Go to Fixture Groups > Release Selected Fixtures From All Fixture Groups |
|
▪The Patch Editor will release all selected fixtures from all the fixture groups they are currently assigned to. |

Removing Fixture Groups
Follow these steps if you want to remove fixture groups from the Patch:
|
1] Select all fixture groups you wish to remove. |
|
2] Go to Fixture Groups > Remove Selected Fixture Groups |
|
▪The Patch Editor will remove all selected fixture groups from the Patch. |

Fixture Group Settings
Overview
▪Select a fixture group [to the left of the Patch Editor] in order to change its settings [to the right of the Patch Editor].
▪You can also select multiple fixture groups in order to change their settings.
General Fixture Group Settings
▪Display Name - Allows you to change the name for the fixture group. [Or use the default name provided by MADRIX 5.]
▪Display Color - Allows you to change the individual color for the fixture group.
- This color is useful to distinguish between fixture groups when controlling them in the Group Control.
- Learn more Controlling Fixture Groups
▪Fixture Group ID - Defines the unique identifier for the selected fixture group.
Fixture Group Control Settings
▪Default Value - Defines the standard value of a fixture group fader. This is important when launching the Group Control for the first time and when restoring the default values in the Group Control.
- Valid values range from 0 to 255 [0% to 100% intensity]. By default, the default is set to 255.
▪Minimum Value - Defines the lowest value a fixture group can be set to.
- Setting a fixture group fader to 0 will set the intensity to this Minimum Value.
- Valid values range from 0 to 255 [0% to 100% intensity]. By default, the default is set to 0.
▪Maximum Value - Defines the highest value a fixture group can be set to.
- Setting a fixture group fader to 255 will set the intensity to this Maximum Value.
- Valid values range from 0 to 255 [0% to 100% intensity]. By default, the default is set to 255.
▪Learn more Controlling Fixture Groups
▪Apply - Always confirm any changes with Apply.
▪Reset - Allows you to discard changes before having confirmed any changes in order to use the values that were set up last.
Creating Fixture Groups
▪First, make sure to create fixture groups in the Patch Editor.
- Otherwise, the Group Control will be empty and no fixture group can be controlled.
- Learn more Managing Fixture Groups
Overview
Fixture groups are controlled in the Group Control.
You can open the Group Control in 3 ways:
▪Go to the menu Tools > Groups...
▪Press F9
▪Or click Layers > Groups on the user interface.
To close the Group Control and change back to the Programmer view:
▪Go to Tools > Groups...
▪Press F9
▪Or click Groups > Layers on the user interface.
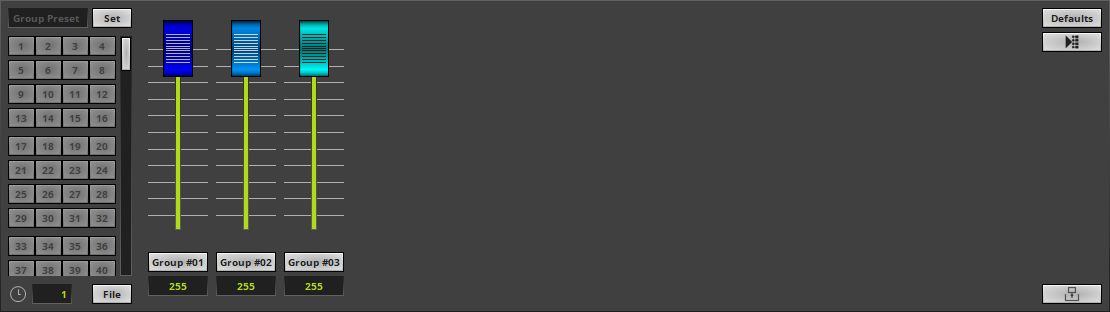
▪The Group Control will include a fader for each fixture group you have created.
▪Each individual fader will be shown with the color you have set up as the fixture group's Display Color
▪Each individual fader will be shown with the label you have set up as the fixture group's Display Name
|
Undock - Creates a separate window to freely use the window detached from the main user interface. The separated window can be enlarged in size and shown on multiple monitors. |
|
Dock - Brings the separate, detached window back again into the main user interface. |


Controlling A Fixture Group
Control
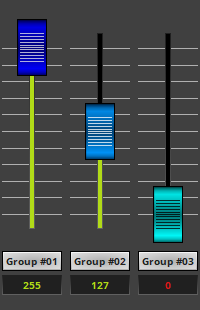
▪Use the fader of a fixture group to control its intensity.
Fixture Group Faders
▪Each fader regulates the intensity of a single fixture group.
- You can set the fader to a specific position.
- You can enter a value in the input field.
- You can flash the fader.
Important Information
▪You will immediately see the changes in the Preview Output.
▪When controlling fixture groups, your settings will be immediately applied and visible on the output/the LEDs!
Mouse Control And Keyboard Shortcuts
▪Single Selection
- A single fader regulates the intensity of a single fixture group.
- Left Arrow / Right Arrow - Quickly switch between faders by using the left or right arrow key.
▪Multiselection
- Use Ctrl + Left Mouse Click to select multiple faders at the same time. A green outline will show that a fader is selected. When multiple faders are selected, you can control them at the same time.
- Use Shift + Left Mouse Click to select multiple faders at the same time. A green outline will show that a fader is selected. When multiple faders are selected, you can control them at the same time.
- Ctrl+A - Selects all faders of the Group Control.
- Ctrl+D - Deselects the current fader selection.
▪ Flash
- Use the button showing the fixture group's Display Name or the keyboard shortcut Spacebar
- It instantly sets the intensity to 255 as long as you hold the button/key down.
- To use this feature, the fader needs to be set to a lower value than 255 first.
▪Restoring The Default Value
- Left Mouse Double-Click - Perform a double-click with your left mouse button directly on a single or multiple faders to restore the Default Value
- Right Mouse Click - Perform a click with your right mouse button directly on a single or multiple faders to restore the Default Value
Minimum Values And Maximum Values
▪A fixture group fader in the Group Control always ranges from 0 to 255, independently of what Minimum Value or Maximum Value you have defined for the fixture group.
▪Setting a fixture group fader to 0 will set the lowest intensity for this fixture group as defined by Minimum Value.
- That means that a fader set to 0 will not necessarily set the intensity of the fixture group to 0. Instead, it will be set to the minimum value you defined.
▪Setting a fixture group fader to 255 will set the highest intensity for this fixture group as defined by Maximum Value.
- That means that a fader set to 255 will not necessarily set the intensity of the fixture group to 255. Instead, it will be set to the maximum value you defined.
Restoring The Default Fixture Group Values
Quickly reset any changes and set all fixture group faders to their default values in the Group Control:
|
▪Restores the default fixture group values for all fixture groups as defined by their Default Value |

Updating The Default Fixture Group Values
Quickly update all default fixture group values using the Group Control:
|
▪Overwrites the Default Value as defined in the Patch Editor with the current fader position of the Group Control for each fixture group individually. |

Saving a Fixture Group Preset
|
1] Set each fixture group fader to its required position. - A value of 0 is shown in red in order to make its severe affect on the visual outcome clear. |
|
2] Enter a description for the Group Preset. |
|
3] Click Set |
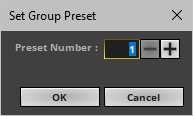
|
4] A new window opens. ▪Define the Preset Number |
|
5] MADRIX 5 will save the currently set fader positions as a Group Preset. |


Calling A Saved Group Preset
|
▪Left Click - Calls a previously saved Group Preset. MADRIX 5 will automatically fade according to the Fade-In Time. ▪Left Mouse Double-Click - Calls a previously saved Group Preset and activate it immediately without using the Fade-In Time. |
Fading Between Group Presets
|
Fade-In Time - Defines the duration of the automatic fade between fader positions [in s], when selecting a different Group Preset. |

Group Preset Context Menu
|
▪Right Mouse Click on a Group Preset number to quickly perform various actions. |
Group Control File Menu
|
▪Click on File to open a submenu. |

Chasing Group Values
|
Group Value Chaser - Allows you to chase group values. |
Drag And Drop [Copy/Cut/Paste]
Copy And Paste
▪Left Mouse Click And 2 Sec. Hold - You can perform a Copy and Paste with the mouse.
Use a left mouse click on a Group Preset and continue to hold for 2 seconds. A small + appears. Continue to hold and move your mouse to another Group Preset number. Release the mouse button to paste a copy onto the new Group Preset.
Use the keyboard button Ctrl in addition to remove the wait time to immediately perform the drag and drop.
Cut And Paste
▪Left Mouse Click And 2 Sec. Hold + Shift - You can perform a Cut and Paste with the mouse.
Use a left mouse click on a Group Preset and continue to hold for 2 seconds. Press Shift in addition. A small rectangle appears. Continue to hold the buttons and keys and move your mouse to anotherGroup Preset number. Release the mouse button to move the previously selected Group Preset to the new position.
Use the keyboard button Shift in addition to remove the wait time to immediately perform the drag and drop.
Drag And Drop
▪File Drag And Drop - You can select a MADRIX 5 Group Preset file [of the file type *.mgpz or *.mgpx] in Windows and drag it to a Group Preset of your choice in MADRIX 5 in order to load it in MADRIX 5.
Using Fixture Groups As Map Settings Preset
In addition to controlling fixture groups directly in the Group Control, you can use fixture groups in other ways. Since fixture groups include specific fixtures, these fixtures cover a well-defined area of the Patch. As such, you can use a fixture group as preset for the Map Settings of a Layer.
▪Click Map

▪A new window will open.
▪Go to Mapping > Preset or Tiling > Preset
▪The list will include an item for each fixture group you have created by using the fixture group's Display Name
[You will find these items below Full Size]
▪Select the fixture group from the list.
▪MADRIX 5 will automatically set the correct Map Settings.
- The Mapping or Tiling will be repositioned and resized according to the fixture group.
- The adjusted Map Settings will always be a rectangular selection since MADRIX 5 uses the bounding box of the fixture group with only its largest dimensions in X, Y, and Z.
▪Learn more »Mapping / Tiling / Rotation
Calling Group Presets Using A Cue List
Controlling fixture groups in the Group Control is mainly a live feature that works independently of other controls, such as Storage Places for example. But you can further integrate Group Presets into your workflow. You can use a Cue List to trigger Group Presets for each Cue.
▪Open the Cue List Editor and make sure to set up the Group Preset for a Cue where required.
- Valid values range from 1 to 256.

▪Learn more »Cue List Editor