Advanced
Advanced
|
<< Click To Display Table Of Contents >> You Are Here: Device Configuration > Web Panel >
|
This topic includes:
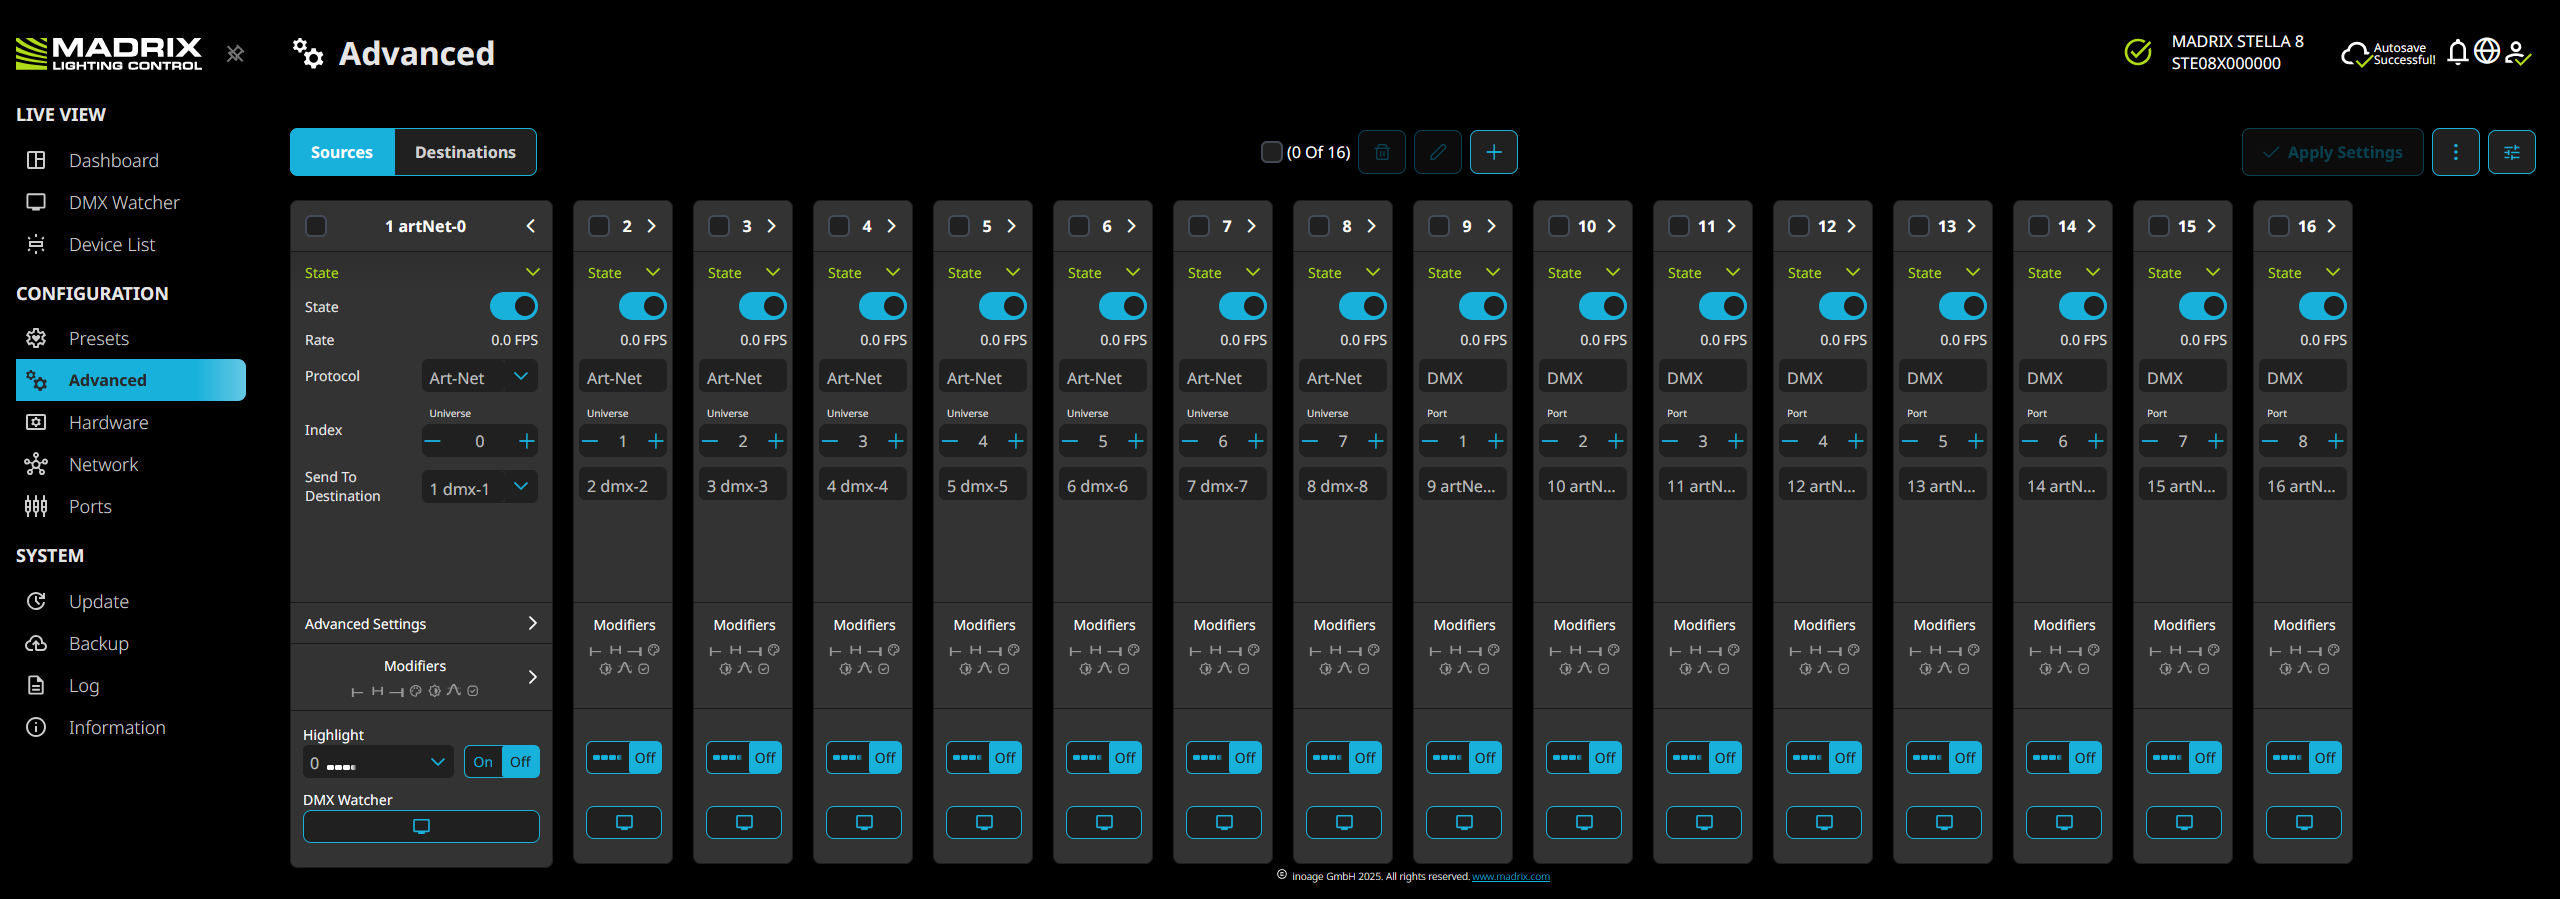
The Advanced Configuration is –the– configuration section of MADRIX STELLA 8.
While it can be complex, simple configurations as well as the most advanced and customized configurations are possible here.
▪You can start by loading and customizing one of the Presets under menu »Presets
▪Or you can create a new configuration from the beginning.o click Apply Settings after making any changes. Otherwise, your changes will be discarded.Otherwise, your changes will be discarded.
Make sure to click Apply Settings after making any changes. Otherwise, your changes will be discarded.
Sources Destinations |
Allows you to choose the view between Sources and Destinations. |
|
Allows you to select all Sources or Destinations. Shows the number of currently selected Sources or Destinations, as well as the total number of added Sources or Destinations. |
|
Delete - Removes all currently selected Sources or Destinations. Select one or more Sources or Destinations first. |
|
Edit - Allows you to edit all currently selected Sources or Destinations [one item, or more items with multi-selection]. Select one or more Sources or Destinations first. A new window opens allowing you to edit the settings described below. |
|
Add - Allows you to add new Sources or Destinations. A new window opens. [See below.]
|
|
Apply Settings - Becomes available once you have changed any of the settings and is visually highlighted to show that there are unsaved changes. Make sure to click Apply Settings after making any changes. Otherwise, your changes will be discarded. |
|
View - Quickly changes the tiles to show more or less information, and thus their size. ▪Expand All Sources ▪Expand All Destinations ▪Expand All Advanced Settings ▪Expand All Modifiers ▪Collapse All Sources ▪Collapse All Destinations ▪Collapse All Advanced Settings ▪Collapse All Modifiers |
|
Filter - Allows you to change the view. ▪Sort By - Arranges Sources based on Destinations Ascending Order, Destinations Descending Order, Protocol, or State. Or Protocol and State for Destinations. ▪State - Only shows Sources or Destinations with State On or State Off. ▪Protocol - Only shows Sources or Destinations with Art-Net, DMX, sACN, or Pattern. ▪Type - Only shows the specific Source or Destination. ▪Reset All Filters - Restores the original view and does not apply any filters or sorting. |
▪Sources define where the data is being received from.
▪Up to 32 Sources can be configured.
Make sure to click Apply Settings after making any changes. Otherwise, your changes will be discarded.
General Settings
|
Selection - Allows you to select the specific Source. Name - Allows you to change the name of the Source via left mouse double-click [with a maximum of 31 characters plus null]. Or leave the default name. Collapsed/Extended View - Quickly changes the tile to show more or less information, and thus its size. |
State |
Allows you to enable or disable the specific Source. |
Rate |
Shows the rate at which data is being received in FPS [Frames Per Second]. |
Protocol |
Defines the type of data source, including Art-Net, DMX, sACN, Pattern [including Snapshots]. |
Index |
Defines the index of the data source: ▪Universe for Art-Net, ranging from 1 to 32,767. ▪Port for DMX, ranging from 1 to 8 referring to the physical ports of the controller. ▪Universe for sACN, ranging from 1 to 63,999. ▪Index number for Pattern, ranging from 0 to 58. |
Send To Destination |
Defines to which configured Destination the received data is being sent to. |
Advanced Settings
Repeat Last Frame |
If the data source is sending at a slow frame rate: ▪The controller will repeat the last frame until a new frame is received [in order to achieve the desired output frame rate of the Destination]. If the connection to the data source has been lost: ▪The controller will repeat the last frame that has been received. For Patterns, including Snapshots: ▪Cannot be disabled since the controller automatically creates a loop and always repeats the scene. |
Limit To IP Address |
Allows you to enter a specific IP address of your sender, when you wish to receive only from this single source.  Select IP Address - Opens the IP-address selection to quickly change the IP address. A new window opens: Select IP Address - Opens the IP-address selection to quickly change the IP address. A new window opens:
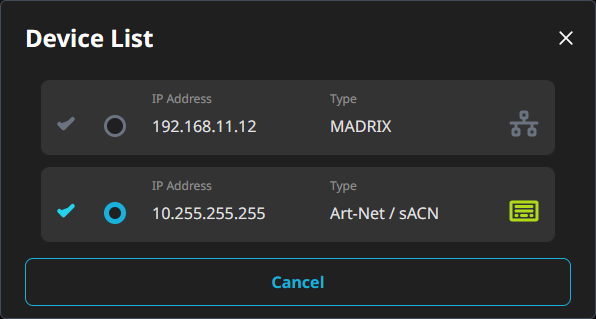
Select a device/IP address from the list by clicking on it: Blue/Green - Shows the currently set IP address.
|
Limit To Mode |
For Art-Net, choose between: ▪Unicast - Receives only Unicast Art-Net data from one sender, e.g. your MADRIX computer. ▪Broadcast - Receives Art-Net data from all IP addresses in the network. ▪Unicast & Broadcast - Receives from both. For sACN, choose between: ▪Unicast - Receives only Unicast sACN data from one sender, e.g. your MADRIX computer. ▪Multicast - Receives sACN data from multiple IP addresses in the network. ▪Unicast & Multicast - Receives from both. |
Modifiers
Channels From |
Allows you to shift the received data [512 DMX channels] if required, and works in combination with Within Range and Offset To. Valid values range from 1 to 512. |
Within Range |
Allows you to shift the received data [512 DMX channels] if required, and works in combination with Channels From and Offset To. Valid values range from 0 to 512. 0 means Automatic. 512 means Full Frames. Optimized Frames / Full Frames: ▪Set Channels From 1, Within Range 0, Offset To 1 in order to receive Optimized Frames. ▪Set Channels From 1, Within Range 512, Offset To 1 in order to receive Full Frames. |
Offset To |
Allows you to shift the received data [512 DMX channels] if required, and works in combination with Channels From and Within Range. Valid values range from 1 to 512. |
Color Order |
Changes the order of channels. ▪Original [meaning RGB would be 1-2-3, or RGBW would be 1-2-3-4] ▪1-3-2 [meaning the third channel is changed to position 2] ▪2-1-3 [meaning the first channel is changed to position 2] ▪2-3-1 [meaning the first channel is changed to position 3] ▪3-1-2 [meaning the third channel is changed to position 1] ▪3-2-1 [meaning the channel order is inverse for all three channels] ▪1-3-2-4 [meaning the third channel is changed to position 2] ▪2-1-3-4 [meaning the first channel is changed to position 2] ▪2-3-1-4 [meaning the first channel is changed to position 3] ▪3-1-2-4 [meaning the third channel is changed to position 1] ▪3-2-1-4 [meaning the first channel and third channel are being swapped] ▪4-1-2-3 [meaning the fourth channel is changed to position 1] ▪4-1-3-2 [meaning the fourth channel is changed to position 1 and the second channel is changed to position 4] ▪4-2-1-3 [meaning the fourth channel is changed to position 1 and the first channel is changed to position 3] ▪4-2-3-1 [meaning the fourth channel is changed to position 1 and the first channel is changed to position 4] ▪4-3-1-2 [meaning the fourth channel is changed to position 1 and the third channel is changed to position 2] ▪4-3-2-1 [meaning the channel order is inverse for all four channels] |
Brightness |
Sets the brightness level of the output [towards the LED fixtures by functioning as a dimmer]. ▪Valid values range from 10 % to 100 %. ▪The default value is 100 %. ▪Can be used alone or at the same time as Intensity Limit. First, the controller applies the Brightness. Second, the Intensity Limit is applied. |
Intensity Limit |
Sets the maximum brightness level that can be sent. ▪Valid values ranges from 1 to 255. ▪The default value is 255. ▪Can be used alone or at the same time as Brightness. First, the controller applies the Brightness. Second, the Intensity Limit is applied. |
Priority |
Allows you to set a custom priority for this Source. ▪Valid values range from 0 to 200. ▪The default value is 0 [Disabled]. This means the default priorities will be assigned automatically: ▪The default value for Protocol Art-Net is 100. ▪The default value for Protocol DMX is 100. ▪The default value for Protocol sACN is 100. ▪The default value for Protocol Pattern is 100. ▪The default value for feature Highlight is 250. ▪The default value for feature Repeat Last Frame is 1. |
Highlight
Highlight |
On / Off - Allows you to enable or disable channel highlighting on the specific Source. Use this workflow: 1] Choose one of the built-in Patterns You can choose from the following Patterns: ▪0 ▪01 – 32 ▪33 ▪34 ▪35 ▪36 ▪37 ▪38 ▪39 ▪40 ▪41 ▪42 ▪43 ▪44 ▪45 ▪46 ▪47 ▪48 ▪49 ▪50 ▪51 ▪52 ▪53 ▪54 ▪55 ▪56 ▪57 ▪58 |
DMX Watcher
DMX Watcher
|
Opens the DMX Watcher menu item in order to monitor incoming data live. |
Adding New Sources
▪1] Click +
▪2] A new window opens.
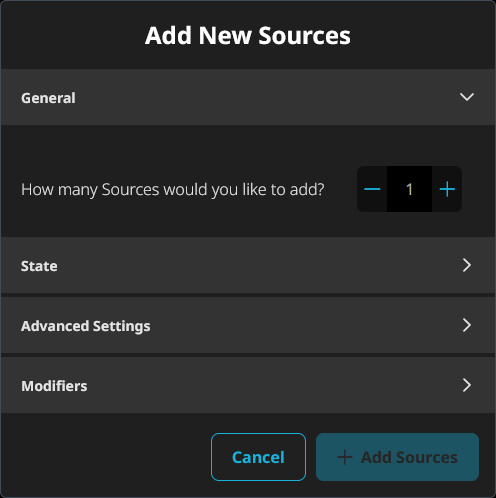
▪3] How many Sources would you like to add? - Defines the number of new Sources that will be added.
▪4] Set up State, Advanced Settings, and Modifiers as explained above. You can also change all settings afterwards. State > Send To Destination is required here.
▪5] Click + Add Sources in order to confirm.
▪Destinations define where the data is being sent to.
▪Up to 32 Destinations can be configured.
Make sure to click Apply Settings after making any changes. Otherwise, your changes will be discarded.
General Settings
|
Selection - Allows you to select the specific Destination. Name - Allows you to change the name of the Destination via left mouse double-click [with a maximum of 31 characters plus null]. Or leave the default name. Collapsed/Extended View - Quickly changes the tile to show more or less information, and thus its size. |
State |
Allows you to enable or disable the specific Destination. |
Rate |
Shows the rate at which data is being processed or sent in FPS [Frames Per Second]. ▪You can see the final output rate, especially that of DMX, by using the »DMX Watcher or »Ports |
Protocol |
Defines the type of data output, including Art-Net, DMX, sACN. |
Index |
Defines the index of the data output: ▪Universe for Art-Net, ranging from 1 to 32,767. ▪Port for DMX, ranging from 1 to 8 referring to the physical ports of the controller. ▪Universe for sACN, ranging from 1 to 63,999. |
Advanced Settings
Art-Net
LTP |
Applies the Latest Takes Precedence principle. If ArtSync is received continuously from one data source, the first data source will be locked in and it will win against other data sources. If LTP is disabled, i.e. in all other cases, Destinations are applying HTP merging! |
IP Address |
Allows you to enter a specific IP address of your receiver, when you wish to send data in Unicast mode [see below].
Select IP Address - Opens the IP-address selection to quickly change the IP address. A new window opens:
Select a device/IP address from the list by clicking on it: Blue/Green - Shows the currently set IP address. |
Mode |
Choose between ▪Unicast - Sends Art-Net data only to one receiver. Enter the IP address of your receiver in the IP Address field above. ▪Broadcast - Sends Art-Net data to all IP addresses in the network. |
Send Over Ethernet |
Sends Art-Net data over the Ethernet ports of the controller. |
Send Over USB (Virt. Ethernet) |
Sends Art-Net data over the USB ports of the controller via the virtual Ethernet link. |
DMX
LTP |
Applies the Latest Takes Precedence principle. If ArtSync is received continuously from one data source, the first data source will be locked in and it will win against other data sources. If LTP is disabled, i.e. in all other cases, Destinations are applying HTP merging! |
sACN
LTP |
Applies the Latest Takes Precedence principle. If ArtSync is received continuously from one data source, the first data source will be locked in and it will win against other data sources. If LTP is disabled, i.e. in all other cases, Destinations are applying HTP merging! |
IP Address |
Allows you to enter a specific IP address of your receiver, when you wish to send data in Unicast mode [see below].
Select IP Address - Opens the IP-address selection to quickly change the IP address. A new window opens:
Select a device/IP address from the list by clicking on it: Blue/Green - Shows the currently set IP address. |
Mode |
Choose between ▪Unicast - Sends sACN data only to one receiver. Enter the IP address of your receiver in the above IP Address field. ▪Multicast - Sends sACN data to all sACN devices in the network. |
Send Over Ethernet |
Sends sACN data over the Ethernet ports of the controller. |
Send Over USB (Virt. Ethernet) |
Sends sACN data over the USB ports of the controller via the virtual Ethernet link. |
Modifiers
Channels From |
Allows you to shift the sent data [512 DMX channels] if required, and works in combination with Within Range and Offset To. Valid values range from 1 to 512. |
Within Range |
Allows you to shift the received data [512 DMX channels] if required, and works in combination with Channels From and Offset To. Valid values range from 0 to 512. 0 means Automatic. 512 means Full Frames. Optimized Frames / Full Frames: ▪Set Channels From 1, Within Range 0, Offset To 1 in order to receive Optimized Frames. ▪Set Channels From 1, Within Range 512, Offset To 1 in order to receive Full Frames. |
Offset To |
Allows you to shift the sent data [512 DMX channels] if required, and works in combination with Channels From and Within Range. Valid values range from 1 to 512. Note: For example, this allows you to spread the same universe over different output ports using different offsets. |
Color Order |
Changes the order of channels. ▪Original [meaning RGB would be 1-2-3, or RGBW would be 1-2-3-4] ▪1-3-2 [meaning the third channel is changed to position 2] ▪2-1-3 [meaning the first channel is changed to position 2] ▪2-3-1 [meaning the first channel is changed to position 3] ▪3-1-2 [meaning the third channel is changed to position 1] ▪3-2-1 [meaning the channel order is inverse for all three channels] ▪1-3-2-4 [meaning the third channel is changed to position 2] ▪2-1-3-4 [meaning the first channel is changed to position 2] ▪2-3-1-4 [meaning the first channel is changed to position 3] ▪3-1-2-4 [meaning the third channel is changed to position 1] ▪3-2-1-4 [meaning the first channel and third channel are being swapped] ▪4-1-2-3 [meaning the fourth channel is changed to position 1] ▪4-1-3-2 [meaning the fourth channel is changed to position 1 and the second channel is changed to position 4] ▪4-2-1-3 [meaning the fourth channel is changed to position 1 and the first channel is changed to position 3] ▪4-2-3-1 [meaning the fourth channel is changed to position 1 and the first channel is changed to position 4] ▪4-3-1-2 [meaning the fourth channel is changed to position 1 and the third channel is changed to position 2] ▪4-3-2-1 [meaning the channel order is inverse for all four channels] |
Brightness |
Sets the brightness level of the output [towards the LEDs by functioning as a dimmer]. ▪Valid values range from 10 % to 100 %. ▪The default value is 100 %. ▪Can be used alone or at the same time as Intensity Limit. First, the controller applies the Brightness. Second, the Intensity Limit is applied. |
Intensity Limit |
Sets the maximum brightness level that can be sent. ▪Valid values ranges from 1 to 255. ▪The default value is 255. ▪Can be used alone or at the same time as Brightness. First, the controller applies the Brightness. Second, the Intensity Limit is applied. |
Highlight
Highlight |
On / Off - Allows you to enable or disable channel highlighting on the specific Destination. Use this workflow: 1] Choose one of the built-in Patterns You can choose from the following Patterns: ▪0 ▪01 – 32 ▪33 ▪34 ▪35 ▪36 ▪37 ▪38 ▪39 ▪40 ▪41 ▪42 ▪43 ▪44 ▪45 ▪46 ▪47 ▪48 ▪49 ▪50 ▪51 ▪52 ▪53 ▪54 ▪55 ▪56 ▪57 ▪58 |
DMX Watcher
DMX Watcher
|
Opens the DMX Watcher menu item in order to monitor incoming data live. |
Adding New Destinations
▪1] Click +
▪2] A new window opens.
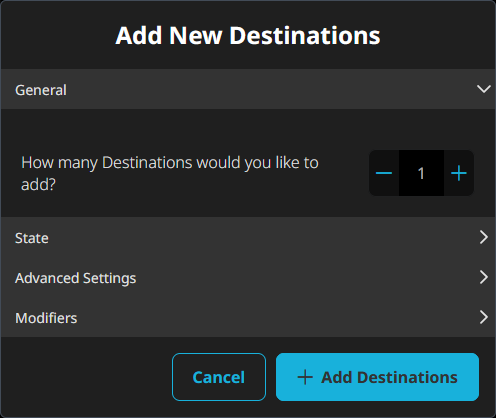
▪3] How many Destinations would you like to add? - Defines the number of new Destinations that will be added.
▪4] Set up State, Advanced Settings, and Modifiers as explained above. You can also change all settings afterwards.
▪5] Click + Add Destinations in order to confirm.
Use the built-in Presets to quickly get started!
DMX Controller — Output/DMX-OUT
▪Setting up eDMX Sources and sending them to DMX Destinations.
▪For each received universe, choose your Source: Protocol, i.e. Art-Net or sACN.
▪Set up the number of required DMX ports = number of Destinations with Protocol DMX and index 01 – 08.
DMX Controller – Input/DMX-IN
▪Setting up DMX Sources and sending them to eDMX Destinations.
▪If DMX to eDMX is also configured, DMX-IN automatically becomes active if no eDMX is sent to the device and DMX is received on the DMX ports.
▪Set up the number of receiving DMX ports = number of Sources with Protocol DMX and index 01 – 08.
▪For each received universe, set up a Destination with Destination: Protocol, i.e. Art-Net or sACN.
DMX Splitter
▪Setting up single DMX Sources and sending them multiple times to several DMX Destinations.
▪Set up the number of required DMX ports = number of Destinations with Protocol DMX. For 4 output ports, use index 05 – 08, for example.
▪Set up 4 Sources with Protocol: DMX and Index 01 and send to each of the 4 different Destinations, for example.
DMX Booster
▪Setting up several DMX Sources and sending them to several DMX Destinations.
▪Each different Source: Protocol DMX has one different Destination: Protocol DMX, such as Index 1 [Source] to Index 2 [Destination], Index 3 [Source] to Index 4 [Destination], Index 5 [Source] to Index 6 [Destination], Index 7 [Source] to Index 8 [Destination].
Protocol Converter
▪Setting up eDMX Sources and sending them to eDMX Destinations.
▪For every required Source/Destination universe, choose Source: Protocol Art-Net and then Destination: Protocol sACN; or choose Source: Protocol sACN and then Destination: Protocol Art-Net.
Backup Strategies
▪Using the special Priority feature of the controller to assign staggered priority levels to different Sources.
▪Set up additional Sources with a lower Priority than the default priority [as described above] and they will be used instead after having received no signal for 3 seconds.
Merger – DMX/eDMX
▪Sending multiple data sources to single Sources and/or sending multiple Sources to Destinations.
▪You can send up to 8 different data sources [with different IP addresses] to a single Source.
▪Up to 8 different Sources can be sent to a single Destination.
▪Destinations are always applying HTP merging; except when LTP is enabled.
In Case Of Missing Network Data
▪You can set up an extra Source with Pattern 33 Black or 0 All and give it a lower Priority [than your main Source] in order to send a last black or white frame after the connection to your main data source has been lost.
Important Notes
▪When receiving Art-Net and sending data out as Art-Net again [e.g. DMX to Art-Net, or Art-Net to Art-Net], make sure that your output universes are —not֪— the same as your input universes; or otherwise you will create a loop.
| MADRIX STELLA 8 User Manual 1.07. |
| [Ctrl & +/-] = Zoom In/Out | [Ctrl & 0] = 100% |
|
Previous Next
|
|
Enable Automatic Translation | Activer La Traduction Automatique | 启用自动翻译 |