This topic includes:
MA-Net from MA Lighting is a proprietary Ethernet network protocol. MADRIX 5 supports it natively.
MADRIX 5 supports:
▪MA-Net 1
▪MA-Net 2
1] Set up networking for your MA product.
2] Set up the correct network settings in Windows.
3] Enable drivers in MADRIX 5.
4] Activate the devices.
5] Set up remote control.
1] Setting Up MA Networking
▪Make sure to connect your MA devices and the MADRIX computer in the same Ethernet network over network cabling [and possibly a network switch]!
[For example, use the Ethernet 1 port for products of the grandMA 2 series and the network card of the computer that runs the MADRIX 5 Software.]
▪Consult the user manual of your MA product to set up the correct settings for MA-Net for your MA product.
▪Start Networking for your MA product.
[For example, go to Setup > Network to start or join a session for products of the grandMA 2 series.]
2] Windows Network Settings
MA-Net is a network-based protocol. MADRIX 5 will use the network card of your computer to receive data.
▪It is required to set up the correct network settings in Windows, first.
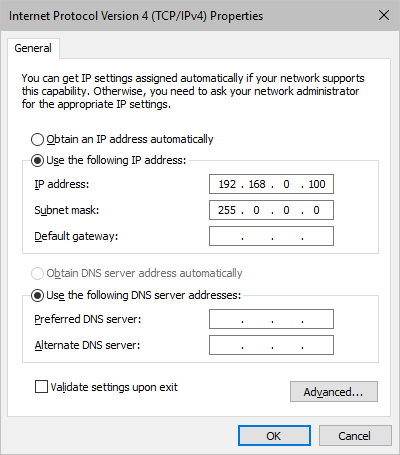
▪You must use the correct IP address and Subnet mask settings. Otherwise, MA-Net might not work!
▪The IP addresses of your computer and your MA-Net devices need to be different.
▪Set up an individual IP address according to the IP address range of your MA product.
- Make sure that the first, second, and third part of the IP address are the same. The fourth part must be different from your MA product.
- A general recommendation is:
- 192.168.X.1 ... 192.168.X.254
▪Set up the corresponding Subnet mask
- 255.0.0.0
▪Restart MADRIX 5, if you have changed the network settings in Windows while MADRIX 5 was running.
▪Check the settings of the Windows Firewall.
▪Learn more »Tips [Microsoft Windows / Networks / USB]
▪Example for PCs that are running MADRIX 5:
3] Enabling Drivers In MADRIX 5
▪Go to the menu Preferences > Options... > Devices Network
[Keyboard shortcut: Ctrl+Alt+O > Devices Network]
▪Activate MA Lighting - MA-Net
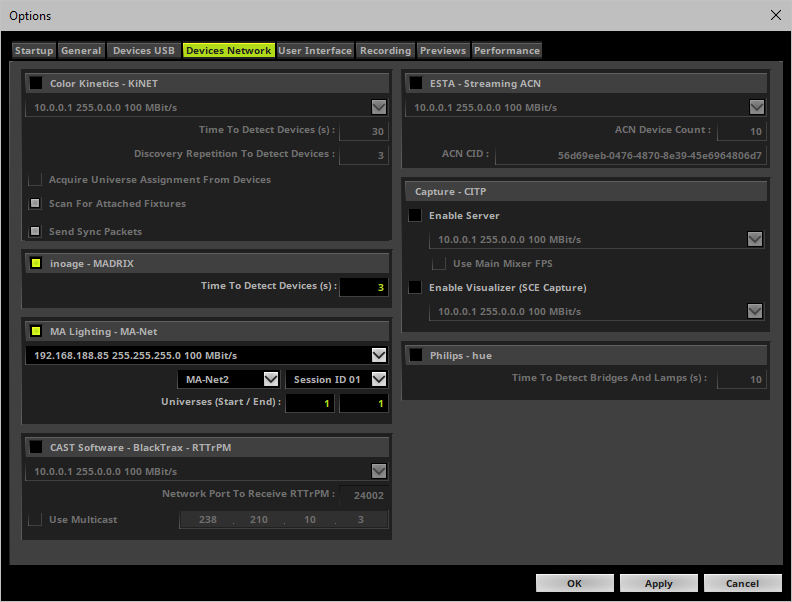
▪Choose the correct network/network card from the drop-down list.
- Always make sure that you have selected the correct network. Otherwise, no data can be received.
- Please note: A loopback adapter is also available. Learn more »Loopback Adapater [127.0.0.1]
▪ - Defines the protocol version.
- Choose the correct MA-Net here [MA-Net 1 or MA-Net 2].
- MA-Net 1 is used by the grandMA1 series.
- MA-Net 2 is used by the grandMA2 series.
▪Session ID - Defines the session you want to work in. Choose the session you have set up in your MA product also here.
▪Universes (Start / End) - Defines the universe or universe you wish to receive.
- The default Start Universe is 1 and the default End Universe is 1, which means that one DMX universe will be received.
4] Activating Devices
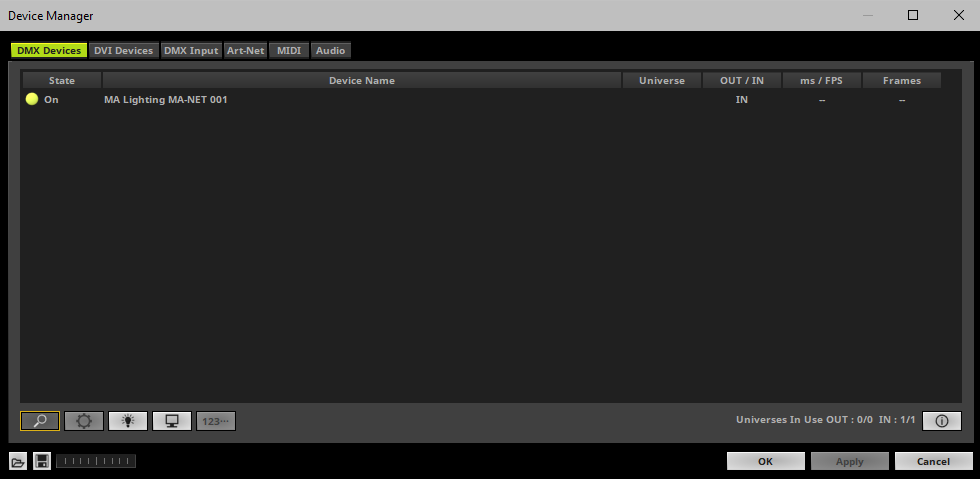
▪Go to the menu Preferences > Device Manager... > DMX Devices
[Keyboard shortcut: F4]
▪MADRIX 5 automatically adds the number of MA-Net universes/devices according to your settings for Start Universe and End Universe
▪Your devices are automatically activated.
▪If it is no activated, select your devices in the list.
▪Right Mouse Click on the column State to set it from Off to On [indicated by green light].
▪IN is automatically activated.
▪Since MADRIX 5 will receive data, the frame time and frame rate [ms / FPS] are managed automatically by MADRIX 5.
[Please note when checking incoming data via the Task Watcher: A maximum frame rate of 30 FPS will be sent by your MA product over MA-Net.]
5] Setting Up Remote Control
▪Go to the menu Preferences > Device Manager... > DMX Input
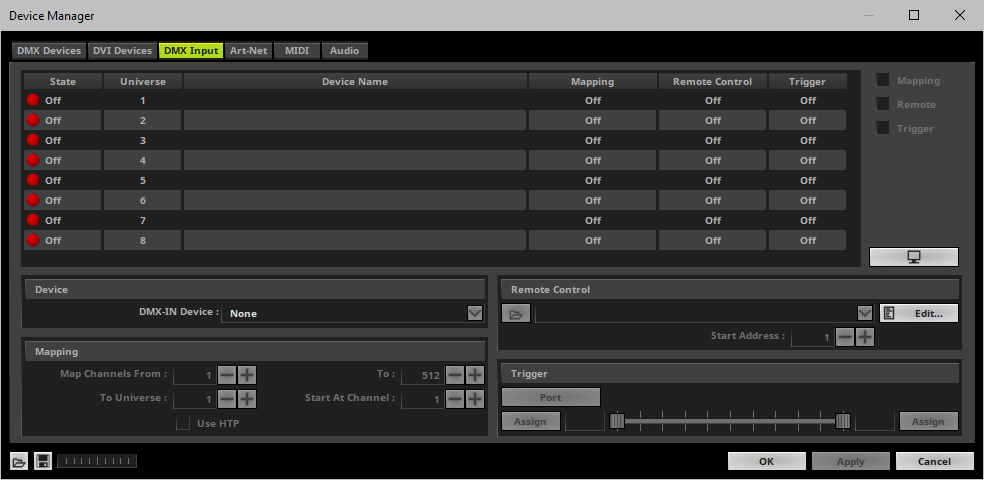
▪Select your preferred DMX Universe in the list.
[By default, DMX universe 1 to 8 are listed. If you wish to increase the number of DMX-IN universes, you can change the setting. Learn more »Performance]
▪Select your DMX-IN Device in the section Device by choosing the MA Lighting MA-Net device.

▪[If needed, you can disable DMX-IN by deselecting the device under DMX-IN Device and choose the list entry that is empty or disable the interface under Device Manager... > DMX Devices.]
▪Make sure that your device is still selected in the list.
▪Activate Remote
▪Select one of the built-in protocols in the section Remote Control [as explained below]
or create your own remote configuration. Learn more »DMX-IN Remote Editor
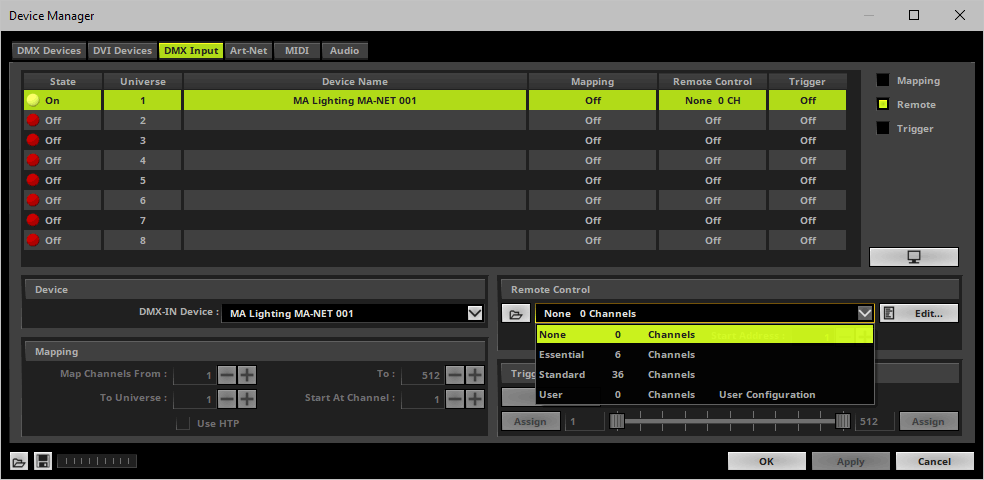
|
Open - Loads a previously saved MADRIX 5 DMX Remote Configuration file [of the file type *.mdrx]. |
|
Protocols - Choose from a pre-configured protocol [configuration]. |
|
DMX-IN Remote Editor - Allows you to modify a configuration or create a new configuration. |
|
Start Address - Defines on which particular DMX channel the protocol should start. The whole protocol will be mapped to this new address area. |
|
DMX Watcher - Opens the DMX Watcher to monitor your DMX output or input. |
Mapping is not available for MA-Net and cannot be enabled.
There are preprogrammed DMX protocols you can choose from:
▪Always make sure to have a valid network card active or selected! Otherwise, MADRIX 5 cannot receive MA-Net.
▪Always make sure to have a valid license for your MA product to send out Ethernet data or use a console.
[MA on PC requires an MA 2Port Node or MA onPC command wing, for example.]
▪Please make sure to save your MADRIX 5 Setup file after the configuration process.
If you are encountering problems, please work through the following checklist:
▪Double-check the settings of your network card.
▪Make sure to set up the Windows Firewall correctly. Learn more »Tips [Microsoft Windows / Networks / USB]
▪Double-check the settings of the MA-Net devices in MADRIX 5.
▪Double-check the configuration of your MA product.
▪Check if your MA product has a valid license to send out Ethernet data.
▪Use the DMX Watcher to monitor incoming data.
| MADRIX 5.7. |
| [Ctrl & +/-] = Zoom In/Out | [Ctrl & 0] = 100% |
|
Previous Next
|
|
Enable Automatic Translation | Activer La Traduction Automatique | 启用自动翻译 |


