This topic includes:
Based on the widely available IP technology, NDI [abbr., Network Device Interface] by NewTek makes streaming video over standard network easily possible.
![]()
▪With MADRIX 5, you can send or receive video or the software's output stream over NDI.
▪The features are directly built into the software without the need for any additional drivers.
▪NDI is usually used between two or more separate devices.
▪NDI version 6.0.0 is currently supported.
▪Any other sender or receiver also needs to support NDI. Otherwise, the connection will not work.
▪Make sure that all senders and receivers of NDI are connected to the same Ethernet computer network.
Step-By-Step Configuration
1] Prerequisites.
2] Patching DVI fixtures.
3] Adding an NDI DVI Device.
4] Important information.
1] Prerequisites
▪The NDI network settings are automatically set up for you.
▪You only need a computer with a network card and a valid IP address.
▪You do not have to change the IP address settings in Windows for NDI!
▪You need to patch DVI fixtures [see below].
2] Patching DVI Fixtures
▪Configure your LED matrix first.
▪You need to add DVI fixtures [Fixture Protocol > DVI]. Otherwise, it will not work and no output is sent.
▪ Learn more »Matrix Generator or »Patch Editor
3] Activating The DVI Device
▪Go to the menu Preferences > Device Manager... > DVI Devices
[Keyboard shortcut: F4 > DVI Devices]

▪Add devices manually.
- Click ![]()
- A small selection list will be opened above the button.

- Select NDI
▪The new DVI device will appear in the list after is has been added.
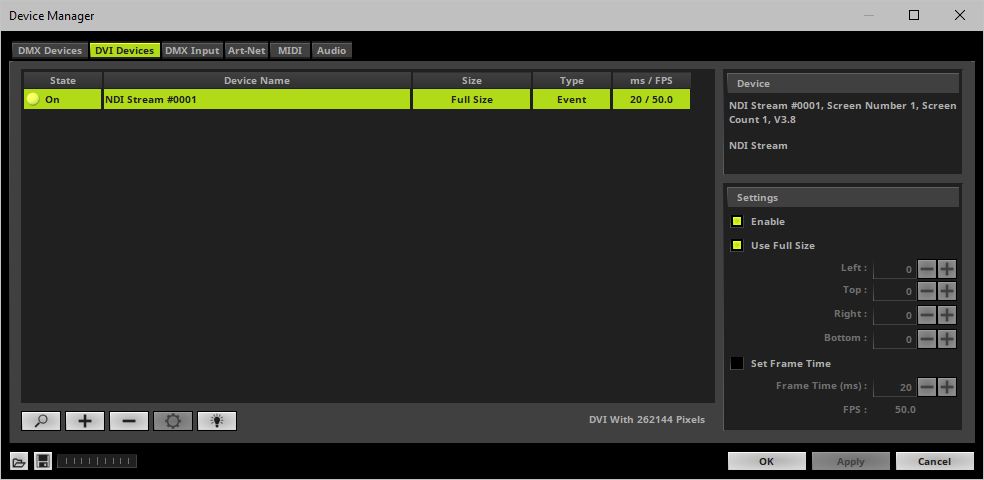
There are different Settings available for further configuration. By default, all settings should be set up correctly already.
▪If you change a setting, always click Apply to confirm the changes.
▪Enable - Activates or deactivates the currently selected DVI device. This is activated by default. It needs to be activated in order to work correctly.
▪Use Full Size - Displays the full Matrix Size on the device. This is activated by default and the recommended setting.
- Deactivate if you want to set up a certain cut-out and specify which details of your matrix will be shown. You can choose the start coordinates and the end coordinates of this area. Left and Top define the start coordinates in a coordinate system that starts with 0,0 in the top left corner. Right and Bottom define the end coordinates.
Scaling is not available.
Your virtual LED matrix will not be stretched or compressed in order to fit the DVI device or vice versa.
▪Set Frame Time - Activate in order to set a different frame time in milliseconds. By default, the DVI device is set to be an Event type with the software's main mixing frame rate [50 FPS by default] .
- If you manually set a new frame time, the output might flicker.
- It is not recommended to set a higher frame rate than 50 FPS. But if your hardware controller requires a different, adjust the value to these requirements. Then, the type of your device will be set to Frame in the list.
▪![]() - Removes the currently selected DVI devices.
- Removes the currently selected DVI devices.
▪ - Makes your device flash and will set all pixels instantly to white for testing purposes.
4] Important Information
▪The MADRIX 5 Software does not send an Alpha channel.
▪The MADRIX 5 Software does not send or receive audio over NDI.
▪NDI uses video compression in order to manage the amount of video data that is sent over Ethernet network.
- Beware that this might result in distorted colors or visual artifacts when sending MADRIX Effects.
- This is usually not immediately visible for Full HD video content and the softer image content of videos.
- However, you may see it when sending pixel-perfect and color-perfect MADRIX Effects, since they often use precise and thus hard edges with high color contrasts.
- Any receiver might thus receive interpolated image data.
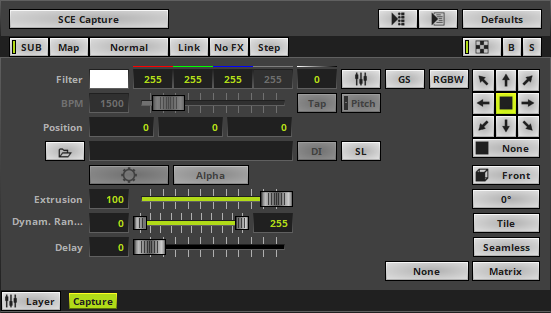
In order to receive NDI, you need to use the MADRIX Effect SCE Capture
Step-By-Step Configuration
1] Prerequisites.
2] Using SCE Capture.
1] Prerequisites
▪Make sure that you are sending NDI over network.
▪The NDI network settings are automatically set up for you.
▪You only need a computer with a network card and a valid IP address.
▪You do not have to change the IP address settings in Windows for NDI!
2] Using SCE Capture
▪Select SCE Capture from the library of effects.
Learn more »Effects [Visuals]
▪ - Open a device.
- Please allow the software to search for devices in the network for at least 5 seconds.
- Only after this short period of time, devices will appear in the list!
▪Select your NDI sender from the list.
- The Source is NDI
▪MADRIX 5 will now receive NDI over Network.
▪Use can use the Dynam. Range setting to improve visual color distortion caused by the video compression.
▪Learn more »SCE Capture
Newtek provides the following information:
▪"npcap loopback adapter has been found to interfere with NDI operation and performance. This driver is not required or used by modern versions of Wireshark. If you find this is installed on your system, then is installed recommend that you go to your network settings and use the context menu on the adapter to disable it."
▪"NDI now uses predictable port numbers in all cases so that fire-wall rules can be properly built."
- "Each connection uses TCP ports 5960 and up."
- "Each mTCP or UDP receiver use port 6960 and up."
- "Each mTCP or UDP sender use port 7960 and up."
| MADRIX 5.7. |
| [Ctrl & +/-] = Zoom In/Out | [Ctrl & 0] = 100% |
|
Previous Next
|
|
Enable Automatic Translation | Activer La Traduction Automatique | 启用自动翻译 |