Overview
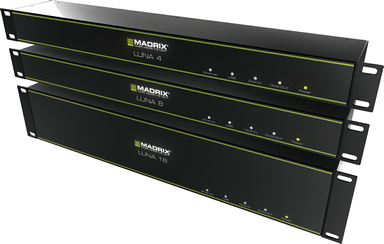
MADRIX LUNA is an Art-Net node or a DMX USB interface.
It reliably distributes your DMX512 data either via Ethernet network (Art-Net) or via USB. But an additional MADRIX KEY (i.e. a software license) is necessary.
3 versions are available:
| • | MADRIX LUNA 4 |
| • | MADRIX LUNA 8 |
| • | MADRIX LUNA 16 |
3rd-Party Controllers
MADRIX LUNA is a standard Art-Net node. Because of this, you can use the device with applications, consoles, desks, or controllers that are compatible with Art-Net to distribute Art-Net data via Ethernet network.
MADRIX 2 Minimum System Requirements
| • | 2.0 GHz dual-core CPU |
| • | 1024 MB RAM |
| • | 500 MB free harddisk space |
| • | 1280 x 768 screen resolution |
| • | Sound card (for Sound2Light & Music2Light) |
| • | Network card |
| • | USB 2.0 |
MADRIX 2 Supported Operating Systems
| • | Microsoft® Windows® XP (SP2) |
| • | Microsoft® Windows® Vista |
| • | Microsoft® Windows® 7 |
| • | Compatible with 32 bit and 64 bit |
Important Note
Make sure to read the provided MADRIX LUNA Quick Start Guide first!
Operating Modes
You can mainly use 4 operating modes together with MADRIX:
Notes:
| • | DMX-OUT and DMX-IN can be used at the same time. |
| • | You always have 1 - 4/8/16 output ports available (DMX 1 - 4/8/16). - In total, 2048 DMX channels can be sent per LUNA 4 unit. - In total, 4096 DMX channels can be sent per LUNA 8 unit. - In total, 8192 DMX channels can be sent per LUNA 16 unit. |
| • | You always have 1 DMX input port available per unit (DMX-IN). In total, 512 DMX channels can be received per unit. |
DMX-OUT via Ethernet Network (Art-Net)
Overview
You can connect the LUNA via Ethernet network to the network card of your computer that runs the MADRIX software. Data is sent to the LUNA via network (Ethernet) and distributed to the XLR output ports (DMX 1 - 4/8/16).
First Steps
| • | Connect your LED controllers or fixtures to the XLR ports of MADRIX LUNA (DMX 1 - 4/8/16) |
| • | Connect MADRIX LUNA to power. (Please see safety instructions in the MADRIX LUNA Quick Start Guide!) |
| • | Connect MADRIX LUNA to your computer using network cabling. |
| • | It is highly recommended to only use Gigabit Ethernet network components (network card, switches, etc.). |
Network Settings
Before you start and in order to be able to use Art-Net, please set up your network card settings in Windows.
Use an IP address in the following address area:
| • | 2.0.0.1 ... 2.255.255.254 or |
| • | 10.0.0.1 ... 10.255.255.254 |
(Via factory default settings, MADRIX LUNA devices will have an IP address in the 10.x.x.x network range, such as 10.206.224.100, for example).
The Subnet mask should be
| • | 255.0.0.0 |
You must use these network settings. Otherwise Art-Net might not work.
The IP addresses of your computer and your MADRIX LUNA device(s) need to be different.
Example for MADRIX PCs:

Please restart MADRIX if you have changed any network settings in Windows.
Fixture Configuration
Start MADRIX now and configure the virtual LED matrix using the Matrix Generator or Patch.
Configure Art-Net
Navigate to the menu "Preferences" -> "Device Manager..." (or press "F4"). Now, select the tab "Art-Net".
Select "Art-Net" in the upper left corner to activate it.
Choose your network card in the drop-down list next to it/to the right (e.g. 10.0.0.1 255.0.0.0).
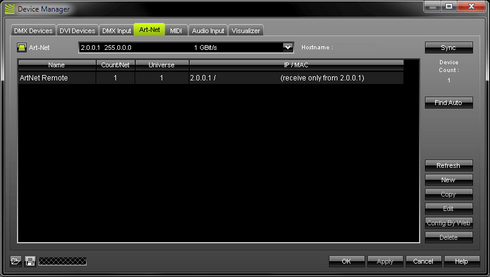
Press "Find Auto".
MADRIX will automatically search for connected LUNA devices in the network and add them to the list. A number of entries will be created in the list for each LUNA device.
(The Art-Net standards only supports a maximum of 4 output ports per device. Since LUNA 8 features 8 ports, 2 entries are created in MADRIX, for example. One entry will be shown for LUNA 4 and 4 entries for LUNA 16.)
Configure DMX Output
In the Device Manager, select the tab "DMX Devices".
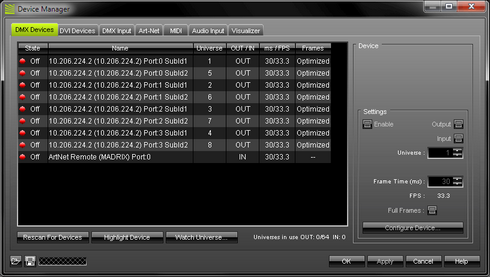
All output ports of each LUNA device will be shown in the list. 4 ports will be shown for LUNA4, 8 ports will be shown for LUNA 8, and 16 ports will be shown for LUNA 16. But the ports are still deactivated.
(Additionally, the entry "ArtNet Remote" is available, which can be used for Art-Net Remote.)
(In the screenshot above, one LUNA 8 is connected. If more devices are connected, use the different IP addresses of different devices to identify them in the Device Manager.)
Now, select all required output ports in the list and activate "Enable". Press "Apply" to confirm.
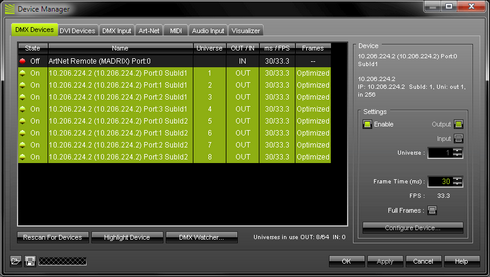
(For a better overview, click on "Universe" in the list to sort in descending order as shown in the screenshot above.)
By default, DMX universe 1 - 4/8/16 are assigned to the ports DMX 1 - 4/8/16 when using one MADRIX LUNA:
LUNA Output Port |
"Name" in the Device Manager -> DMX Devices |
DMX 1 |
Port:0 SubId1 |
DMX 2 |
Port:1 SubId1 |
DMX 3 |
Port:2 SubId1 |
DMX 4 |
Port:3 SubId1 |
DMX 5 |
Port:0 SubId2 |
DMX 6 |
Port:1 SubId2 |
DMX 7 |
Port:2 SubId2 |
DMX 8 |
Port:3 SubId2 |
DMX 9 |
Port:0 SubId3 |
DMX 10 |
Port:1 SubId3 |
DMX 11 |
Port:2 SubId3 |
DMX 12 |
Port:3 SubId3 |
DMX 13 |
Port:0 SubId4 |
DMX 14 |
Port:1 SubId4 |
DMX 15 |
Port:2 SubId4 |
DMX 16 |
Port:3 SubId4 |
To change the DMX universe, select a port in the list and set up "Universe". Press "Apply" to confirm.
To change the output frequency ("FPS"), simply change "Frame Time (ms)". The higher the Frame Time, the lower the FPS will be. Press "Apply" to confirm. When using Art-Net, the Frame Time (ms) can be individually set for each port. But it cannot be set individually for each port, when sync mode is activated. Learn more below.
By default, MADRIX sends Optimized Frames instead of Full Frames. For more information, please see below.
![]() MADRIX LUNA can use the special sync mode of MADRIX.
MADRIX LUNA can use the special sync mode of MADRIX.
Large LED projects require dependable data distribution. The MADRIX software and LUNA hardware allow you to synchronize data output for all 4/8/16 DMX ports and even across multiple LUNA devices to get an optimal image on the LEDs.
An automatic sync mode for Art-Net is implemented in MADRIX. In this way you can activate or deactivate the usage of sync packages.
Before activating sync mode, make sure that all activated Art-Net devices are available in your network! Else, the frame rate of Art-Net might drop. If you are not sure, do not enable any sync mode.
Go to "Preferences" -> "Device Manager..." (or press "F4"). Now, select the tab "Art-Net".
Click "Sync" and a new dialog will open.
Now, choose if you want to activate sync packages to be sent before Art-Net data is sent ("Pre Sync"). Or you can send sync packages after Art-Net data has been sent ("Post Sync").
Press "OK" to confirm.
If you want to disable sync mode, click "Sync" again and deselect the mode that is selected. Then, press "OK".

When MADRIX Sync mode is activated, MADRIX and MADRIX LUNA will automatically handle the synchronization of data.
Additional Art-Net Settings (Broadcast Or Direct IP Mode)
You can decide
| • | to send Art-Net data to all devices in the network (Broadcast Mode). This setting can be useful if you wish to send the same data to several devices or if you wish to send it every single device in the network, for example. But through broadcasting, a large amount of data traffic is sent over the network. This can negatively affect the overall network performance and cause instability. |
| • | to send Art-Net data to only specific devices (Direct IP Mode). In this setting only devices with the specific IP address will be able to receive the data. Direct IP Mode is the default setting. To reduce network traffic and to increase performance and stability, it is recommended using Direct IP mode. |
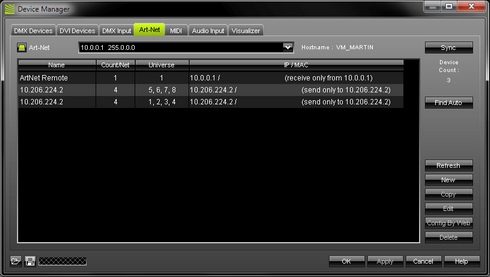
In the Device Manager, select the tab "Art-Net".
Now, select an entry in the list. Press "Edit".
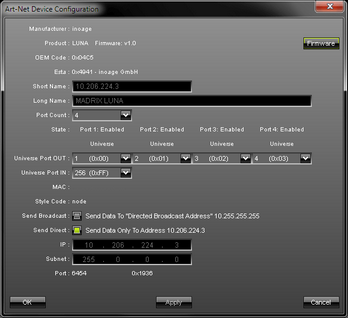
Set up Broadcast or Direct IP mode:
If "Send Broadcast" is activated, MADRIX will send data to the whole Art-Net network. (Broadcast Mode)
If "Send Direct" is activated, MADRIX forwards data directly to the configured IP address (Enter the IP address of your LUNA device(s). (Direct IP Mode)
Repeat the steps for all Art-Net devices you wish to use in this way.
Automatic HTP Merge
Overview
MADRIX LUNA features an automatic HTP merge from 2 Art-Net sources. [Usually, the first source will be MADRIX. The second source could be a console, for example.]
Data from both source will be merged together and sent out as 1 signal. This happens across all 8 output ports and by using the HTP principle.
HTP - Is the acronym for the Highest Takes Precedence. Data from both sources will be compared for each individual channel. The higher value wins per channel.
Example: We are using an LED fixture with a total of 5 control channels [3 color channels and 2 movement channels]. MADRIX should provide the color data for channels 1 to 3 and the console should provide the movement data for channels 4 and 5. Using the MADRIX Fixture Editor, we could create a corresponding fixture where channel 4 and 5 are set up as Fixed channel using always a value of 0. On the other hand, the console will always send a value of 0 for the first 3 channels of each fixture. This will ensure that the data from the console will always provide the higher value on channels 4 and 5, while MADRIX provides the color data. Due to the automatic HTP merge, the LED fixture will receive correct data from both sources as desired.
Configuration & Recommendations
1] Correctly set up and enable Art-Net for each source.
2] Make sure to activate Sync Mode for Art-Net in MADRIX. Learn more »Sync Mode For Art-Net
3] Make sure that MADRIX has a lower IP address compared to the second source. [E.g., 2.0.0.1 compared to 2.0.0.20]
4] Always use Direct IP Mode to directly send data to the correct IP address[es] of your MADRIX LUNA device[s]. [It is not recommend to have any of the two sources or any other source in the network to send data via Broadcast Mode.]
Overview
You can connect the LUNA directly via USB to the computer that runs the MADRIX software. Data is sent to the LUNA via USB and distributed to the XLR output ports (DMX 1 - 4/8/16).
First Steps
| • | Connect your LED controllers or fixtures to the XLR ports of MADRIX LUNA (DMX 1 - 4/8/16) |
| • | Connect power to MADRIX LUNA. (Please see safety instructions in the MADRIX LUNA Quick Start Guide!) |
| • | Connect MADRIX LUNA to your computer via USB. (e.g., use the provided USB cable) |
| • | Start MADRIX. |
| • | In MADRIX, configure the virtual LED matrix using the Matrix Generator or Patch. |
Enable Drivers in MADRIX
Please make sure to activate the driver for the USB connection in the MADRIX Options.
To access the Options of MADRIX, first go to the menu "Preferences" -> "Options" (or "Ctrl+Alt+O"). Second, select the tab "Devices (USB/PCI)".
")
Select the "MADRIX LUNA interfaces" driver and press "Apply". Close the dialog with "OK".
Configure DMX Output
Go to the menu "Preferences" -> "Device Manager..." (or "F4"). Select the tab "DMX Devices".
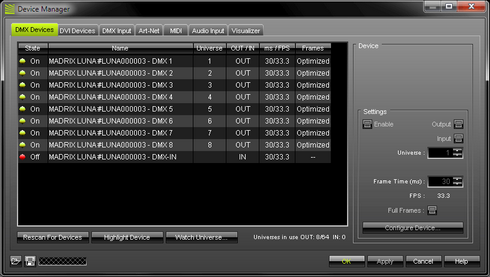
Your LUNA device(s) and all of their ports (4/8/16 output ports, 1 input port) will appear in the list.
If your devices are not in the list, press "Rescan For Devices".
(In the screenshot above, one LUNA 8 is connected.)
By default, DMX universe 1 - 4/8/16 are assigned to the ports DMX 1 - 4/8/16 when using one MADRIX LUNA. All output ports are activated ("On").
To activate or deactivate a port, select the port in the list and select "Enable" or deselect "Enable". Press "Apply" to confirm.
To change the DMX universe, select a port in the list and set up "Universe". Press "Apply" to confirm.
To change the output frequency ("FPS"), simply change "Frame Time (ms)". The higher the Frame Time, the lower the FPS will be. The lower the Frame Time, the higher the FPS will be. Press "Apply" to confirm. When using USB, the Frame Time (ms) will be automatically set to the same value for all output ports.
By default, MADRIX sends Optimized Frames instead of Full Frames. For more information, please see below.
Further Settings For DMX Output
Full Frames Or Optimized Frames
In order reduce network traffic, MADRIX is sending optimized data by default. For example, if you are only using 240 DMX channels, MADRIX sends data for 240 DMX channels. But you can activate full frames. When using full frames, MADRIX will send frames including all 512 DMX channels every time (even if you are only using 240 DMX channels).
Certain LED controllers or LED products might not support optimized frames. This is why full frames are recommended if problems occur.
To reduce network traffic, we suggest using optimized frames.
To enable "Full Frames", please navigate to the menu "Preferences" -> "Device Manager" -> tab "DMX Devices". Select your device and enable "Full Frames" if required.
In addition, you can activate Full Frames for the device and each MADRIX LUNA output port separately. For more information, see LUNA Configuration.
Highlight Device
![]() Go to the menu "Preferences" -> "Device Manager" -> tab "DMX Devices". The "Highlight Device" button activates/deactivates the highlight mode for the selected interface and DMX universe.
Go to the menu "Preferences" -> "Device Manager" -> tab "DMX Devices". The "Highlight Device" button activates/deactivates the highlight mode for the selected interface and DMX universe.
Select one or more interfaces and press the button. The corresponding fixtures at the selected interface(s) will flash white for a better identification. This makes it easier to see them on stage. It considerably speeds up the procedure of programming the selected DMX512/Art-Net interfaces. When connected to USB, the MADRIX logo on the front of the MADRIX LUNA unit will also flash for better identification of the device.
DMX-IN via Ethernet Network (Art-Net Remote)
Overview
You can connect MADRIX LUNA via Ethernet network to the network card of your computer that runs the MADRIX software. Data is sent into the LUNA via DMX-IN (XLR) and from the LUNA to MADRIX via Ethernet network.
First Steps
| • | Connect your external DMX controller to the DMX-IN port of MADRIX LUNA. |
| • | Connect MADRIX LUNA to power. (Please see safety instructions in the MADRIX LUNA Quick Start Guide!) |
| • | Connect MADRIX LUNA to your computer via network cabling. |
| • | It is highly recommended to only use Gigabit Ethernet network components (network card, switches, etc.). |
Network Settings
Before you start and in order to be able to use Art-Net, please set up your network card settings in Windows.
Use the an IP address in the following address area:
| • | 2.0.0.1 ... 2.255.255.254 or |
| • | 10.0.0.1 ... 10.255.255.254 |
Artistic Licence (the creators of Art-Net) recommend to use 2.x.x.x (10.x.x.x is regarded to be an alternative).
Through factory default settings, MADRIX LUNA devices will have an IP address in the 10.x.x.x network range (such as 10.206.224.100 for example).
The Subnet mask should be
| • | 255.0.0.0 |
You must use these network settings. Otherwise Art-Net might not work.
Please restart MADRIX if you have changed any network settings in Windows.
Configure Art-Net Remote
Navigate to the menu "Preferences" -> "Device Manager..." (or press "F4").
Now, choose the tab "Art-Net".
Select "Art-Net" in the upper left corner to activate it.
Choose your network card in the drop-down list next to it/to the right (e.g. 10.0.0.1 255.0.0.0).

The entry "ArtNet Remote" will be created automatically in the list.
Select "ArtNet Remote" in the list and press "Edit".
A new window opens ("Art-Net Device Configuration").
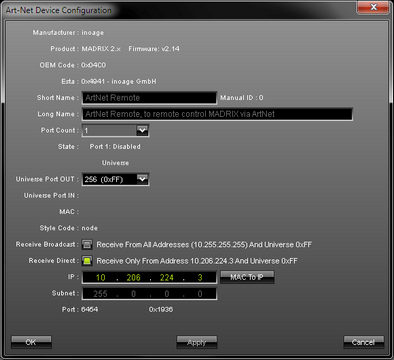
Set "Universe Port OUT" to 256, which is Art-Net universe 256.
(By default, MADRIX LUNA sends DMX-IN data to Art-Net universe 256. If you have changed these settings in the Web Configuration or LUNA Configuration dialog, enter the same Art-Net universe here!)
Activate "Receive Direct" and enter the IP address of your LUNA (e.g., 10.206.224.3). Press "OK".
(You can also activate "Receive Broadcast". In this mode, MADRIX will receive any DMX data that is sent in the network on this Art-Net universe.)
Activate Art-Net Remote
In the Device Manager, select the tab "DMX Devices".
Art-Net Remote is still deactivated.
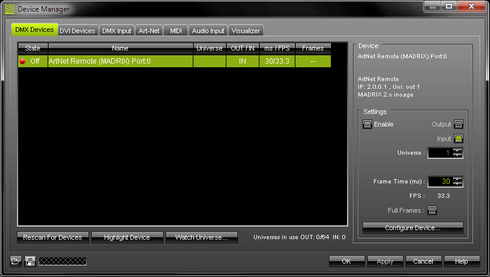
Select "ArtNet Remote" in the list and activate "Enable". "Input" is automatically selected. Press "Apply" to confirm.
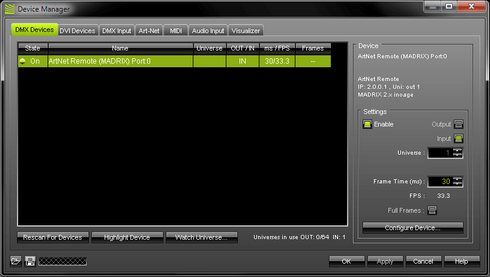
The recommended Frame Time is 30.
To change the input frequency ("FPS"), simply change "Frame Time (ms)". The higher the Frame Time, the lower the FPS will be. The lower the Frame Time, the higher the FPS will be. Press "Apply" to confirm.
Activate DMX Input
In the Device Manager, select the tab "DMX Input".

Select an (empty) entry in the list according to your preferred DMX universe.
(By default, universe 1 to 8 are listed. If you wish to increase the number of DMX-IN universes, please change the setting in the "MADRIX Options" -> Performance.)
After the selection, choose your "DMX-IN Device" in the section "Device". Select "ArtNet Remote".

Art-Net Remote is now activated. MADRIX can already receive DMX data.
Additionally, you can now monitor incoming data (press "Watch Universe") or choose to activate "Mapping" or "Remote". For more information, see Art-Net Remote.
Overview
You can connect the LUNA directly via USB to the computer that runs the MADRIX software. Data is sent into the LUNA via DMX-IN (XLR) and from the LUNA to MADRIX via USB.
First Steps
| • | Connect your external DMX controller to the DMX-IN port of MADRIX LUNA. |
| • | Connect MADRIX LUNA to power. (Please see safety instructions in the MADRIX LUNA Quick Start Guide!) |
| • | Connect MADRIX LUNA to your computer via USB. (E.g., use the provided USB cable) |
| • | Start MADRIX. |
Enable Drivers in MADRIX
Please make sure to activate the driver for the USB connection in the MADRIX Options.
To access the Options of MADRIX, first go to the menu "Preferences" -> "Options" (or "Ctrl+Alt+O"). Second, select the tab "Devices (USB/PCI)".
Select the "MADRIX LUNA interfaces" driver and press "Apply". Close the dialog with "OK".
Configure DMX Output
Go to the menu "Preferences" -> "Device Manager..." (or "F4"). Select the tab "DMX Devices".
Your LUNA device(s) and all of their ports (4/8/16 output ports, 1 input port) will appear in the list.
If your devices are not in the list, press "Rescan For Devices".
(In the screenshot above, one LUNA 8 is connected.)
Now, select "MADRIX LUNA DMX-IN" in the list and activate "Enable". "Input" is automatically activated for you.
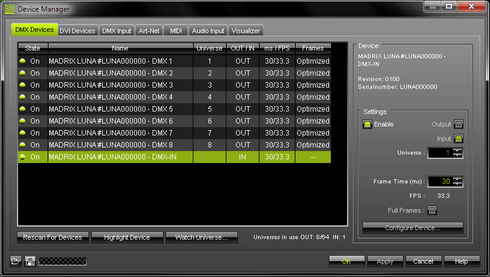
The recommended Frame Time is 30.
To change the input frequency ("FPS"), simply change "Frame Time (ms)". The higher the Frame Time, the lower the FPS will be. The lower the Frame Time, the higher the FPS will be.
Press "Apply" to confirm.
Activate DMX Input
In the Device Manager, select the tab "DMX Input".
Select an (empty) entry in the list according to your preferred DMX universe.
(By default, universe 1 to 8 are listed. If you wish to increase the number of DMX-IN universes, please change the setting in the "MADRIX Options" -> Performance.)
After the selection, choose your "DMX-IN Device" in the section "Device". Select "MADRIX LUNA DMX-IN".

DMX-IN is now activated. MADRIX can receive DMX data.
Additionally, you can now monitor incoming data (press "Watch Universe") or choose to activate "Mapping" or "Remote". For more information, see DMX-IN.
Monitoring DMX Data And Performance
MADRIX provides several tools to monitor outgoing DMX data and performance. The "Task Watcher" (or "F5") provides detailed operational information. The "Logfile" (or "F6") keeps track of all warnings and system information. The "DMX Watcher" (or "Ctrl+Alt+D") allows you to monitor your DMX output or input while using MADRIX.
![]()
![]() Open the "DMX Watcher" to monitor your DMX output or input ("Watch Universe" will appear when you have selected a list entry. The DMX Watcher will open with the particular DMX universe already entered).
Open the "DMX Watcher" to monitor your DMX output or input ("Watch Universe" will appear when you have selected a list entry. The DMX Watcher will open with the particular DMX universe already entered).
You can read more in the chapter Tools.
Reset To Factory Default Settings
Reset via Reset Button
| • | Disconnect MADRIX LUNA from power. |
| • | Use a suitable tool to press the reset button on the unit’s back side. |
| • | Continue to press the reset button and connect to power again. |
| • | Continue to press the reset button and wait until all status LEDs on the front of the device flash repeatedly or wait 10 seconds. |
Reset via USB (MADRIX LUNA Updater)
| • | Connect MADRIX LUNA to power. (Please see safety instructions in the MADRIX LUNA Quick Start Guide!) |
| • | Connect MADRIX LUNA to your computer via USB. (e.g., use the provided USB cable) |
| • | Close the MADRIX software. |
| • | Start the separate MADRIX LUNA Updater tool. (In Windows, go to "Start" -> "All Programs" -> "MADRIX" -> "Tools" -> "MADRIX LUNA Updater") |
| • | In the MADRIX LUNA Updater, press "Reset To Factory Default Settings". |
| • | Wait for the reset process to end (usually it takes only seconds). |
Firmware Updates
Update via USB
| • | Connect MADRIX LUNA to power. (Please see safety instructions in the MADRIX LUNA Quick Start Guide!) |
| • | Connect MADRIX LUNA to your computer via USB or Ethernet. (e.g., use the provided USB cable.) |
| • | Start the MADRIX software. |
| • | Open the LUNA Configuration dialog. Go to "Tools" -> "LUNA Configuration..." |
| • | Press Scan and your device will appear in the list. |
| • | Select your device in the list and press "Firmware". |
| • | Wait for the process to end (usually it takes only seconds). |
| • | Disconnect MADRIX LUNA from power and connect again. |
(You can also use the MADRIX LUNA Updater. More information is available below.)
Update via Ethernet
| • | Connect MADRIX LUNA to power. (Please see safety instructions in the MADRIX LUNA Quick Start Guide!) |
| • | Connect MADRIX LUNA to your computer via Ethernet network. |
| • | Go to "Preferences" -> "Device Manager..." (or press "F4"). Now, select the tab "Art-Net". |
| • | Activate "Art-Net" and press "Find Auto". For more information, see DMX-OUT via Ethernet network (Art-Net). |
| • | Select the device in the list and press "Edit". |
| • | Press "Firmware". The update process will starts. The MADRIX logo on the front of the device will start to flash. |
| • | Press "Firmware" again. The firmware will be updated. |
| • | Wait for the process to end (usually it takes only seconds). |
LED Status Codes
The following tables describe the LED status codes on the front of the device.
STATUS |
POWER |
Powered off |
Power cable not connected. |
Permanently green |
Connected to power. |
STATUS |
ETHERNET |
USB |
Powered off |
Ethernet not connected |
USB not connected |
Permanently green |
Connected to Ethernet. |
Connected to USB. |
Blinking green |
Communicating over Ethernet. |
Communicating over USB. |
STATUS |
DMX-IN |
DMX-OUT |
Powered off |
DMX not connected |
DMX not connected |
Blinking green |
Receiving data via DMX-IN. |
Sending data to DMX 1 -8. |
When connected to Ethernet network, you can easily configure MADRIX LUNA using a web configuration interface.
You have 2 options to access the web interface:
A) Open your web browser and enter the IP address of MADRIX LUNA.
(Both LUNA and your computer need to be in the same network.)
B) In MADRIX, go to "Preferences" -> "Device Manager..." (or press "F4"). Now, select the tab "Art-Net". Select your LUNA device in the list and press "Config By Web". Your web browser will open.
Now, you have access to various information and settings.
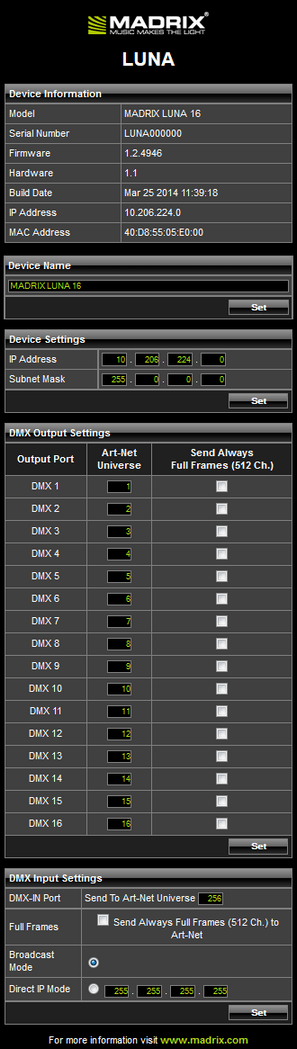
"Device Information" |
This section displays various details about the device, including:
|
||||||||||||||
"Device Name" |
You can change the description of the device. Enter a name and confirm your input with "Set". This label is only shown in this web interface. |
||||||||||||||
"Device Settings" |
You can change the IP address and Subnet Mask. Enter the specific addresses and confirm with "Set". |
||||||||||||||
"DMX Output Settings" |
This section shows specific settings for the DMX output ports (DMX 1 - 4/8/16).
If you are broadcasting data for a large number of Universes (using Broadcast Mode instead of using Direct IP Mode) with MADRIX or a 3rd-party controller for example, you can assign different DMX universes to each LUNA device with these settings. Each MADRIX LUNA will then only receive data from the specific Art-Net universe and send it to its specified output port. For example, you can set up that LUNA 8 #1 only listens to Art-Net universe 1 - 8, while LUNA 8 #2 listens to Art-Net universe 9 - 16, and LUNA 8 #3 listens to Art-Net universe 17 - 24, and so on.
Send Always Full Frames (512 Ch.) is another specific setting. The XLR DMX output port will always send out 512 channels, even if the data sent to LUNA includes less than 512 channels for this port and universe. LUNA automatically sends values of 0 on channels that are not used. |
||||||||||||||
"DMX Input Settings" |
This section allows you to specify settings for DMX input.
LUNA can receive 512 channels via the DMX-IN port. Use "DMX-IN Port Send to Art-Net universe" to specify on which Art-Net universe those 512 channels are sent. By default, 256 is selected. Valid values range from 1 to 256.
Additionally, choose to how MADRIX LUNA sends the data into the network: - Confirm with "Set." |
You can access all information and settings of the web configuration in MADRIX using the LUNA Configuration dialog.
To call up the Luna Configuration dialog, please go to the menu "Tools" -> "LUNA Configuration... " (or "Ctrl+Alt+L").

![]() Scans the USB ports of your computer and the network for connected MADRIX LUNA devices. If devices are found, they will be shown in the list.
Scans the USB ports of your computer and the network for connected MADRIX LUNA devices. If devices are found, they will be shown in the list.
To see USB devices, you need to enable LUNA USB drivers first (they are activated by default). For more information, see Devices (USB/PCI).
To see network devices, you need to enable LUNA networking drivers (they are activated by default) and connect MADRIX LUNA and your computer to the same network first. For more information, see Devices (Network).
![]() Re-scans already connected devices and brings the information in the list up to date.
Re-scans already connected devices and brings the information in the list up to date.
![]() Enables remote access to the web configuration as explained above. MADRIX LUNA needs to be connected via Ethernet (network connection required). First, connect your computer and the MADRIX LUNA to one and the same network. Second, select your MADRIX LUNA in the list. Third, press "Call". A web browser opens automatically.
Enables remote access to the web configuration as explained above. MADRIX LUNA needs to be connected via Ethernet (network connection required). First, connect your computer and the MADRIX LUNA to one and the same network. Second, select your MADRIX LUNA in the list. Third, press "Call". A web browser opens automatically.
![]() Select your device in the list and press Edit in order to change the settings of your device. Apply your changes by pressing "Set".
Select your device in the list and press Edit in order to change the settings of your device. Apply your changes by pressing "Set".
![]() Imports the MADRIX LUNA Device Settings from an external file (*.mlds). Use this option to easily restore all device settings from a file (as described in the table below).
Imports the MADRIX LUNA Device Settings from an external file (*.mlds). Use this option to easily restore all device settings from a file (as described in the table below).
![]() Exports the MADRIX LUNA Device Settings to an external file (*.mlds). Use this option to easily store all device settings in a file. Simply enter a name in the window that opens and press "Save".
Exports the MADRIX LUNA Device Settings to an external file (*.mlds). Use this option to easily store all device settings in a file. Simply enter a name in the window that opens and press "Save".
![]() Updates the firmware of your MADRIX LUNA if a newer firmware is available (USB connection required).
Updates the firmware of your MADRIX LUNA if a newer firmware is available (USB connection required).
For more information, please read the section Web Configuration above.
MADRIX LUNA Updater
Overview
Along with MADRIX a separate tool for the MADRIX LUNA is provided, called "MADRIX LUNA Updater".
Usage

The MADRIX LUNA Updater can be used for several, specific tasks.
"Update LUNA Firmware" |
Updates the firmware of all LUNA devices that are connected to the computer via USB. First, select the correct firmware in the list above this button (Example: 'LUNA 1.0.000 Type V1.0 MADRIX 2.14c'). Second, press the button. Third, disconnect the power after updating in order to restart the device. |
"Reset To Factory Default Settings" |
Resets all settings of all LUNA devices that are connected to the computer via USB to the standard values. Use this function to restore the original settings of the device. |
Additional information on the status of the performed functions will be given on the right side of the window. Information is displayed from down to top (the latest information is shown at the top).
Available Firmware Updates
LUNA Firmware |
MADRIX Version |
Release Date |
1.00.4547 |
MADRIX 2.14c |
April 2013 |
1.01.4555 |
MADRIX 2.14d |
April 2013 |
1.02.4946 |
MADRIX 2.14g |
March 2014 |
1.03.5043 |
MADRIX 2.14h |
November 2014 |
Important Note
If new drivers and a new firmware are available for the MADRIX LUNA, please always update the firmware first and then the drivers!
MADRIX LUNA Updater does not work when MADRIX is running. Please close MADRIX and restart MADRIX LUNA Updater.
Where To Find The MADRIX LUNA Updater
The MADRIX LUNA Updater is included in the MADRIX Installer. After installing MADRIX, you can find a link to the MADRIX LUNA Updater in the Windows Start menu:
'Start' -> 'All Programs' -> 'MADRIX' -> 'Tools' -> 'MADRIX LUNA Updater'
The original, executable program can be found in the MADRIX installation directory: C:\Program Files\MADRIX\Tools or C:\Program Files (x86)\MADRIX\Tools