Overview
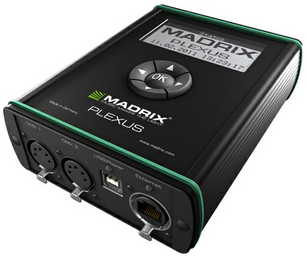
MADRIX PLEXUS is a USB 2.0 DMX512 interface. The device can be used as a live controller (Live Mode) or stand-alone interface (Stand-Alone Mode).
Contents of this chapter:
| • | Tips |
More Information About MADRIX PLEXUS
You can find the majority information about the MADRIX PLEXUS in the MADRIX PLEXUS Quick Start Guide and the MADRIX PLEXUS User Manual.
Regarding the MADRIX PLEXUS, the MADRIX software license for 1024 DMX channels is already included.
The MADRIX KEY is not necessary for the MADRIX PLEXUS.
Using A MADRIX KEY Instead Of A MADRIX Interface
The Quick Start Guides describe which software elements should be installed when you wish to use the MADRIX NEO or MADRIX PLEXUS interfaces. If you want to use a MADRIX KEY (e.g. MADRIX basic), please re-install the software and choose the necessary software components. Please see the chapter Installation Of MADRIX for more details.
MADRIX 2 Minimum System Requirements
| • | 2.0 GHz dual-core CPU |
| • | 1024 MB RAM |
| • | 500 MB free harddisk space |
| • | 1280 x 768 screen resolution |
| • | Sound card (for Sound2Light & Music2Light) |
| • | Network card |
| • | USB 2.0 |
MADRIX 2 Supported Operating Systems
| • | Microsoft® Windows® XP (SP2) |
| • | Microsoft® Windows® Vista |
| • | Microsoft® Windows® 7 |
| • | Compatible with 32 bit and 64 bit |
USB Drivers
Please make sure to activate the driver for the USB connection in the MADRIX Options. To access the Options of MADRIX, first go to the menu "Preferences" -> "Options" (or "Ctrl+Alt+O"). Second, select the tab "Devices (USB/PCI)".
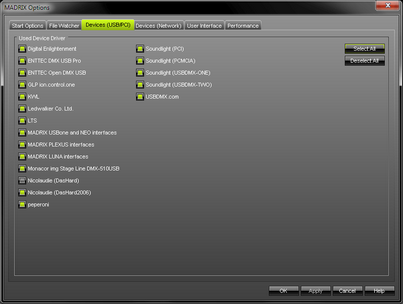
Enable the "MADRIX PLEXUS interfaces" driver and press "Apply". Close the dialog with "OK".
Network Drivers
Please make sure to activate the driver for the Ethernet (network) connection in the MADRIX Options. To access the Options of MADRIX, please press "Ctrl+Alt+O" or go to the menu "Preferences" -> "Options". Now go to the tab "Devices (Network)".
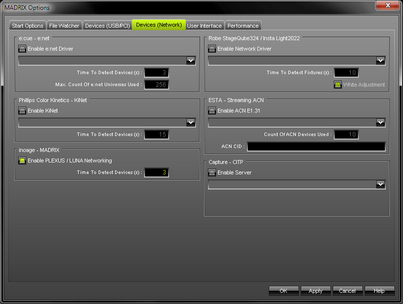
Select "Enable PLEXUS / LUNA Networking" and press "Apply". Close the dialog with "OK".
The PLEXUS allows you to send or receive data via MADRIX using 1024 DMX channels per device. The MADRIX PLEXUS features two Female 5-pin XLR connectors. A Male to Male 3-pin or 5-pin XLR Gender Changer is required for DMX-IN.
Learn more about DMX-OUT in the chapter DMX512.
Learn more about DMX-IN and Software Remote Control in the chapter DMX-IN & Art-Net Remote.
Learn more about Art-Net in the chapter Art-Net.
Introduction
Normally, a computer runs the MADRIX software live and thereby controls the LED installation. In contrast, the Stand-Alone Mode of the MADRIX PLEXUS can be used to control LED installations without the need for a computer during the show.
The PLEXUS can use an SD card (SD or SDHC) on which a Stand-Alone Show can be saved. But first, it is necessary to create such a Stand-Alone Show.
Please read the following chapter carefully in order to learn how to create a MADRIX PLEXUS Stand-Alone Show.
Basic Workflow (Step By Step)
In order to create a show file, please follow these steps:
Step 1) |
Configure your virtual matrix according to your LED installation. |
Step 2) |
Create the MADRIX effects you wish to use. |
Step 3) |
Create a Cue List, if you wish to use it during the recording. |
Step 4) |
Record your effects by creating a MADRIX Record File (*.mrec). |
Step 5) |
Convert the Record File (*.mrec) into a DMX Data File (*.dxd). |
Step 6) |
Create a PLEXUS Configuration. This will be your Stand-Alone Show! |
Step 7) |
Upload your Stand-Alone Show onto the SD card. |
Step 8) |
Activate Stand-Alone Mode for the MADRIX PLEXUS. |
Step 1), Step 2), And Step 3)
Please use the Matrix Generator or the Patch for Step 1).
Please read the chapter Effects for Step 2).
Please read the chapter Cue List if you wish to do Step 3).
Step 4) Recording Your Effects
Overview
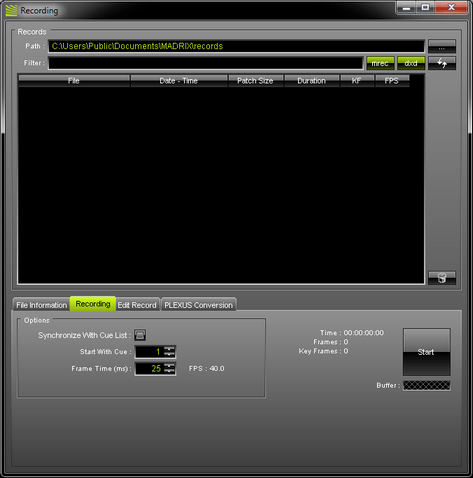
To call up the Recording dialog, please go to the menu "Window" -> "Recording" (or "Ctrl+Alt+R").
Files
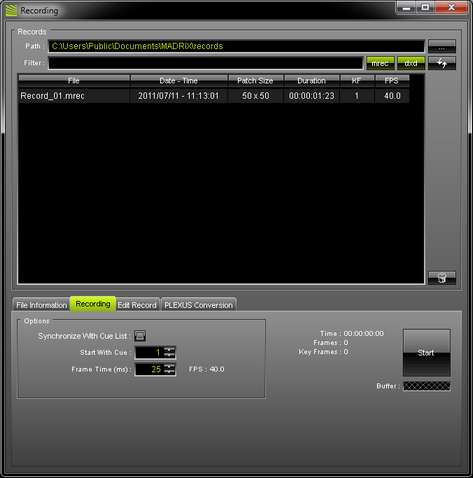
Files, i.e. records, will be displayed in the large list of the Recording dialog. If you did not create any records yet, the list is empty (as shown above).
Path
"Path" specifies a directory on your hard disk. All record files will be saved in this folder. By default, a useful folder is already chosen for you (For example C:\Users\USERNAME\Documents\MADRIX\records).
![]() You can change the folder. Use this button to browse for a different folder on your hard disk.
You can change the folder. Use this button to browse for a different folder on your hard disk.
Filter
Use this filter to search for specific files in the list. Simply enter a name/word and the filter will only show files that include these characters in their file name. Delete any input to show all files.
Managing Files And List Entries
![]() Shows MADRIX Record File (*.mrec) from the folder in the list. When activated, the button is green. Disable the option to hide all Record Files.
Shows MADRIX Record File (*.mrec) from the folder in the list. When activated, the button is green. Disable the option to hide all Record Files.
![]() Show DMX Data Files (*.dxd) from the folder in the list. When activated, the button is green. Disable the option to hide all DMX Data Files.
Show DMX Data Files (*.dxd) from the folder in the list. When activated, the button is green. Disable the option to hide all DMX Data Files.
![]() Use this button to refresh the list of records. Please make sure to select your preferred records folder first.
Use this button to refresh the list of records. Please make sure to select your preferred records folder first.
![]() Delete the selected file or files from your hard disk. You can also use the "Delete" key on your keyboard.
Delete the selected file or files from your hard disk. You can also use the "Delete" key on your keyboard.
Columns Of The List
![]()
"File" |
Shows the name of the record and its file type (*.mrec or *.dxd). Double-click on the list entry to change the name of the file. |
"Date - Time" |
Shows the time and date when the record was created. |
"Patch Size" |
Shows the size of the virtual matrix (Patch Size) used for this record in pixels x pixels. (It can be configured in the Matrix Generator or Patch.) |
"Duration" |
Shows the length of the record, i.e. how long it is. The format is HH:MM:SS:FF (Hours:Minutes:Seconds:Frames). |
"KF" |
Stands for Key Frames. MADRIX will automatically optimize the file size of records if recorded frames are identical. Hence, the total number of frames can be different to the number of recorded key frames. For example, a color change (without a fade) might use only two colors. In this case, the record may have 400 frames in total, but just 2 key frames. |
"FPS" |
Stands for Frames Per Second. Shows the number of frames recorded per second of the record file. |
Window Size
In order to increase the size of the Recording dialog window, please drag the bottom border of the window until the best size is reached. In this way you can see more files in the list.
File Information
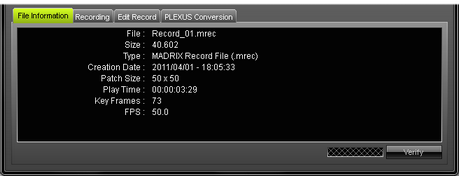
Select the Tab "File Information" to receive detailed information about the files you have created. Please select a file in the list first.
Recording
Select the Tab "Recording" to create a new record.
Preparation
Please make sure to do Step 1), 2), and 3) before recording.
Important Note
Please note: Only the Main Output will be recorded. Make sure that your content is displayed on Preview Window Output before you record.
Options
Please configure the following options before recording.
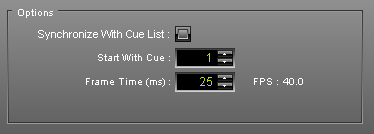
"Synchronize With Cue List" will create a record according to your preprogrammed Cue List. If this option is activated, the Cue List will automatically start to play when the Recording is started (by pressing the button "Start").
"Start With Cue" allows you to specify which Cue List entry should be used first, when you wish to use the function "Synchronize With Cue List".
"Frame Time (ms)" defines the frame rate of the record. Please adjust the setting to the requirements of your LED fixtures! A frame rate (FPS) that is too high might cause visual problems.
Please adjust the setting to the requirements of your LED fixtures and devices!
Please note: A frame rate (FPS) that is too high might cause problems. Those can be visual problems on your LEDs, for example. For the MADRIX PLEXUS a maximum frame rate of 40 FPS is recommended. Otherwise, PLEXUS devices may drop single frames to maintain the timing. PLEXUS devices are likely to drop frames in order to maintain the timing, when all 512 DMX channels of a DMX universe are used. If your DMX universes contain less than 512 channels (324 DMX channels, for example) this behavior is less likely. |
Creating A Record File
Please make sure to configure all available options before recording (see above).
Step 1)
 Begin recording by pressing "Start". MADRIX will start to record the Main Output. Please note: When recording without a Cue List, you can change Storage Places, use the cross-fader, use the Master Fader, etc. in order to customize your record.
Step 2)
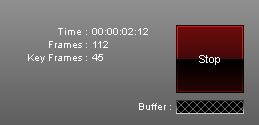 Various information will be displayed.
The Time is displayed in HH:MM:SS:FF (Hours:Minutes:Seconds:Frames).
Step 3)
 Simply press "Stop" to halt the process. Please wait a few seconds to let MADRIX process the data. Afterwards you will need to enter a name for the new record.
Step 4)
Afterwards, you will see your record in the list.
Edit Record
After creating your record, you can edit your record.
First, please select your Record File in the list. Second, change to the tab "Edit Record" in the "Recording" dialog.
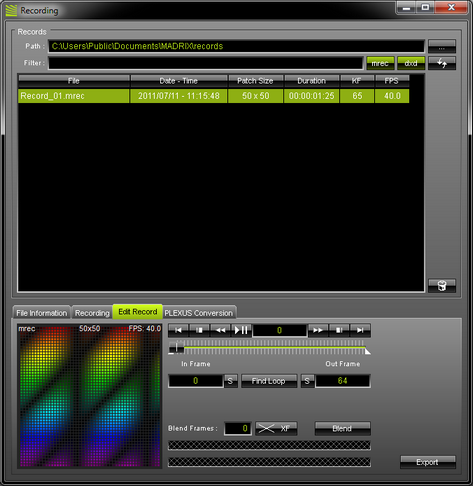
A small preview window is provided in the lower left to inspect the record.
Please note: If you see the message !NO MADRIX KEY!, that means that you are using MADRIX in demo mode. However, this is no problem. Your record will NOT include this text!
Use the provided controls to edit your record. That means you can preview, trim, and loop your record. First, select a list entry. Trim the record by setting up a new In Frame and a new Out Frame.
|
Use the slider to select a specific frame. |
|
This field displays the current frame that is also shown in the small preview window. Enter a number to jump directly to this frame. |
|
Starts or stops the preview playback. |
|
Rewinds or forwards one frame per click. |
|
Skips directly to the In Frame or the Out Frame. |
|
Skips to the beginning or the end of the record. |
|
Enter a number or use the slider to select a specific frame. Then, use the "S" button to set the In Frame (start frame). |
|
Enter a number or use the slider to select a specific frame. Then, use the "S" button to set the Out Frame (end frame). |
|
MADRIX will search the Record File in order to find a segment that is loopable. It will automatically set the In Frame and Out Frame afterwards. Use the button "Export" to export your loop. Before that, you can also insert "Blend Frames". |
|
Insert "Blend Frames" into your record. First, enter the number of frames you wish to use. This defines the length. Second, choose the fade mode (XF: Cross-fade, WF: White-fade, BF: Black-fade, >>more info). Third, press "Blend". Fourth, use PlayPause to preview the edited record. Fifth, use the button "Export" to export your loop. |
|
Exports the edited record. Choose a name in the second step. |
Step 5) Converting Files
Overview
Call up the Recording dialog again. Please go to the menu "Window" -> "Recording" (or "Ctrl+Alt+R").
First, select your MADRIX Record File (*.mrec) in the list. Second, switch to the tab "PLEXUS Conversion".
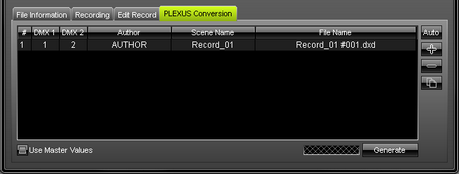
The tab "PLEXUS Conversion" allows you to prepare the conversion. You can edit and configure how a MADRIX Record File (*.mrec) is converted into a DMX Data File (*.dxd).
Preparing The Conversion
Please make sure that your virtual matrix (Patch) is configured correctly before generating DMX Data Files (*.dxd).
Note: The PLEXUS Conversion tab only factors in the settings of the Patch and not the settings of the Device Manager.
If your live output via the Device Manager works and you have changed the assignment of DMX universes, please make sure to adjust the settings in the PLEXUS Conversion tab as well!
![]() Automatically adds entries to the list. The number of entries will automatically calculated according to the number of DMX universes configured in your Patch. The name of your Windows account will automatically be used for the column "Author". The name of the record file will automatically be used for the column "Scene Name". The name of the record file and an additional number will automatically be used for the column "File Name".
Automatically adds entries to the list. The number of entries will automatically calculated according to the number of DMX universes configured in your Patch. The name of your Windows account will automatically be used for the column "Author". The name of the record file will automatically be used for the column "Scene Name". The name of the record file and an additional number will automatically be used for the column "File Name".
![]() Adds a list entry. Do not forget to adjust the entry "DMX 1" and "DMX 2" as well as "Author", "Scene Name", "File Name" for each list entry.
Adds a list entry. Do not forget to adjust the entry "DMX 1" and "DMX 2" as well as "Author", "Scene Name", "File Name" for each list entry.
![]() Removes an entry from the list. Select an entry in the list first. You can also use the "Delete" key on your keyboard.
Removes an entry from the list. Select an entry in the list first. You can also use the "Delete" key on your keyboard.
![]() Duplicates list entries. Select one or several entries in the list first. The File Name will automatically be adjusted.
Duplicates list entries. Select one or several entries in the list first. The File Name will automatically be adjusted.
You may edit the each entry.
"Author", "Scene Name", "File Name" can be changed. They define how the new DMX Data File will be named after the conversion. Select an entry. Double-click on the particular column and enter the values or characters using the keyboard. Use "Enter" to apply your changes. Please make sure that your "File Name" has the ending "*.dxd".
"DMX 1" defines which DMX universe of your virtual matrix (Patch) will be used for the first output port of your PLEXUS. Select an entry. Perform a double-click and simply enter the number of the universe. Use "Enter" to apply the changes. Select "No" if the output port should be deactivated.
"DMX 2" defines which DMX universe of your virtual matrix (Patch) will be used for the second output port of your PLEXUS. Select an entry. Perform a double-click and simply enter the number of the universe. Use "Enter" to apply the changes. Select "No" if the output port should be deactivated.
"Use Master Values" can be activated if you have used the Master Fader during recording. Then, your converted record will include the brightness levels set by the Master Fader during the recording. Leave the option unchanged if your did not use the Master Fader during recording.
Please note: If your are using more than 2 DMX universes and more than 1 MADRIX PLEXUS at the same time, please make sure to have a list entry for each PLEXUS (You will need 1 list entry for each PLEXUS of your installation).
Example:
We have created a Patch for 6 DMX universes and we are using 3 MADRIX PLEXUS. PLEXUS number 1 should play DMX universe 1 and 2, PLEXUS number 2 should play DMX universe 3 and 4, PLEXUS number 3 should play DMX universe 5 and 6. Then, we need to create 3 list entries or use the "Auto" button.
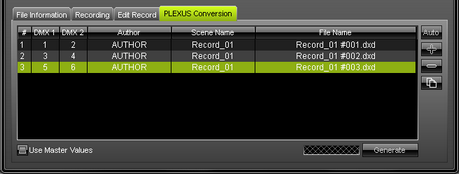
(We will also have to generate 3 DMX Data Files (*.dxd) in the next step.)
Generating DMX Data Files (*.dxd)
Please make sure that your virtual matrix (Patch) is configured correctly before generating DMX Data Files (*.dxd).
1. Select your MADRIX Record File (*.mrec) in the list.
2. Make sure to have configured your list entry or several list entries in the tab "PLEXUS Conversion".
3. Press the button "Generate" to convert the MADRIX Record File (*.mrec) into one or multiple DMX Data Files (*.dxd).
4. The newly create DMX Data Files (*.dxd) will be added to the list above.
Please note:
| • | You can create several, different DMX Data Files (*.dxd) from one MADRIX Record File (*.mrec). |
| • | Your MADRIX Record File (*.mrec) will not be deleted when a new DMX Data Files (*.dxd) is generated. |
| • | When using multiple devices at the same time in one installation, you will need multiple DMX Data Files (*.dxd). When using the button "Generate", all list entries in the tab "PLEXUS Conversion" will be used to automatically create multiple DMX Data Files. |
Warnings:
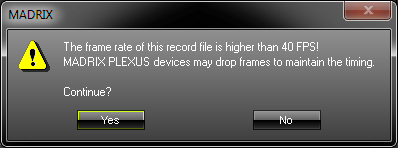
When generating *.dxd files, you may encounter two messages.
1) As described above, you need to configure your virtual matrix (Patch Size) correctly, before generating DMX Data Files. This message box is a reminder to check if your Patch settings are configured correctly. Press "Yes" if you would like to proceed with your current settings. Press "No" if you would like to change your settings.

2) As described above, the maximum recommended frame rate for the MADRIX PLEXUS is 40 FPS (a frame time of 25ms). This message box is a reminder to check if your frame rate settings are configured correctly. Press "Yes" if you would like to continue with your current settings. Press "No" if you would like to change your settings.
Step 6) Creating PLEXUS Configurations (Show Files)
Overview
To call up the PLEXUS Configuration dialog, please go to the menu "Tools" -> "PLEXUS Configuration " (or "Ctrl+Alt+P").
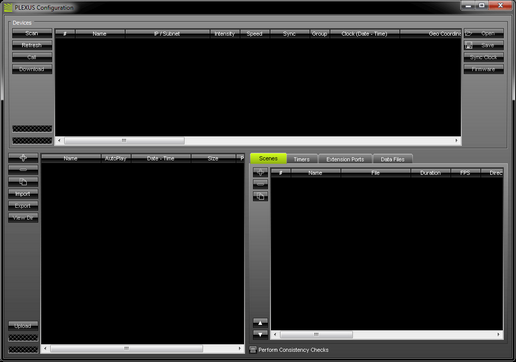
It is highly recommended to maximize the size of the PLEXUS Configuration dialog.
The upper section of the PLEXUS Configuration dialog is called "Devices". It can be used to manage your PLEXUS devices (see below).
The lower section of the PLEXUS Configuration dialog has two parts. The left part is used to manage your PLEXUS Configurations (create a new Configuration, import/export a Configuration, etc). The right part is used to edit each PLEXUS Configuration individually (add Scenes, add Timers etc).
Basically, when you create and configure a MADRIX PLEXUS Configuration, you create a Show for the PLEXUS Stand-Alone Mode.
How To Create And Manage PLEXUS Configurations
In order to manage your PLEXUS Configurations, please use the lower left part of the PLEXUS Configuration dialog.
Please note: A MADRIX PLEXUS Configuration is not one single file. A Configuration is a folder containing several files.
![]() Creates a new PLEXUS Configuration. Enter a name for the new PLEXUS Configuration in the second step.
Creates a new PLEXUS Configuration. Enter a name for the new PLEXUS Configuration in the second step.
![]() Removes an existing PLEXUS Configuration. Select the particular PLEXUS Configuration first.
Removes an existing PLEXUS Configuration. Select the particular PLEXUS Configuration first.
![]() Duplicates an existing PLEXUS Configuration. Select one PLEXUS Configuration first. Enter a new name for the copy in the second step.
Duplicates an existing PLEXUS Configuration. Select one PLEXUS Configuration first. Enter a new name for the copy in the second step.
![]() Imports a PLEXUS Configuration. Press the button and select the directory or the source on which the Configuration can be found. Importing a PLEXUS Configuration is useful when receiving Configurations from someone else.
Imports a PLEXUS Configuration. Press the button and select the directory or the source on which the Configuration can be found. Importing a PLEXUS Configuration is useful when receiving Configurations from someone else.
![]() Exports a PLEXUS Configuration. Select the particular PLEXUS Configuration first. In the second step, please select the directory or the source on which the PLEXUS Configuration should be saved. Exporting a Configuration is useful for exchanging PLEXUS Configurations with each other (on USB sticks, for example) and for uploading a Stand-Alone Show directly onto an SD card.
Exports a PLEXUS Configuration. Select the particular PLEXUS Configuration first. In the second step, please select the directory or the source on which the PLEXUS Configuration should be saved. Exporting a Configuration is useful for exchanging PLEXUS Configurations with each other (on USB sticks, for example) and for uploading a Stand-Alone Show directly onto an SD card.
![]() Shows the content of a PLEXUS Configuration (View Directory). Remember that a MADRIX PLEXUS Configuration is not one, single file, but a folder containing several files. You will hence view the whole directory that includes all files of the PLEXUS Configuration.
Shows the content of a PLEXUS Configuration (View Directory). Remember that a MADRIX PLEXUS Configuration is not one, single file, but a folder containing several files. You will hence view the whole directory that includes all files of the PLEXUS Configuration.
![]() Uploads a PLEXUS Configuration onto an SD card that is inserted into a MADRIX PLEXUS. Learn more below.
Uploads a PLEXUS Configuration onto an SD card that is inserted into a MADRIX PLEXUS. Learn more below.
 Please configure the column "AutoPlay" for each of your PLEXUS Configurations. This setting specifies what to do when a new Stand-Alone Show is uploaded to a MADRIX PLEXUS or when a newly recorded SD card is inserted into a MADRIX PLEXUS. Select "No" and nothing will be played automatically. Select "Last" and the PLEXUS will continue where it last stopped. Or you can select a specific Scene after you have created Scenes (Number "1", "2", "3", etc). Perform a double-click to change the entry.
![]() You may also change the name of your PLEXUS Configurations after you have created them. Simply perform a double-click on the column "Name" and enter the new description via the keyboard. Press "Enter" to apply the changes.
You may also change the name of your PLEXUS Configurations after you have created them. Simply perform a double-click on the column "Name" and enter the new description via the keyboard. Press "Enter" to apply the changes.
"Power-Up Delay" specifies a timeout in seconds for PLEXUS devices at startup for improved network behavior. Playback is delayed to ensure that all Slave devices are ready in the network after startup.
How To Edit PLEXUS Configurations
In order to edit your PLEXUS Configurations individually, use the lower right part of the PLEXUS Configuration dialog.
First, create a new PLEXUS Configuration as described above.
![]() MADRIX can automatically control if your editing is logical and consistent within one PLEXUS Configuration. Enable this function in order to receive warnings if your editing may be false. Disable this function to hide such messages.
MADRIX can automatically control if your editing is logical and consistent within one PLEXUS Configuration. Enable this function in order to receive warnings if your editing may be false. Disable this function to hide such messages.
 You will automatically receive small warning symbols if your editing is inconsistent and illogical. MADRIX then indicates that you have created conflicts. You will receive these warnings even if you disable "Perform Consistency Checks". Click on a warning to display the message behind it.
![]() Swaps places of list entries. Quickly change the order of Scenes and Timers using the up or down button. Select an entry in the list, press up or down and the entry will move one place up or down. The neighboring entry will automatically move one place down or up, respectively.
Swaps places of list entries. Quickly change the order of Scenes and Timers using the up or down button. Select an entry in the list, press up or down and the entry will move one place up or down. The neighboring entry will automatically move one place down or up, respectively.
Scenes are based on a DMX Data Files (*.dxd). Scenes are smaller parts of a whole show. All Scenes together create your Stand-Alone Show.
First, please select one PLEXUS Configuration you wish to edit.
![]() Creates a new Scene.
Creates a new Scene.
When creating a new Scene, a new window will open and you will be asked to select a DMX Data File (*.dxd).
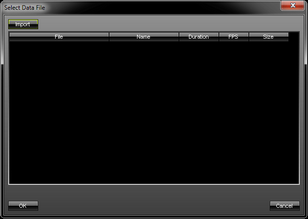 Select a file from the list of Data Files. Or you can simply "Import" a *.dxd file from your hard disk. If the list is empty, please import a file.
![]() Removes a Scene. Select the particular Scene first.
Removes a Scene. Select the particular Scene first.
![]() Duplicates a Scene. Select the particular Scene first. Enter a new name for the copied Scene in the second step.
Duplicates a Scene. Select the particular Scene first. Enter a new name for the copied Scene in the second step.
In addition, please edit the following columns according to your requirements.
(Perform a double-click to change their values. Press "Enter" to apply your changes. Press "Escape" to cancel.)
"#'" |
defines the number of the Scene. Simply enter a number. |
"Name" |
defines the description of the Scene. Simply enter a name. |
"File" |
defines the source of the Scene. Simply select another source (using a double-click), if you wish to change it. |
"Duration" |
shows how long the Scene is playing. This value cannot be changed. |
"FPS" |
shows the frames per second of the record file. This value cannot be changed. |
"Direction" |
defines which way the Scene is played. Applicable values are: "Forward", "Ping Pong", "Backward". "Ping Pong" plays the Scene forwards first and automatically plays it also backwards afterwards. |
"Repeat" |
defines how often the Scene is repeated. Simply enter a number. A value of 0 will be shown in the list as "Endless", that means it will be repeated endlessly. |
"Soft Loop" |
creates an automatic loop by the software. First, enter a number of frames. MADRIX will add these frames to the end of the Scene and therefore loops towards the first frame of your Scene. A cross-fade is created. For example, if your record was set to a frame rate of 33 FPS and you enter 66 here, two seconds will be used for a loop towards the first frame. |
"Follow" |
defines which Scene will be played after the currently selected Scene. Applicable values are: "No", "Next", and a specific Scene ("1", "2", "3", etc). |
"Intensity" |
defines the brightness for the Scene in percent. Applicable values are: 0 - 100. |
"Speed" |
defines the tempo in percent. Applicable values are: 1 - 1000. |
"Port 1" |
defines if Port 1 of the extension port will be triggered when the Scene begins to play. Applicable values are: "NO", "0" (OFF), or "1" (ON). |
"Port 2" |
defines if Port 2 of the extension port will be triggered when the Scene begins to play. Applicable values are: "NO", "0" (OFF), or "1" (ON). |
"Port 3" |
defines if Port 3 of the extension port will be triggered when the Scene begins to play. Applicable values are: "NO", "0" (OFF), or "1" (ON). |
"Port 4" |
defines if Port 4 of the extension port will be triggered when the Scene begins to play. Applicable values are: "NO", "0" (OFF), or "1" (ON). |
"Port 5" |
defines if Port 5 of the extension port will be triggered when the Scene begins to play. Applicable values are: "NO", "0" (OFF), or "1" (ON). |
"Port 6" |
defines if Port 6 of the extension port will be triggered when the Scene begins to play. Applicable values are: "NO", "0" (OFF), or "1" (ON). |
"Port 7" |
defines if Port 7 of the extension port will be triggered when the Scene begins to play. Applicable values are: "NO", "0" (OFF), or "1" (ON). |
"Port 8" |
defines if Port 8 of the extension port will be triggered when the Scene begins to play. Applicable values are: "NO", "0" (OFF), or "1" (ON). |
"Port 9" |
defines if Port 9 of the extension port will be triggered when the Scene begins to play. Applicable values are: "NO", "0" (OFF), or "1" (ON). |
"Port 10" |
defines if Port 10 of the extension port will be triggered when the Scene begins to play. Applicable values are: "NO", "0" (OFF), or "1" (ON). |
Timers:
The tab "Timers" allows you to add specific events to your Stand-Alone Show.
First, please select one PLEXUS Configuration you wish to edit.
![]() Creates a new Timer.
Creates a new Timer.
![]() Removes a Timer. Select the particular Timer first.
Removes a Timer. Select the particular Timer first.
![]() Duplicates a Timer. Select the particular list entry first.
Duplicates a Timer. Select the particular list entry first.
A maximum of 1000 Timers can be configured per PLEXUS Configuration to ensure performance.
In addition, please edit the following columns according to your requirements.
(Perform a double-click to change their values. Press "Enter" to apply your changes. Press "Escape" to cancel.)
"Action" |
defines the type of Timer. Applicable values are: "Scene", "Intensity", "Speed, "Next, "Previous", "Stop", "Play", "Pause", "Port 1", "Port 2", "Port 3", "Port 4", "Port 5", "Port 6", "Port 7", "Port 8", "Port 9", "Port 10". "Scene" will trigger a specific Scene to be played. "Intensity" will trigger the brightness of the output to change. "Speed" will trigger a change of tempo. "Next" or "Previous" skip to the last or next entry. "Stop", "Play", and "Pause" end, start, or halt the playback. "Port" will trigger the specific Port of the extension port. |
"Value" |
is a field that depends on the "Action". Enter a number to specify a certain "Scene". Enter a value from 0 to 100 for "Intensity". Enter a value from 1 to 1000 for "Speed". Select 0 (Off) or 1 (On) for "Port". |
"Type" |
defines the how often the "Action" is triggered. Applicable values are: "Once", "Cycle", "Daily", "Weekly", "Monthly", "Yearly". "Once" will trigger the event only one time. "Cycle" will trigger the event according to the "Cycle Interval", for example every 10 minutes. |
"Time Type" |
includes various variables: 'Time', 'Sunrise', 'After Sunrise', 'Before Sunrise', 'Sunset', 'After Sunset', 'Before Sunset'. Choose 'Time' to exactly define the time and date under 'Start'. Choose 'Sunrise' or 'Sunset' to begin at sunrise or sunset. Those times will be automatically calculated according to the Geo Coordinates. Use 'Start' to define the start date. Choose 'After Sunrise', 'Before Sunrise', 'After Sunset', or 'Before Sunset' to use the automatically calculated sunrise and sunset times together with an offset (in hours:minutes:seconds). The offset can be set in the 'Start' column, value 'Time'. For example, you may trigger the Timer 2 hours before sunset on May 12, 2012. |
"Start" |
defines the date and time, that means when the event will be triggered. |
"Valid From" |
defines together with "Valid Thru" a time interval, in which the event will be triggered. "Valid From" sets the starting point. |
"Valid Thru" |
defines together with "Valid From" a time interval, in which the event will be triggered. "Valid Thru" sets the end point. |
"Cycle Interval" |
defines a time period for the "Type" "Cycle" in HH:MM:SS (Hours:Minutes:Seconds). |
Extension Ports:
The tab "Extension Ports" allows you to configure the individual pins of the extension port.
First, please select one PLEXUS Configuration you wish to edit.
![]() Resets all settings of the currently selected Ports to their default value. This will discard any changes you have made.
Resets all settings of the currently selected Ports to their default value. This will discard any changes you have made.
Please edit the following columns according to your requirements.
(Perform a double-click to change their values. Press "Enter" to apply your changes. Press "Escape" to cancel.)
"Type" |
defines the character for each Port. On the one hand, "Ports 1 - 6" can be either "Digital Input", "Digital Output" or "Analog Input". On the other hand, "Ports 7 - 10" are only digital ports and can be switched from "Digital Input" to "Digital Output" and vice versa. |
"Invert" |
defines if the status of the Port (1 = On, 0 = Off) will be reversed to 0 = On, 1 = Off. |
"Action" |
defines the type of event that will be triggered when a Port is triggered. Applicable values are: "No", "Scene", "Intensity", "Speed", "Next", "Previous", "Stop", "Play", "Pause", "PlayPause", "Freeze". "Scene" will trigger a Scene. "Master" adjusts the Master Fader. "Speed" will trigger a change of tempo. "Next" or "Previous" skip to the last or next entry. "Stop", "Play", and "Pause" end, start, or halt the playback. "PlayPause" will start or halt the playback. "Freeze" will halt the output. |
"Value" |
defines the "Action" in more detail. Enter a number to specify a certain Scene. Enter a value from 0 to 100 for "Master". Enter a value from 1 to 1000 for "Speed". |
"Threshold High" |
can be entered when using "Analog Input". Specify the limit an analog input must be moved up to before the event is triggered. |
"Threshold Low" |
can be entered when using "Analog Input". Specify the limit an analog input must be moved back before the event is triggered. |
The tab "Data Files" shows all DMX Data Files (*.dxd) that are used in the selected PLEXUS Configuration. It represents a database of your DMX Data Files within one PLEXUS Configuration. (Remember that you need DMX Data Files (*.dxd) in order to create Scenes.)
First, please select one PLEXUS Configuration you wish to edit.
![]() Adds a new DMX Data File (*.dxd).
Adds a new DMX Data File (*.dxd).
![]() Removes an existing DMX Data File from the PLEXUS Configuration.
Removes an existing DMX Data File from the PLEXUS Configuration.
"#" |
shows the indexing number of the Data File. This value cannot be changed. |
"In Use" |
shows how often the Data File is used in your PLEXUS Configuration by Scenes. This value cannot be changed. |
"File" |
shows the exact name of the record file. This value cannot be changed. |
"Name" |
shows the general label of the file. This value cannot be changed. |
"Duration" |
shows the length of the record. This value cannot be changed. |
"FPS" |
shows the frames per second of the record file. This value cannot be changed. |
"Size" |
shows the file size in Bytes. This value cannot be changed. |
Step 7) Uploading A Stand-Alone Show Onto The SD Card
(Press "Scan" to find your connected PLEXUS. Learn more on how to manage your PLEXUS devices below.)
You can either
A) directly save your Stand-Alone Show on an SD card
![]() Please make sure to use an empty, formatted SD card! First, select your Configuration. Second, press "Export". In the third step, choose your target source.
Please make sure to use an empty, formatted SD card! First, select your Configuration. Second, press "Export". In the third step, choose your target source.
Or
B) you can save your Stand-Alone Show on the SD card that is inserted into your MADRIX PLEXUS.
Your PLEXUS must be connected via USB or via Ethernet (network).
![]() First, select your MADRIX PLEXUS. Second, select your PLEXUS Configuration. Third, press "Upload" and the PLEXUS Show will be saved on the SD card of your device.
First, select your MADRIX PLEXUS. Second, select your PLEXUS Configuration. Third, press "Upload" and the PLEXUS Show will be saved on the SD card of your device.
Step 8) Activating Stand-Alone Mode
Last but not least, you will have to activate Stand-Alone Mode on your MADRIX PLEXUS.
A) Activate Stand-Alone Mode manually on the device using the menu (LCD graphics display) and the 5 control buttons (menu Playback).
B) "Call" your device and activate Stand-Alone Mode remotely (menu Playback). Learn more below.
C) Use the "AutoPlay" option to automatically start playing a Scene.
Managing Your MADRIX PLEXUS Devices
To call up the PLEXUS Configuration dialog, please go to the menu "Tools" -> "PLEXUS Configuration " (or "Ctrl+Alt+P").
It is highly recommended to maximize the size of the PLEXUS Configuration dialog.

The lower section of the PLEXUS Configuration dialog consists of two parts for the Stand-Alone Mode. The upper section of the PLEXUS Configuration dialog is labeled "Devices". The upper section can be used to manage your PLEXUS devices further.
![]() Scans the USB ports of your computer and the network (Ethernet) for connected PLEXUS devices. If devices are found, they will be shown in the list.
Scans the USB ports of your computer and the network (Ethernet) for connected PLEXUS devices. If devices are found, they will be shown in the list.
![]() Re-scans already connected devices and brings the information in the list up to date.
Re-scans already connected devices and brings the information in the list up to date.
![]() Enables remote access to your device. The PLEXUS needs to be connected via Ethernet (network connection required). First, connect your computer and the PLEXUS to one and the same network. Second, select your PLEXUS in the list. Third, press "Call". A web browser opens automatically.
Enables remote access to your device. The PLEXUS needs to be connected via Ethernet (network connection required). First, connect your computer and the PLEXUS to one and the same network. Second, select your PLEXUS in the list. Third, press "Call". A web browser opens automatically.
![]() Downloads a saved PLEXUS Configuration directly from a connected PLEXUS to your harddisk. You can use this feature to create backups, for example.
Downloads a saved PLEXUS Configuration directly from a connected PLEXUS to your harddisk. You can use this feature to create backups, for example.
![]() Imports the MADRIX PLEXUS Device Settings from an external file (*.mpds). Use this option to easily restore all device settings from a file (as described in the table below).
Imports the MADRIX PLEXUS Device Settings from an external file (*.mpds). Use this option to easily restore all device settings from a file (as described in the table below).
![]() Exports the MADRIX PLEXUS Device Settings to an external file (*.mpds). Use this option to easily store all device settings in a file (as described in the table below).
Exports the MADRIX PLEXUS Device Settings to an external file (*.mpds). Use this option to easily store all device settings in a file (as described in the table below).
![]() Synchronizes the internal clock of the PLEXUS with the clock of your computer. The computer clock will define the time that is used. First, select your PLEXUS devices in the list. Then, press "Sync Time".
Synchronizes the internal clock of the PLEXUS with the clock of your computer. The computer clock will define the time that is used. First, select your PLEXUS devices in the list. Then, press "Sync Time".
![]() Updates the firmware of your MADRIX PLEXUS (USB connection required). Please read the MADRIX PLEXUS User Manual for more information!
Updates the firmware of your MADRIX PLEXUS (USB connection required). Please read the MADRIX PLEXUS User Manual for more information!
In addition, please edit the following columns according to your requirements.
Each column represents a certain setting of the device, which can often be adjusted in the various menus on the device itself.
For more information about each PLEXUS menu, please see the MADRIX PLEXUS User Manual.
(Perform a double-click to change their values. Press "Enter" to apply your changes. Press "Escape" to cancel.)
"Name" |
defines the name (label) of the device. |
"IP/Subnet" |
defines the network settings regarding IP address, Subnet mask, and Standard Gateway for the device. |
"Intensity" |
defines the main brightness of the output your device in percent. Applicable values are: 0 - 100%. The default value is 100%. |
"Speed" |
defines the tempo of the output in percent. Applicable values are: 1 - 1000%. The default value is 100%. |
"Sync" |
defines if your interfaces, who are in the same Group, use the implemented Master-Slave Synchronization. |
"Group" |
assigns your device to a certain group. In this way you may set up several different Master-Slave clusters (in the same network). Make sure that Master or Slave devices that should communicate with each other are assigned to the same group! |
"Clock |
defines the time and date of the device. |
"Geo Coordinates" |
defines the geographical location of the device, incl. the Time Zone. This information is required to calculate the corresponding sunrise and sunset times. |
"SD Card" |
cannot be edited. The 'used space'/'total available space' of your SD card is shown. The values are displayed in GB. |
"Remote Control" |
defines the source for remote control. You can choose to receive remote commands via USB, via Art-Net, or to turn remote control off (Disabled). The PLEXUS supports Remote Control in Live and Stand-Alone Mode. |
"Receive Universe / Port" |
defines for Art-Net which universe or for DMX which XLR port is used to receive the remote commands. |
"Remote Start Channel" |
defines a DMX start channel, which specifies the range of DMX channels used for the set of remote functions. 20 DMX channels are used by the remote functions. The default value is 1. |
"Remote Thru" |
defines if DMX-Thru is enabled (DMX -> Art-Net) , when Remote Control is activated over DMX. Incoming DMX data would then additionally be sent through to Art-Net. |
"Timers" |
defines if Timers are activated or deactivated for the device. |
"Ext. Port" |
defines if the Extension Port and its Ports are activated or deactivated for the device. |
"Art-Net -> DMX 1" |
defines which incoming Art-Net universe is assigned to the first XLR port for output (DMX 1). |
"Art-Net -> DMX 2" |
defines which incoming Art-Net universe is assigned to the second XLR port for output (DMX 2). |
"DMX 1 -> Art-Net" |
defines which Art-Net universe is assigned to the first XLR port for input (DMX 1). |
"DMX 2 -> Art-Net" |
defines which Art-Net universe is assigned to the second XLR port for input (DMX 2). |
"Serial Number" |
cannot be edited. It shows the serial number of the device. |
"Firmware" |
cannot be edited. It shows the current firmware version of the device. |
"Brightness" |
defines how bright the display is, when it is used. Applicable values are: 10 - 100%. The default value is 100%. |
"Brightness Dimmed" |
defines how bright the display is, when it gets dimmed. Applicable values are: 0 - 100%. The default value is 10%. |
"Dim After" |
defines after how much time the display will be dimmed. The default value is 30s. |
"Contrast" |
defines the contrast of the display and how well it can be read. Applicable values are: 0 - 100%. The default value is 50%. |
"Invert" |
defines if the colors of the display are inverted from white text and black background ('No') to black text and white background ('Yes'). |
"Rotation" |
defines if the display of the device is rotated or not. Choose between '0°' (no rotation) and '180°' (rotated display). |
"Language" |
defines the language of the PLEXUS menus. Choose from 'English', 'Deutsch' (German), or Español (Spanish). |
"Intensity Group 1 - 8" |
defines the brightness for each Intensity Group. Applicable values are: 0 - 100%. The default value is 100%. |
'Full Frames DMX 1' |
defines if the device should always send full frames for the first XLR output. |
'Full Frames DMX 2' |
defines if the device should always send full frames for the second XLR output. |
'Full Frames Art-Net 1' |
defines if the device should always send full frames for Art-Net and the first Art-Net universe. |
'Full Frames Art-Net 2' |
defines if the device should always send full frames for Art-Net and the second Art-Net universe. |
'MAC Address' |
cannot be edited. It shows the MAC address of the device. |
| • | You can create a Stand-Alone Show without having connected the PLEXUS to the computer. |
| • | In order to upload a Stand-Alone Show onto an SD card, either the SD card or the device with the SD card must be connected. You can upload a show onto the SD card of a device via USB or via Ethernet (network). |
| • | You can export a Stand-Alone Show directly to the SD card using the "Export" button in the "PLEXUS Configuration" dialog. Please make sure to use an empty, formatted SD card! |
More Information
A complete guide about the PLEXUS interface can be found in the MADRIX PLEXUS Quick Start Guide and in the MADRIX PLEXUS User Manual.
