Introduction
After starting up MADRIX, it is necessary to configure your light matrix.
You can either use the "Matrix Generator" for this task or the "Patch". Please see the chapter Matrix Generator for simple tasks. The Patch described in this chapter offers many more options and allows to configure your virtual matrix in great detail. The Patch allows you to configure DMX and DVI fixtures freely and individually.
If you are working with DMX, please read this chapter. If you are working with DVI fixtures, please read this chapter and the chapter DVI Patch.
Patch and DVI Patch are one and the same tool in MADRIX. The term DVI Patch specifically refers to using DVI fixtures.
To open the Patch, go to the menu and click "Preferences" -> "Patch" or simply press the key "F3".
The Patch dialog is a separate window. Hence, you will be able to control MADRIX while working with the Patch.
Overview
Layout
The patch is divided into different main sections. In addition to the menu and the toolbar, you will find three large columns.

The first column on the left side is a list, which contains the different fixtures and their assigned start channel. A drop box above this list allows you to select the DMX universe or the DVI category. If the DVI category is displayed, the DVI Mapping status is shown.
The second column represents a graphical version of your virtual matrix.
The third column includes the information regarding the "Fixture Settings", "DVI Mapping", and the "Fixture Description".
You can rearrange the width of each column by dragging the column edges. Moreover, you can hide the columns if you drag them to the border of the window. They will snap back into view if you drag the border back far enough.
If you wish to reset the layout of the Patch dialog, please navigate to the menu "View" -> "Reset Layout".
Visualization

The workspace is represented with the help of a dark grey grid. The virtual matrix or patch is represented with the help of a light grey grid.

DVI fixtures are displayed in dark yellow. Selected DVI fixtures are displayed in yellow. DMX fixtures are displayed in dark green. Selected DMX fixtures are displayed in green.
The Patch Menu
You can find the menu in the upper section of the Patch including File, Edit, Select, Preferences, and View.
File Menu

The File Menu includes "New" (or "Ctrl+N"), "Open Patch..." (or "Ctrl+O"), "Save Patch" (or "Ctrl+S"), "Save Patch As..." (or "Ctrl+Alt+S"), or "Close" (or "F3"). These functions are self-explanatory.
Additionally, you can export your current Patch to the Patch file format of MADRIX 3. Simply choose "Export Patch for MADRIX 3..." (or "Ctrl+Alt+E"), enter a File name, and press "Save".
Edit Menu

Use "Undo" (or "Ctrl+Z") in order to restore the previous state of the Patch. "Redo" (or "Ctrl+Y") can be used to recreate the state after having performed an undo.
The menu entry "Patch Size" will call up a small dialog to change the major settings of your virtual matrix (size and color depth).
"Add Fixtures..." (or "Ins") will call up a dialog similar to the Matrix Generator. Here you can set up the fixture or set of fixtures you want to add to your virtual matrix. Please always remember that there is a specific function called "Allow Overlapping" in the preferences menu. If overlapping is allowed, fixtures will be placed on top of existing fixtures in the Patch. If it is deactivated, you cannot place any fixture to a position that is occupied by another fixture in the Patch. Likewise, you may simply "Delete Selected Fixtures" (or "Del").
"Reset Selected DVI Maps" is only relevant when working with DVI fixtures. Please read the chapter DVI Patch for more information.
"Rotate Selection by 90°" (or "Page Down"), "Rotate Selection by 180°" and "Rotate Selection by 270°" (or "Page Up") can be used to quickly change the rotation of a single fixture or even multiple fixtures. If you select multiple fixtures and use these functions, the entire block of fixtures will be rotated. They will be literally rotated using the central point of all fixtures. Hence, the position of the fixtures change automatically. In contrast, if you select several fixtures and adjust the "Rotation" in the "Fixture Settings" in the third column of the Patch dialog, each fixture will be rotated individually. Their positions will not change.
Select Menu

"Select All" (or "Ctrl+A") can be used to select every single fixture in the Patch. Simultaneously, the fixtures will be highlighted and selected in the left column, which is the list of fixtures.
Use "Deselect All" (or "Ctrl+D") to drop your current selection.
"Invert Selection" (or "Ctrl+I") will select every fixture except the ones you have currently selected.
Preferences Menu

"Highlight Selected Fixtures" will make corresponding fixtures flash for a better identification. This makes it easier to see them on stage.
"Allow Overlapping" allows fixtures as well as DVI Maps to be arranged on top of each other in the virtual matrix. If overlapping is allowed, fixtures or DVI Maps will be placed on top of existing fixtures or DVI Maps in the Patch. If it is deactivated, you cannot place any fixture or DVI Map to a position that is occupied by another fixture or DVI Map in the Patch.
"Link DVI Maps And Fixtures" (or "Ctrl+L") is only relevant for the DVI Patch. It links DVI fixtures and their corresponding DVI Maps together when applying a transformation (position, rotation, or flipping).
"Copy DVI Maps With Fixtures" is only relevant for the DVI Patch. It allows you to copy corresponding DVI Maps along with their DVI fixtures without resetting the settings of the DVI Maps.
"Auto Address Copied DMX Fixtures" enables auto addressing for DMX fixtures only. Auto addressing is explained below.
"Options..." (or "Ctrl+Alt+O") will call up the options dialog of the Patch.
View Menu

You can show or hide the various elements of the toolbar. The "File Toolbar" refers to options regarding the Patch files. The "Edit Toolbar" refers to options regarding working with the Patch itself. The "Select Toolbar" includes options to select fixtures. The "Preferences Toolbar" includes options for various settings. The "View Toolbar" includes options referring to the layout of the Patch.
The next features will influence the appearance of the second column, the graphical patch itself:
"Zoom In" (or "Ctrl+Plus") or "Zoom Out" (or "Ctrl+Minus") will determine the level of detail. Zoom in to see single fixtures, their assigned universe, channel, and rotation.
The option "Focus All" (or "Ctrl+0") will display all fixtures (and their DVI Maps) you have patched in their full size to fit the width of the column. In contrast, "Focus Selection" (or "Ctrl+F") will zoom in to the highest level containing the selected fixtures (and their DVI Maps) in order to have a detailed view of it.
"DVI Map Mode" is only relevant when working with DVI fixtures. Please read the chapter DVI Patch for more information.
If you wish to reset the layout of the Patch dialog to its original settings, use the option "Reset Layout".
The Toolbar
The toolbar provides shortcuts for the most convenient tasks and includes the majority of options, which are also included in the menus.

Working With The Patch
Navigation
Press Space and use a left-click in order to drag the graphical patch.
Or you can use the scroll bars to navigate in detailed view.
Zooming
In addition, to the functions you can find in the menu (with their keyboard shortcuts), you can use the mouse wheel to zoom in and out. Please note that the description text and the icons on the fixtures do not scale, that means that they will only be visible in high zoom levels.
Selecting Fixtures
You can select fixtures in the list to the left and they will be automatically selected in the graphical patch. This also works when you select several fixtures in the list using the "Shift" or "Ctrl" button.
The graphical Patch itself offers various other possibilities to select fixtures:
Simply move your mouse, "left-click" a single fixture, and you will have selected this fixture. If you want to deselect a single fixture, hold "Ctrl" while clicking it again.
If you want to select several fixtures, simply hold the "Ctrl" button while using a "left mouse-click".
There is also a selection box to select multiple fixtures. To use the selection box hold "Shift" first. Then, hold your left mouse button and drag your mouse. A selection mask will become visible. It is displayed with the help of a dotted line. Additionally, hold the "Ctrl" button and you will be able to select different areas of the patch which will be added to your selection.
Additionally, hold the "Shift" button, "left-click" the first fixture, then "left-click" the last fixture, and applying a rectangular selection mode, every single fixture between the first and the last fixture will be selected. Hold the "Ctrl" and the "Shift" button at the same time and you can select different fixtures each time, while the previously selected fixtures remain selected.
Use "Ctrl+A" to select every single fixture in the Patch (select all). Simultaneously, the fixtures will be highlighted and selected in the left column. Use "Ctrl+D" to drop your current selection (deselect all). "Ctrl+I" will select every fixture except the ones you have currently selected (invert selection). These options are also available in the menu and the toolbar.
Interaction
You can apply drag & drop to a single fixture. Simply select it and hold the mouse button. Then, move your cursor. Your selection will stand out from the rest of the patch. Drop it on the new position and it will automatically snap to this position according to the grid.
This also works with multiple fixtures.
Use drag & drop together with the "Ctrl" button to copy fixtures and the DMX universe and DMX channel will be automatically adjusted if this option is activated. For more details, please see below (Copying Fixtures).
Select one or several fixtures and use the arrow keys on your keyboard to move them to a different position.
If you select multiple fixtures and use "Page Up" or "Page Down" on your keyboard, the entire block of fixtures will be rotated. They will be literally rotated using the central point of all fixtures. Hence, the position will be changed automatically.
In contrast, if you select several fixtures and adjust the "Rotation" in the "Fixture settings", each fixture will be rotated individually. Their positions will not change.
Undo And Redo
Use "Undo" (or "Ctrl+Z") in order to restore the previous state of the Patch. "Redo" (or "Ctrl+Y") can be used to recreate the state after having performed an undo.
By default, the Patch allows 500 steps to be reversed. You can change the so-called "History Size" in the Options. Go to the menu "Preferences" -> "Options" or press "Ctrl+Alt+O".

Using The Workspace
The workspace allows you to freely work with fixtures in the Patch. It is shown via a dark grey grid. By default, the size is set to 512x512 pixels.
You can change the size of your workspace in the Options. Go to the menu "Preferences" -> "Options" or press "Ctrl+Alt+O".
Changing The Size Of The Virtual Matrix
The virtual matrix defines the actual Patch area. It represents your LED fixtures and therefore the area on which the MADRIX effects are rendered and displayed.
Go to the menu "Edit" -> "Patch Size" to change the main settings of your virtual matrix.
 "Dimension X" determines the number of pixels in x. "Dimension Y" sets the number of pixels in y. "Color Depth" represents the number of colors your LED fixtures support. A color depth of 3 resembles RGB mode, while a value of 4 represents RGBW mode.
Please remember to change the Color Depth if you added 4 color LED fixtures.
Adding New Fixtures
If you go to the menu "Edit" -> "Add Fixtures..." a dialog comparable to the Matrix Generator will open. Or, you could simply press "Ins" on your keyboard. According to the settings, one or more fixtures will be added to the patch at the specified position.
Please note: You can add fixtures from different manufacturers and you can also add fixtures that are of different types, i.e. DMX or DVI. In this way, you can create your own individual Patch according to your requirements.

Press "Default" if you wish to reset this window to its original settings.
Please pay attention to "Start Position X" and "Start Position Y" as those values define where exactly the fixture or fixtures will be added to the workspace. If a fixture is already patched to this area, you will get a notification that the fixture positions overlap. Please choose a different start position then or activate "Overlap" if you really want the fixtures to overlap.
![]() "Merge Fixtures" becomes available when using the protocol "DVI". Deactivate this option if you wish to patch DVI fixtures individually. If the option is activated, all fixtures will be merged to one, single DVI fixture.
"Merge Fixtures" becomes available when using the protocol "DVI". Deactivate this option if you wish to patch DVI fixtures individually. If the option is activated, all fixtures will be merged to one, single DVI fixture.
Please remember to change the Color Depth if you added 4 color LED fixtures in the option "Patch Size".
For more information about this dialog, please read the chapter Matrix Generator.
Deleting Fixtures
You can easily delete fixtures. Select the fixtures you want to remove and use the "Delete" icon in the toolbar or press "Del" on your keyboard.
Copying DVI Fixtures
Single Fixtures
Copying a DVI fixture is simple. Select a single DVI fixture by holding down the "Ctrl" key and the left mouse button at the same time. Then, drag your mouse and a copy of the DVI fixture will be created as a result. Finally, drop the fixture at its new position.
Multiple Fixtures
Select multiple DVI fixtures and hold down the "Ctrl" key. Now hold down the left mouse button at the same time. Then, drag your mouse and copies of the DVI fixtures in a corresponding pattern will be created as a result. Finally, drop the fixtures at their new position.
Copying DMX Fixtures / Auto Addressing
Copying DMX fixtures has been improved by adding auto addressing. If auto addressing is enabled, MADRIX will automatically increase the DMX channel (and DMX universe) of the copied fixture. You can enable the feature in the Patch menu "Preferences" -> "Auto Address Copied DMX Fixtures". Disable this feature and the copied fixtures will have the same DMX channel and universe as their sources.
Please pay attention when using auto addressing and double-check if each fixture is addressed correctly!
Single Fixtures
Select a single DMX fixture by holding down the "Ctrl" key and the left mouse button at the same time. Then, drag your mouse and a copy of the fixture will be created as a result. Finally, drop the fixture at its new position. The DMX channel and the DMX universe will be automatically adjusted if "Auto Address Copied DMX Fixtures" is enabled.
Example:
The original fixture at position 1,1 is mapped to DMX universe 1 and channel 1. It requires 3 DMX channels. Therefore the first copy, fixture number 2, is automatically set to channel 4, and so on.

Multiple Fixtures
If you select several DMX fixtures, auto addressing also works. The intelligent function calculates the next free DMX address for each of the copied DMX fixtures and automatically adjusts the DMX channel and the DMX universe for each fixture.
Example 1:
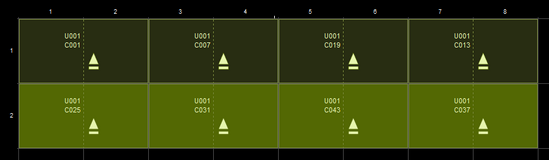
A row of four linearly addressed fixtures shall be copied at once (6 DMX channels per fixture). Result: Each fixture will be addressed to the next free DMX address in comparison to the previous fixture.

Example 2:
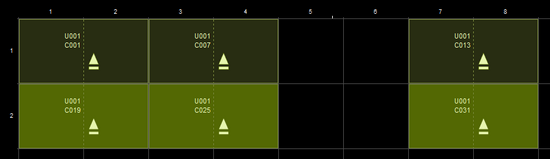
A row of four linearly addressed fixtures shall be copied at once, while fixture number 3 has a higher address than fixture number 4 (6 DMX channels per fixture). Result: Fixture number 7 has also a higher DMX address than fixture number 8.
Example 3:
A row of three linearly addressed fixtures should be copied at once, while spacing and an offset is added to fixture number 3 (6 DMX channels per fixture). Result: Fixture number 6 continues with the next free addressing of fixture number 5 and does not have an additional offset, while keeping the spacing.
Highlight Selected Fixtures
Activating this option will make corresponding fixtures flash for better identification. This makes it easier to see them on stage/in your LED installation. That means, if you select one or several fixtures within the Patch dialog, the corresponding devices in your installation will light up.
Allow Overlapping Fixtures
This feature allows fixtures in your virtual matrix to overlap. In order to rearrange the virtual matrix, a fixture may be dragged/repositioned to the position of another fixture.
Error And Information Messages
The Patch comes with an integrated message system. Depending on the issue, an information box will be displayed at the bottom of the second column. The following image is an example of a message. If overlapping fixtures are not allowed and you would want to relocate a fixture to an occupied position, the following message appears:
![]()
Fixture Settings, DVI Mapping & Fixture Description For Single Fixtures
Overview
 To configure a fixture within the Patch dialog window, just select it in the list to the left or via your virtual matrix. You may use the mouse or the arrow keys on your keyboard to navigate through the list. The according information will be displayed in the third column.
Every single fixture has its own "Fixture Settings". You can edit the short name, flipping, rotation, DMX channel, DMX universe, and its position in the virtual matrix. Moreover, values can be adjusted using an offset, which can simplify the set up process. Please apply every single change by pressing "OK". "Reset" can be used to restore original settings.
The section "DVI Mapping" is only relevant for DVI fixtures. Please read the chapter DVI Patch for more information.
A detailed "Fixture Description" of the fixture will be given as well.
Fixture Rotation
Fixture rotation is shown for both DMX and DVI fixtures with the help of a solid arrow.
(A small baseline indicates the opposite direction of the direction the arrow shows)
0° |
90° |
180° |
270° |
|
|
|
|


Fixture Flipping
Fixture flipping is shown for both DMX and DVI fixtures with the help of a double arrow/Two-way symbol. (If a fixture is not flipped, no symbol will be shown)
Flipping is applied to the original fixture position, before rotation.
None |
Flip H |
Flip V |
Flip HV |
|
|
|
|


Fixture Settings, DVI Mapping & Fixture Description For Multiple Fixtures
 To configure multiple fixtures within the Patch window, you can simply select them in the fixture list to the left side of the screen by using and holding "Ctrl" or "Shift" while clicking in order to select several devices.
The according information will be displayed in the third column. The usual "OK" and "Reset" buttons below the settings will vanish and several new "OK" buttons will emerge. Simply change the specific settings and apply the changes by pressing "OK".
For example if you select several fixtures and adjust the "Rotation" in the "Fixture Settings", each fixture will be rotated.
A detailed "Fixture Description" will provide a summary about the selected fixtures as well.
Exporting Fixtures From The Patch
![]() If you wish to save a fixture directly from the Patch, without using the Fixture Editor first, select the fixture and use the button "Save Fixture As". MADRIX will save it on your hard disk as an MADRIX Fixture in *.mfx file format. Simply choose a name.
If you wish to save a fixture directly from the Patch, without using the Fixture Editor first, select the fixture and use the button "Save Fixture As". MADRIX will save it on your hard disk as an MADRIX Fixture in *.mfx file format. Simply choose a name.
How The Patch Affects The Internal Previews
Preview A, Preview B, and Preview Output will be influenced by the individual Patch you are creating. If you create a pattern, these Previews will reflect your LED installation. Learn how to use this feature in the chapter Preview Windows.
Further Tips
Please make sure to save your MADRIX Setup after the configuration process.
You may also save and/or export the Patch file (*.mpf) separately.