|
In this tutorial, we want to show you how fast and easily you can create your first patch. It is important for this tutorial that all fixtures are of the same type.
Date: 09/2014
MADRIX Version: 3.3 (Created with)
We want to patch 8 pieces of the Ehrgeiz FS-60 RGB/1 (Mode 7). 2 units should be placed in the X-direction and 4 units in the Y-direction. This mode of the fixture uses 60 DMX channels per fixture. That means that we need 480 DMX channels for the whole patch (8 fixtures x 60 channels). A DMX universe includes 512 channels and we only need 480 channels. That means one DMX universe is enough for this patch. For more information about DMX512, have a look at the »What Is DMX tutorial.
1.
|
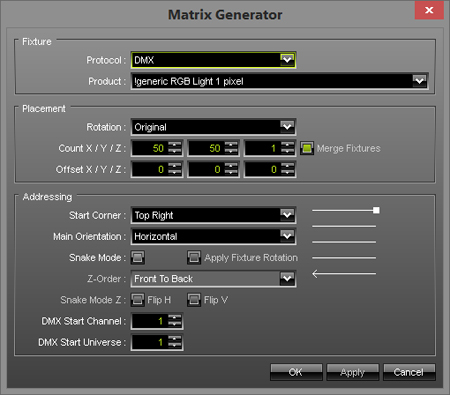
Start MADRIX and go to Preferences > Matrix Generator or press the F2 key on your keyboard. The following window appears:
|
2.
|
Change the following settings:
| ▪ | Protocol: Should be DMX. If not, change it to DMX because we want to add DMX fixtures. |
| ▪ | Fixture: Click on the down arrow on the right side and search for Ehrgeiz fixtures. You can press the E key and the drop down menu automatically jumps to the fixture manufacturers begin with an E. If you have found the Ehrgeiz fixtures, click Ehrgeiz FS-60 RGB/1 60 Ch (Mode 7). The drop down menu will be closed and you can see that Ehrgeiz FS-60 RGB/1 is selected. |
| ▪ | Rotation: Select Original |
| ▪ | Count: We want to have 2 fixtures in X-direction, 4 in Y-direction, and 1 in Z-direction. Enter 2 for Count X, 4 for Count Y, and 1 for Count Z.
Note: We have now created a 2D Patch. If you want a 3D Patch, change Count Z to higher than 1. |
| ▪ | Offset: Here you can create space between fixtures. But in this example we won't have space. Therefore set Offset X to 0, Offset Y to 0 and Offset Z to 0. |
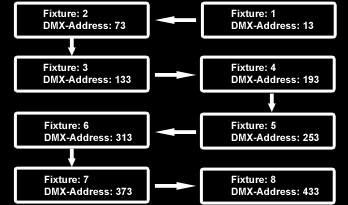
| ▪ | Start Corner: It is the position where the fixture with the DMX start channel is located. In this example change it to Top Right. That means that the first fixture is at the top on the right side. The second fixture is also at the top but on the left hand side of the first device. The Start Corner can be understood as a camera view from you onto the fixtures. |
| ▪ | Main Orientation: Change it to Horizontal. Here you can change the orientation of the fixtures' adresses. If it is set to Vertical, the second fixture is the one under or over (it depends on the Start Corner) the first. If it is set to Horizontal, the second fixture is next to the first fixture. |
| ▪ | Snake Mode: Please activate it. The check box will be illuminated green. That means that the DMX address of the first fixture in the second row is located under the fixture with the last DMX address of line one. If Snake Mode is disabled, the DMX address of the first fixture in line two is patched under the fixture that contains the first DMX address. |
| ▪ | DMX Start Channel: You will need to set the start channel of your first device. In this tutorial, change it to 13. (Now, we have freed up 12 on the DMX universe and we could use those to easily control a strobe or a fog machine with the DMX Fader Tool in MADRIX. You can learn how that works in another tutorial called »The DMX Fader Tool |
Your Matrix Generator should now look like this:

|
3.
|
Click OK
|
Congratulations! You have now patched these fixtures as shown below.
|