This topic includes:
Based on time code, you can trigger cue segments at exactly the right time and synchronize your lighting to audio shown in waveforms by creating a Timeline.
In this case, MADRIX 5 itself can become the time-code sender.
This feature is also know as sequencing.
You can open the Timeline Editor in 3 ways:
▪Go to the menu Tools > Timelines...
▪Or press F10
▪Or click Layers > Timelines on the user interface.
To close the Timeline Editor again and change back to the original MADRIX 5 user interface:
▪Go to the menu Tools > Timelines...
▪Or press F10
▪Or click Timelines > Layers on the user interface.
|
Undock - Creates a separate window to freely use the Editor window detached from the main user interface. The separated window can be enlarged in size and shown on multiple monitors. |
|
Dock - Brings the separate, detached window back again into the main user interface. |


It is highly recommended to set up your Storage Places [incl. MADRIX Effects, Layers, Chasers, etc.] before using the Timelines feature.
No matter if audio files are added to a Timeline or not, a functioning audio-output device is required for Timeline playback!
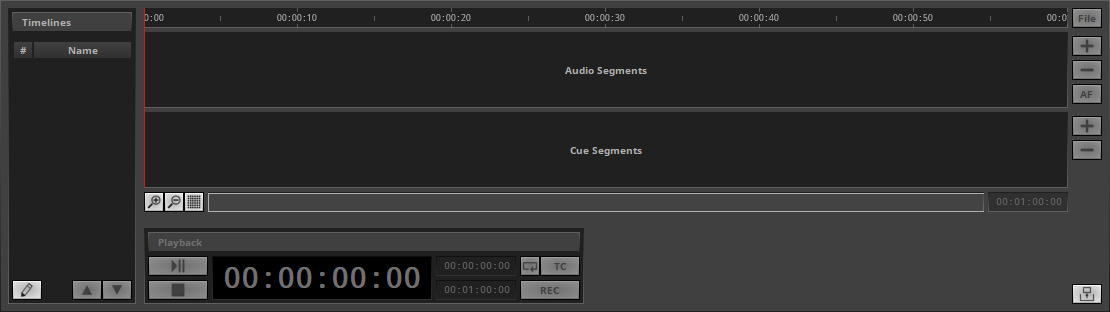
Timelines
The Timeline Editor is empty when opening it for the first time.
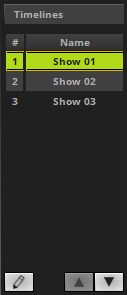
▪You need to create a new Timeline first.
[Navigate the left side of the window.]
|
Add - Creates a new Timeline. ▪You can add more than one Timeline. Remove - Removes the currently selected Timeline. Timelines that currently playing or are paused cannot be removed. Stop the playback first. Duplicate - Copies the currently selected Timeline and adds it as a new item. |
|
Position Up - Changes the order, and moves the currently selected Timeline one item higher up in the list. |
|
Position Down- Changes the order, and moves the currently selected Timeline one item lower down in the list. |
#
|
Index - References the different Timelines with a continuous index number. Left Mouse Double-Click - Allows you to edit the index. Enter a number and confirm with Enter on your keyboard to change the order of Timelines. |
Name |
Shows the label of the Timeline. The software names new Timelines Timeline by default. Left Mouse Double-Click - Allows you to edit the name. Enter any name and confirm with Enter on your keyboard. |


▪Note: Only one Timeline can be selected and active at once.
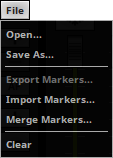
File
After creating a Timeline, the following file-management options become available:
[Navigate to the right side of the window.]
|
Left Mouse Click - Opens the context menu. Open... - Loads a previously saved file, which can be a MADRIX Timeline or MADRIX Cue List [of the file type *.mtlx or *.mclx]. Choose the file from your system. Save As... - Stores your current Timeline in an external file as MADRIX Timeline [of the file type *.mtlx]. Import Markers... - Loads Timeline Markers from an external file [of the file type *.csv]. Attention: Any existing Markers will be removed in the process. Learn more below. Merge Markers... - Loads Timeline Markers from an external file and adds them to Markers that are already existing [of the file type *.mtlx]. Learn more below.
Clear - Resets the current Timeline and removes all content, such as audio segments, cues, and other settings. |
▪Note: It is not required to add audio files to a Timeline.
[Skip to '3] Creating Cue Segments' if you don't want to add audio files.]
▪By default, a new Timeline does not yet include any audio segments.

|
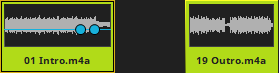
Add - Adds a new audio segment at the current cursor position. This defines the time code at which the audio segment is inserted. ▪You can add more than one audio file/segment. Duplicate ▪ Select one or more segments and hold down Ctrl on your keyboard. ▪Then, continue to hold Ctrl and the left mouse button and drag your mouse. ▪A copy of the segments will be created. ▪Simply release the mouse at the segments's new position. Drag And Drop Audio Files ▪Left Mouse Click And Hold + Drag - You can select and drag and drop audio files directly into the Timeline Editor. ▪Audio files are only referenced by the Timeline Editor. Make sure the source files are always available! |
|
Remove - Removes the currently selected audio segments. Select one or more audio segment first. |
|
Automatic Audio-Volume Fade - If enabled, creates automatic mixes [crossfades] between overlapping audio segments. |


▪Note: You can further edit these audio segments, as explained below.
▪Note: If no cue segments are added to a Timeline, the currently selected Storage Places will be displayed continuously.
▪By default, a new Timeline does not yet include any cue segments.

|
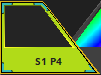
Add - Adds a new cue segment at the current cursor position. This defines the time code at which the cue segment is inserted. - Cue segments reference Storage Places [just like a Cue List]. ▪You can add more than one cue segment. ▪Cue segments can only be used back to back. If cue segments have been added, it is not possible to not reference a Storage Place at a time. Duplicate ▪ Select one segment and hold down Ctrl on your keyboard. ▪Then, continue to hold Ctrl and the left mouse button and drag your mouse. ▪A copy of the segment will be created. ▪Simply release the mouse at the segments's new position. Drag And Drop Storage Places ▪ ▪Left Mouse Click And 2 Sec. Hold - You can perform a Copy and Paste with the mouse. |
|
Remove - Removes the currently selected cue segments. Select one or more cue segments first. |


▪Note: You can further edit these cue segments, as explained below.
Navigation And Selection
Timeline
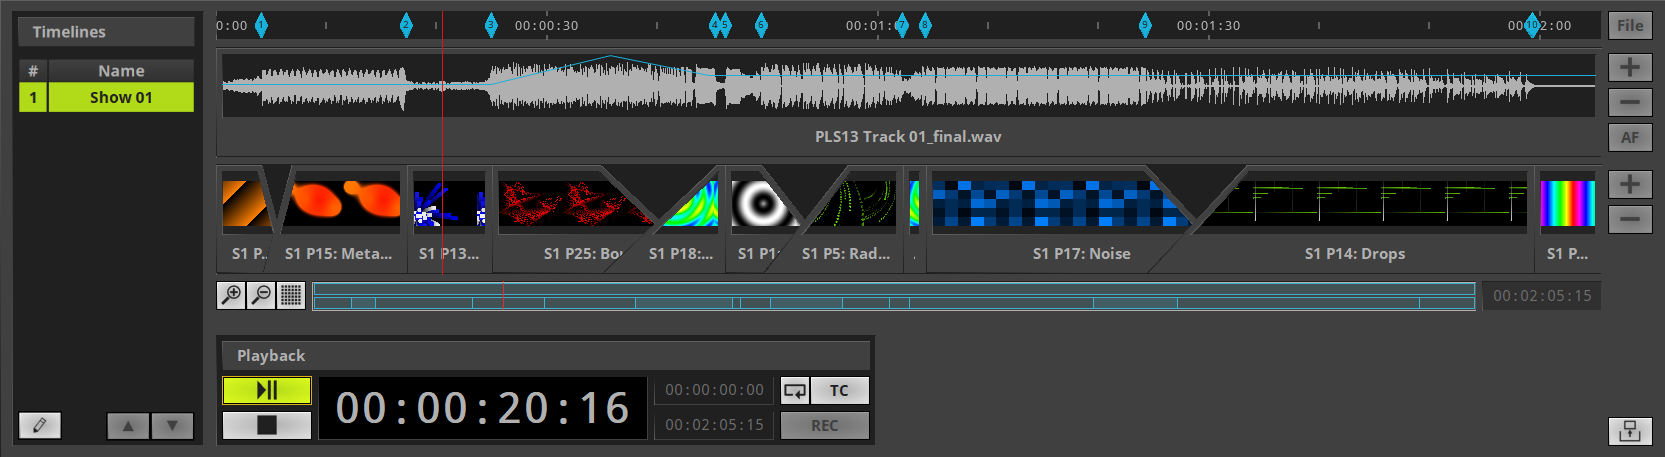
Timeline Overview
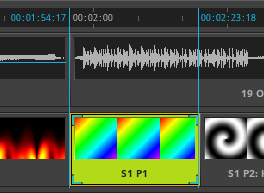
The Timeline itself is shown at the top of the Timeline Editor.
▪The time is shown in HH:MM:SS:FF [hours:minutes:seconds:frames].
- The level of detail depends on the zoom level.
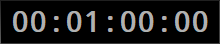
▪The default Timeline is 00:01:00:00 long.
▪The Timeline expands when new audio files are added that exceed the current Timeline duration.
▪You can define the total duration; as explained below.
▪You can set the current cursor position; as explained below.

Timeline Cursor
|
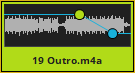
▪A yellow line shows the current cursor position. Left Mouse Click - Puts the cursor on a different position of the Timeline. - Scrubbing: During paused playback associated Storage Places are immediately selected when changing the cursor position and thereby selecting a cue segment. Left / Right - These keyboard shortcuts let the cursors snap to segments and markers. |
|
▪A red line shows the current playback position. |


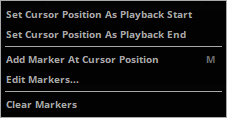
Timeline Context Menu
|
Right Mouse Click - Perform a right click with your mouse on the Timeline to call up the context menu. Set Cursor Position As Playback Start - Sets the playback start time to the time stamp of the cursor. Set Cursor Position As Playback End - Sets the playback end time to the time stamp of the cursor. Add Marker At Cursor Position - Sets a new marker at the current cursor position. [Keyboard shortcut: M] Edit Markers... - Calls up the window to edit markers; as explained below. Clear Markers - Removes all markers from the Timeline. |
Markers allow you to tag and recall specific positions on the Timeline, i.e. timestamps.
This is especially useful for positioning audio segments as well as cue segments.
[For example, you might play back the Timeline to hear the audio and set new markers via the keyboard each time you hear a striking change in music.]
Adding Markers Manually:
|
Right Mouse Click > Add Marker At Cursor Position - Sets a new marker on the Timeline at the current cursor position. ▪Up to 1000 markers can be set [1 - 1000]. |

Exporting Or Importing Markers [CSV Files]:
In order to exchange timestamps between software applications and equipment, use the File menu to export, import, or merge Markers.
This workflow was mainly implemented to be able to export from the audio-production software REAPER.
|
Left Mouse Click - Opens the context menu. Import Markers... - Loads Timeline Markers from an external file [of the file type *.csv]. Attention: Any existing Markers will be removed in the process. Merge Markers... - Loads Timeline Markers from an external file and adds them to Markers that are already existing [of the file type *.mtlx]. |
|
File Format: MADRIX 5 supports a very general file format for this purpose. CSV files are usually text files with tabularly structured data. #,Name,Start M1,,00:00:02:26 M2,,00:00:06:12 M3,,00:00:11:15
Attention: You need to meet the following prerequisites to be able to import Cue Points from REAPER! - The supported time format of MADRIX 5 is Hours:Minutes:Seconds:Frames [HH:MM:SS:FF]. - Regions are exported from REAPER and can be included in the export but will simply be ignored by the import process. - Exported Timestamps that lay outside of the Timeline duration of the MADRIX 5 Timeline Editor will be ignored during the import process. |
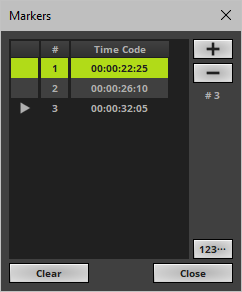
Managing Markers:
|
Right Mouse Click > Edit Markers... - Perform a right click with your mouse on the Timeline to call up the context menu and choose Edit Markers... |
|
> - Shows that the cursor position is at the indicated marker, or at a position between this marker and the next marker. Left Mouse Double-Click - Perform a double-click with the mouse on the first column of a list item and the Timeline cursor will jump to that exact position. |
# |
▪Shows the number of this marker. Left Mouse Double-Click - Allows you to edit the number in order to rearrange the order of markers. Confirm with Enter on your keyboard. |
Time Code |
▪Shows the time stamp of the marker in HH:MM:SS:FF. Left Mouse Double-Click - Allows you to edit the time stamp. Confirm with Enter on your keyboard. Left Mouse Click And Hold + Move Mouse Up/Down - Allows you to change the value. |
|
Add - Adds a new marker at the current cursor position. |
|
▪Renumbers all markers anew based on their current, chronological order on the Timeline. |
Clear |
▪Removes all markers from the list. |
Close |
▪Closes the window. |


Audio Segments / Cue Segments
|
Left Mouse Click - Selects a segment. Left Mouse Double-Click - Brings the selected segment fully into view and focus. |
|
Ctrl + Left Mouse Click - Allows you to select several segments at the same time by holding Ctrl on your keyboard while selected several segments with your mouse. Shift + Left Mouse Click - Allows you to select several segments at the same time by holding Shift on your keyboard while selecting the first segment and the last segment with your mouse, and every segment in-between will also be selected as a result. Ctrl+A - This keyboard shortcut selects all audio segments or all cue segments, depending on which kind of segment is currently selected. |

Scroll Bar
The scroll bar provides a visual overview over all segments of the Timeline.

|
Zoom Level Zoom In - Determines the level of detail. Zoom in to see a smaller portion of the timeline and thereby increased detail. Zoom in to the highest zoom level to see single frames on the Timeline. |
|
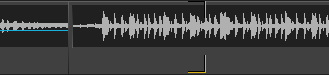
Upper Row - Shows the audio segments. Green - Shows the currently selected segment. Red Line - Shows the current cursor position or playback position [during playback]. |
|
Viewport - A translucent, white overlay shows the current viewport, which defines the portion of the Timeline that is currently shown. Left Mouse Click - Click to the left or the right of the viewport to change the viewport to this position. Left Mouse Click And Hold + Drag - Navigate to the start or end of the viewport overlay and wait for the mouse to change to a double arrow in order to change the size of the viewport overlay and thereby the zoom level. Left Mouse Click And Hold + Move Mouse Up/Down - Allows you to change the zoom level of the viewport. Page Down - This keyboard shortcut scrolls to the left. Page Up - This keyboard shortcut scrolls to the right. Press the Spacebar on your keyboard [and continue to hold it] and left-click in order to drag the viewport for easy navigation. |
|
Duration - Shows and defines the current total duration of the Timeline in [HH:MM:SS:FF]. The default value is 00:01:00:00. The maximum value is 24h minus 1 frame. Left Mouse Click - Allows you to edit the duration. Confirm with Enter on your keyboard. Left Mouse Click And Hold + Move Mouse Up/Down - Allows you to change the value. Spacebar - This keyboard shortcut resets to the default value. |


Editing Audio Segments
Position
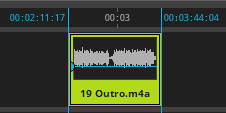
You can change the position of audio segments.
▪A] Repositioning Via Mouse
- Left Mouse Click And Hold + Drag - Make sure to select the audio segment by clicking on the label. The mouse cursor changes to a quadruple arrow. Continue to hold and move the mouse to change the position.
- Blue guides indicate the start time code and the end time code.
- Audio segments snap to other audio segments, cue segments, markers, the cursor, and single frames.
▪B] Repositioning Via Settings

- Make sure to select the audio segment first.
- The Position settings become available [at the bottom of the Timeline Editor].
- Start Time Code - Allows you to set the time code of the beginning of the audio segment.
The end time code will then automatically be set according to the length of the audio segment.
Valid values range from 00:00:00:00 to the duration of the Timeline minus one frame, because of the minimum length of a segment.
- End Time Code - Allows you to set the time code of the ending of the audio segment.
The start time code will then automatically be set according to the length of the audio segment.
Valid values range from 00:00:00:00 to the duration of the Timeline.
- Left Mouse Click And Hold + Move Mouse Up/Down - Move the mouse up or down within the edit field to increase or decrease the value.
- Spacebar - This keyboard shortcut resets to the default value.
Overlapping
Audio segments can overlap.
▪Overlapping is shown with the help of orange lines.
▪Make sure to use it intentionally and not unintentionally.
▪The software can create automatic volume crossfades:
|
Automatic Audio-Volume Fade - If enabled, creates automatic mixes [crossfades] between overlapping audio segments. |
▪AF example for the left audio segment:
▪AF example for the right audio segment:
Length
You can edit the length of audio segments, that is reduce the original length of the audio file to make it shorter.
▪Select an audio segment.
▪A] Editing Via Mouse

- Navigate to the start position of an audio segment [left edge]. The mouse cursor changes to a double arrow.
Left Mouse Click And Hold + Drag - Allows you to trim the beginning of the audio segment by moving the mouse to the right.
- Navigate to the end position of an audio segment [right edge]. The mouse cursor changes to a double arrow.
Left Mouse Click And Hold + Drag - Allows you to trim the ending of the audio segment by moving the mouse to the left.
▪B] Editing Via Settings

- Make sure to select the audio segment first.
- The Trim Settings become available [at the bottom of the Timeline Editor].
- Start Trimmer - Allows you to trim the beginning of the audio segment.
Valid values range from 00:00:00:00 to the length of the audio file minus one frame, which is the minimum length.
The default value is 00:00:00:00.
- End Trimmer - Allows you to trim the ending of the audio segment.
Valid values range from 00:00:00:00 to the length of the audio file minus one frame, which is the minimum length.
The default value is 00:00:00:00.
- Left Mouse Click And Hold + Move Mouse Up/Down - Move the mouse up or down within the edit field to increase or decrease the value.
- Spacebar - This keyboard shortcut resets to the default value.
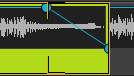
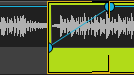
Volume
You can edit the volume of an audio segment. You can do so down to each frame.
▪Right Mouse Click > Edit Volume - Perform a right click with your mouse on an audio segment to call up the context menu and choose Edit Volume
▪Left Mouse Click - Then, click with your mouse on the preview image of the audio segment to add a new volume point.
- Add more points by clicking on the blue line.
Green - Shows the currently selected volume point.
Blue - Shows added volume points.
▪Select the volume point you wish to edit.
Select multiple points via Ctrl/Shift + Left Mouse Click
▪The Volume settings become available [at the bottom of the Timeline Editor].

|
Volume-Point Value - Allows you to change the exact value. Valid values range from 0.00 to 100 [in percent]. The default value is 100. ▪Left Mouse Click And Hold + Move Mouse Up/Down - Move the mouse up or down within the edit field to increase or decrease the value. ▪Spacebar - This keyboard shortcut resets to the default value. ▪Left Mouse Click And Hold + Move Mouse Up/Down - Alternatively, you can select the volume point and move your mouse up or down to change the volume value. |
|
Volume-Point Position - Allows you to precisely set the position of the volume point on the Timeline in HH:MM:SS:FF. |
Del |
▪Select one or more volume points and use Delete on your keyboard to remove the points. |
Close |
▪Closes this window. |


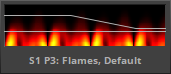
▪The preview image of the audio segment will show the volume adjustments with the help of gray line graphs after the editing process.
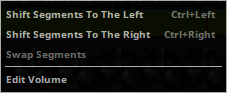
Context Menu – Audio Segments
|
Right Mouse Click - Perform a right click with your mouse on an audio segment to call up the context menu. Shift Segments To The Left - Sends the currently selected segments one position to the left and allows you to quickly reposition them in this way. Shift Segments To The Right - Sends the currently selected segments one position to the right and allows you to quickly reposition them in this way. Swap Segments - Switches the positions of the currently selected segments. Select two or more segments first. Edit Layer Opacity - Allows you to edit the volume of an audio segment; as explained above. |
Editing Cue Segments
Position
You can change the position of cue segments.
▪A] Repositioning Via Mouse
- Left Mouse Click And Hold + Drag - Make sure to select the cue segment by clicking on the label. The mouse cursor changes to a quadruple arrow. Continue to hold and move the mouse to change the position.
- Blue guides indicate the start time code and the end time code.
- Cue segments snap to other cue segments, audio segments, markers, the cursor, and single frames.
[When moved, they automatically change the size of neighboring cue segments. Since cue segments can only be used back to back, you will see other cue segments change in length accordingly.]
- Note: When moving the first cue segment or the last cue segment, you cannot freely reposition them. The start time code of the first cue segment needs to remain at the beginning of the Timeline. The end time code of the last cue segment needs to remain at the end of the Timeline. When trying to move them, you will change their length by making the cue segment shorter.
▪B] Repositioning Via Settings
- Make sure to select the cue segment first.
- The Position settings become available [at the bottom of the Timeline Editor].
- Start Time Code- Allows you to set the time code of the beginning of the cue segment.
Note: The end time code will not be automatically adjusted accordingly. Instead, you will change the length of the cue segment.
[Since cue segments can only be used back to back, you will also see other cue segments change in length accordingly.]
- End Time Code - Allows you to set the time code of the ending of the cue segment.
Note: The start time code will not be automatically adjusted accordingly. Instead, you will change the length of the cue segment.
[Since cue segments can only be used back to back, you will also see other cue segments change in length accordingly.]
- Left Mouse Click And Hold + Move Mouse Up/Down - Move the mouse up or down within the edit field to increase or decrease the value.
- Spacebar - This keyboard shortcut resets to the default value.
Length
You can edit the length of cue segments.
[Depending where you add new cue segments, they initially take on certain lengths automatically.]
▪Select a cue segment.
▪A] Editing Via Mouse

- Navigate to the start position of a cue segment [the middle of the left edge]. The mouse cursor changes to a double arrow.
Left Mouse Click And Hold + Drag - Allows you to change the beginning of the cue segment by moving the mouse to the right.
[Since cue segments can only be used back to back, you will also see other cue segments change in length accordingly.]
- Navigate to the end position of a cue segment [the middle of the right edge]. The mouse cursor changes to a double arrow.
Left Mouse Click And Hold + Drag - Allows you to change the ending of the cue segment by moving the mouse to the left.
[Since cue segments can only be used back to back, you will also see other cue segments change in length accordingly.]
▪B] Editing Via Settings
- Make sure to select the cue segment first.
- The Position settings become available [at the bottom of the Timeline Editor].
- Start Time Code- Allows you to set the time code of the beginning of the cue segment.
Note: The end time code will not automatically be adjusted accordingly. Instead, you will change the length of the cue segment.
[Since cue segments can only be used back to back, you will also see other cue segments change in length accordingly.]
- End Time Code - Allows you to set the time code of the ending of the cue segment.
Note: The start time code will not automatically be adjusted accordingly. Instead, you will change the length of the cue segment.
[Since cue segments can only be used back to back, you will also see other cue segments change in length accordingly.]
- Left Mouse Click And Hold + Move Mouse Up/Down - Move the mouse up or down within the edit field to increase or decrease the value.
- Spacebar - This keyboard shortcut resets to the default value.
Settings
There are various settings for cue segments that you can and should edit.
▪Make sure to select the cue segment first.
▪The Cue Segment Settings become available [at the bottom of the Timeline Editor].

Storage Place: |
The title of this section shows which Storage Place is selected for the cue segment and its Description. |
|
Storage - Defines the Storage Place. This is the selection of the Storage. |
|
Place - Defines the Storage Place. This is the selection of the Place. |
|
Group Preset - Defines which Group Preset is triggered together with this cue segment. Choose the preset from the list. The default value is None, which does not trigger any preset. Fade-In Time - Defines the duration of the automatic fade between fader positions in HH:MM:SS:FF, when triggering a Group Preset. The default value is 00:00:00:00. The maximum value is 24h minus 1 frame. |
|
Fade In ▪Fade Type - Defines how the fade will look like. The default value is XF. Learn more »Fade Types ▪Fade-In Time - Defines the duration of the fade in HH:MM:SS:FF. The default value is 00:00:00:00. The maximum value is the length of the cue segment. ▪Left Mouse Click And Hold + Drag - Alternatively, you can select the left blue corners of a cue segment and change the Fade In.
▪Note: The Fade In of the current cue segment has the same fade time as the Fade Out of the previous cue segment next to it on the left. |
|
Fade Out ▪Fade Type - Defines how the fade will look like. The default value is XF. Learn more »Fade Types ▪Fade-Out Time - Defines the duration of the fade in HH:MM:SS:FF. The default value is 00:00:00:00. The maximum value is the length of the cue segment. ▪Left Mouse Click And Hold + Drag - Alternatively, you can select the right blue corner of a cue segment and change the Fade Out.
▪Note: The Fade Out of the current cue segment has the same fade time as the Fade In of the next cue segment next to it on the right. |


Context Menu – Cue Segments
|
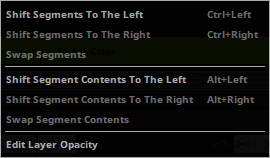
Right Mouse Click - Perform a right click with your mouse on a cue segment to call up the context menu. Shift Segments To The Left - Sends the currently selected segments one position to the left and allows you to quickly reposition them in this way. Shift Segments To The Right - Sends the currently selected segments one position to the right and allows you to quickly reposition them in this way. Swap Segments - Switches the positions of the currently selected segments. Select two or more segments first. Shift Segment Contents To The Left - Sends the contents of the cue segment to the next segments to the left. Shift Segment Contents To The Right - Sends the contents of the cue segment to the next segments to the right. Swap Segment Contents - Switches the contents of the currently selected segments. Select two or more segments first. Edit Layer Opacity - Allows you to edit the opacity of the different layers of the cue segment; as explained below. |
Opacity
You can edit the opacity of a cue segment. You can do so down to each frame. Since a Storage Place can contain several layers, you can do so for each layer.
▪Right Mouse Click > Edit Layer Opacity - Perform a right click with your mouse on a cue segment to call up the context menu and choose Edit Layer Opacity
▪Left Mouse Click - Click with your mouse on the preview image of the cue segment to add a new opacity point.
- Add more points by clicking on the blue line.
Green - Shows the currently selected opacity point.
Blue - Shows added opacity points.

▪Select the opacity point you wish to edit.
Select multiple points via Ctrl/Shift + Left Mouse Click
▪The Layer Opacity Settings become available [at the bottom of the Timeline Editor].

|
Opacity Value - Allows you to change the exact value. Valid values range from 0 to 255. The default value is 255. ▪Left Mouse Click And Hold + Move Mouse Up/Down - Move the mouse up or down within the edit field to increase or decrease the value. ▪Spacebar - This keyboard shortcut resets to the default value. ▪Left Mouse Click And Hold + Move Mouse Up/Down - Alternatively, you can select the opacity point and move your mouse up or down to change the opacity value. |
|
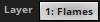
Layer Selection - Allows you to choose for which layer you would like to edit the opacity. |
Del |
▪Select one or more opacity points and use Delete on your keyboard to remove the points.w. |
Close |
▪Closes this window. |

▪The preview image of the cue segment will show the opacity with help of gray line graphs after the editing process.
Note: The Layer Opacity can not only be changed by the Timeline Editor, but also via the regular Layer Settings, Chasers, Macros, Remote Control, etc. They influence each other and do not override. They work in LTP mode (Latest Takes Precedence)!
Overview
After setting up your Timeline, you can operate its playback.

|
Play/Pause - Starts or holds playback. No matter if audio files are added to a Timeline or not, a functioning audio-output device is required for Timeline playback! |
|
Time Code - Shows the current cursor position or playback position [during playback] in HH:MM:SS:FF. |
|
Start Time Code - Defines the time code at which playback starts. [It can be different from 00:00:00:00 and the Timeline and any of its segments.] End Time Code - Defines the time code at which playback starts. [It can be different from the duration of the Timeline and the end time of any of its segments.] ▪The duration of a Timeline needs to be at least 1 second long [the difference between start time code and end time code]. |
|
Loop - Loops the playback and starts to play back the Timeline from the beginning again if the end has been reached. |


You can choose how MADRIX 5 manages the user interface when playing back a Timeline.
Learn more »User Interface
Sending Time Code
Time Code Settings
|
TC - Opens the Time Code Settings [to the right of the button]. |


Frame Rate |
▪Allows you choose between different time-code formats. You can choose from: ▪The default value is 30 FPS. ▪The structure of the Timeline is based on this setting! |
Offset |
▪Defines an additional offset that is added to the time code of the Timeline playback for output. |
Confirm |
▪Applies all settings and closes this window. |
Sending Time Code
Having set up the Time Code Settings, as described above, does not yet mean that time code is already sent out.
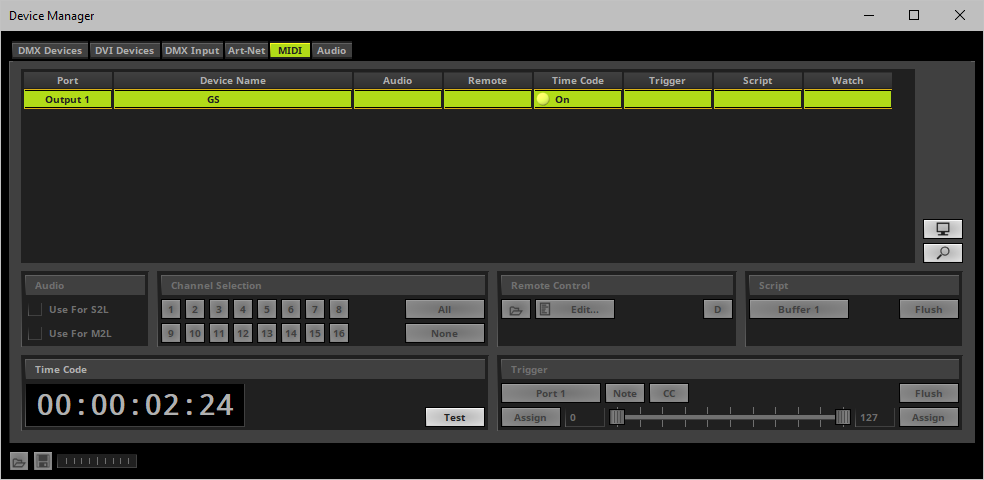
You need to set up an output device in the Device Manager first.
▪Go to the menu Preferences > Device Manager... > MIDI
[Keyboard shortcut: F4 > MIDI ]
▪A new window will open.
▪Select your output device in the list.
▪Left Mouse Double-Click Or Right Mouse Click - Perform a double-click or right-click with the mouse on the column Time Code in order to enable sending of time code for this output device.
▪When playing back a Timeline, you will see the corresponding Time Code here in the Device Manager in the Time Code section.
Recording
|
Starts or stops the Timeline Recording. See »Recording |

| MADRIX 5.7. |
| [Ctrl & +/-] = Zoom In/Out | [Ctrl & 0] = 100% |
|
Previous Next
|
|
Enable Automatic Translation | Activer La Traduction Automatique | 启用自动翻译 |