This topic includes:
Advanced schedules, including calendar functions, are easily available to you.
While Schedules do incorporate advanced workflows, one of their main areas of application is the [time] management of several Cue Lists and/or Timelines.
You can open the Schedules in 2 ways:
▪Go to the menu Tools > Scheduling...
▪Or click Layers > Scheduling on the user interface.
To close the Schedules again and change back to the original MADRIX 5 user interface:
▪Go to the menu Tools > Scheduling...
▪Or click Scheduling > Layers on the user interface.
![]()
|
Undock - Creates a separate window to freely use the Scheduling window detached from the main user interface. The separated window can be enlarged in size and shown on multiple monitors. |
|
Dock - Brings the separate, detached window back again into the main user interface. |


Schedules
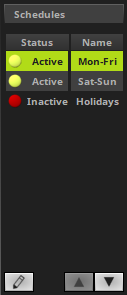
▪You need to create a new Schedule first.
[Navigate the left side of the window.]
|
Add - Creates a new Schedule, which has no Events added to it yet, but is set as Active. ▪You can add more than one Schedule. ▪Creating multiple Schedules is a tool to organize yourself. Multiple Schedules can be active and are active at the same time!
Remove - Removes the currently selected Schedules, including all Events. Duplicate - Copies the currently selected Schedules and adds it as a new item. |
|
Position Up - Changes the order, and moves the currently selected Schedules one item higher up in the list. |
|
Position Down- Changes the order, and moves the currently selected Schedules one item lower down in the list. |
|
Left Mouse Double-Click / Right Mouse Click - Allows you to enable or disable the currently selected Schedules. |
Name |
Shows the label of the Schedule. The software names new Schedules Schedule # by default and indexes them. Left Mouse Double-Click - Allows you to edit the name. Enter any name and confirm with Enter on your keyboard. |


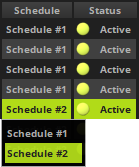
Multiple Schedules
|
If you have selected several Schedules, all included Events will be shown [on the right hand side] and a new column is shown. Left Mouse Double-Click / Right Mouse Click - Allows you to re-assign Events to other Schedules for better organization. |
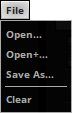
File
The following options for file management are available:
[Navigate to the right side of the window.]
|
Left Mouse Click - Opens the context menu. Open... - Loads a previously saved Schedule file [of the file type *.mscx]. Choose the file from your system. Open+... - Loads a previously saved Schedule file [of the file type *.mscx] and appends it to the current items. Choose the file from your system. Save As... - Stores all of your Schedules in an external file as MADRIX Schedule [of the file type *.mscx]. Clear - Removes all Schedules and their included Events. |
▪By default, a new Schedule does not yet include any Events.
▪Make sure to select a Schedule first and only select one Schedule.
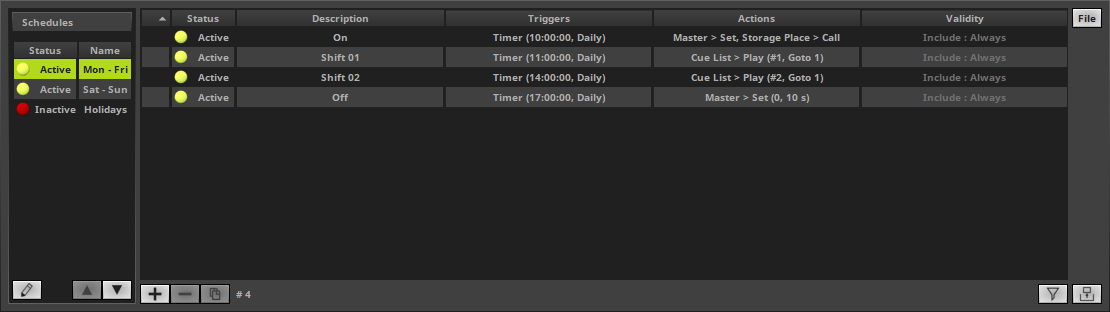
▪You can sort Events in ascending or descending order by clicking on the corresponding column headers, such as Status, Description, Triggers, Actions, Validity.
|
Add - Adds a new Event, which has no Triggers or Actions defined yet, but is set as Active. |
|
Remove - Removes the currently selected Events. Select one or more Events first. |
|
Duplicate - Copies the currently selected Events and adds them as a new item at the end of the list. |
|
Count - Displays the total number of Events in the Schedule. |
|
Filter - Activates the filter. - Enter any text to filter out items that do not include this text. The button is shown in green if the filter is active. Ctrl+F - Opens the filter. Right Mouse Click - Resets the filter [and closes it again if it is still open]. |


(Manual) Triggering
|
A play icon is being flashed when an Event hast been triggered automatically. |
|
Left Mouse Double-Click / Right Mouse Click - Allows you to trigger an Event manually. |

Status
|
Left Mouse Double-Click / Right Mouse Click - Allows you to enable or disable an Event. |
Description
This column allows you to add a label to the Event.
Left Mouse Double-Click / Right Mouse Click - Allows you to edit the Description. Enter any text and confirm with Enter on your keyboard.
Triggers
▪Left Mouse Double-Click / Right Mouse Click - Allows you to edit the Triggers.
▪Note: Several Triggers can be configured per Event.
The following Triggers are available:
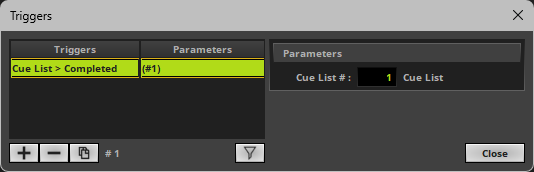
Cue List > Completed |
The configured Action of the Event will be triggered once the specified Cue List has been completed. Parameters: |
Timeline > Completed |
The configured Action of the Event will be triggered once the specified Timeline has been completed. Parameters: |
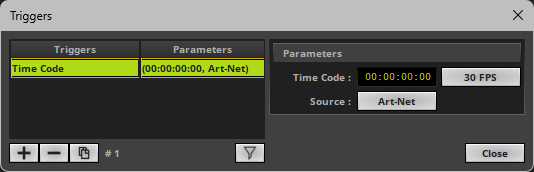
Time Code |
The configured Action of the Event will be triggered once the specified Time Code has been received and reached. Parameters: |
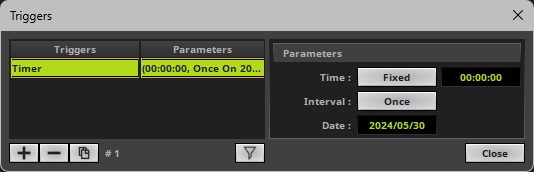
Timer |
The configured Action of the Event will be triggered once the specified Time has been reached. Parameters: - Once. Then, enter a specific Date in YYYY/MM/DD [Year/Month/Day]. [Triggers only once.] |


Actions
▪Left Mouse Double-Click / Right Mouse Click - Allows you to edit the Actions.
▪Note: Several Actions can be configured per Event.
The following Actions are available:
Audio Input Level > Set |
Changes the level of the Audio Input. Parameters: |
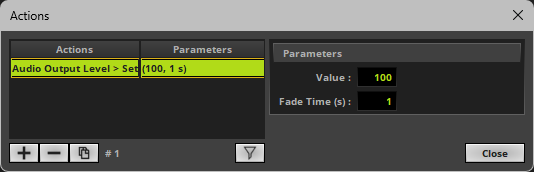
Audio Output Level > Set |
Changes the level of the Audio Output. Parameters: |
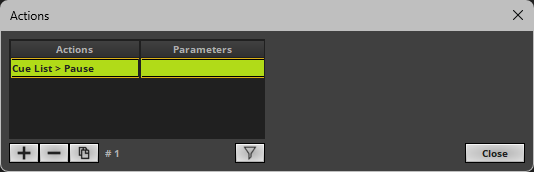
Cue List > Pause |
Pauses playback of the currently playing Cue List. |
Cue List > Play |
Starts playback of the specified Cue List. Parameters: |
Group Preset > Call |
Activates the specified Group Preset. Parameters: |
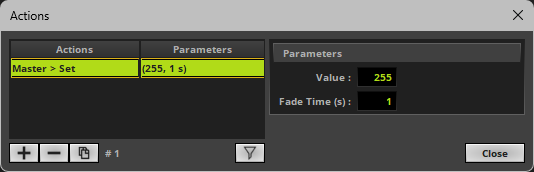
Master > Set |
Changes the level of the Master. Parameters: |
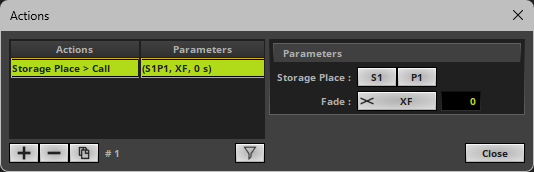
Storage Place > Call |
Activates the specified Storage Place. Parameters: |
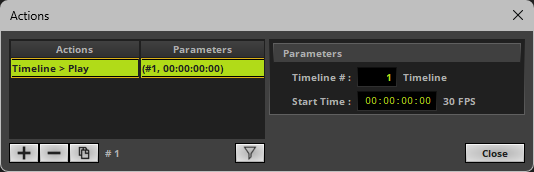
Timeline > Play |
Starts playback of the specified Timeline. Parameters: |
Timeline > Stop |
Stops playback of the currently playing Timeline. |


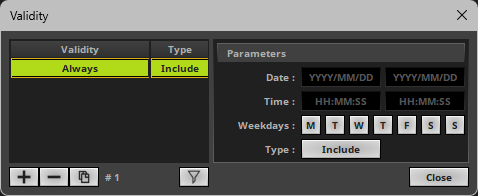
Validity
▪Left Mouse Double-Click / Right Mouse Click - Allows you to edit the Validity.
▪Note: Several time frames can be configured per Event.
Validity |
Allows you to specify time slots in which the Event is valid. Make sure to enter valid time slots. Date - Specifies the start date and end date of the time slot [both inclusively]. [Short versions for single items] Events are inactive in the following two cases: - There is at least one time slot of the Type Exclude and the current point in time falls into this time window.
|
| MADRIX 5.7. |
| [Ctrl & +/-] = Zoom In/Out | [Ctrl & 0] = 100% |
|
Previous Next
|
|
Enable Automatic Translation | Activer La Traduction Automatique | 启用自动翻译 |