This topic includes:
▪Example: Screen-Capturing With 1 Monitor
▪Example: Screen-Capturing With 2 Graphic Card Output Ports
▪Example: Using Beamers/Projectors/TVs
This topic presents various scenarios how DVI output can be used.
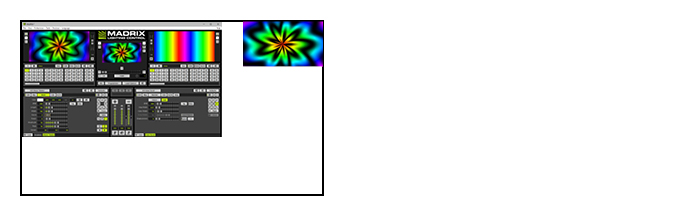
Example: Screen-Capturing With 1 Monitor
▪You might only have 1 monitor [1 monitor output on the graphics card]. But you need to use MADRIX 5 and the DVI output at the same time.
▪In this case, it is recommended to use the MADRIX 5 interface and the DVI output next to each other on your main monitor.
▪Your main monitor has a certain pixel resolution [e.g., 1920 x 1080]. Learn more »DVI
▪Position MADRIX 5 in the upper, left corner.
▪Go to the menu Previews > External Preview 1 > DVI to activate the DVI output.
▪Go to the menu Previews > External Preview 1 > Preview Settings...
▪Set up Left and Top under DVI Window Position [e.g., 1300 and 0] .
- The standard size of the MADRIX 5 user interface is 1280 x 768.
▪Activate Previews > External Preview 1 > Lock Position
▪Keep Always On Top is automatically applied/activated.
|
|
Graphics Card Output 1 [Monitor 1] - MADRIX 5 GUI [Normal window size] |
|
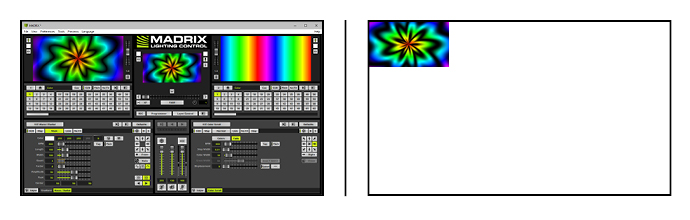
Example: Screen-Capturing With 2 Graphic Card Output Ports
▪When using screen-capturing, it is usually recommended to use a graphics card with 2 monitor outputs.
▪In this case, you can use the complete monitor 1 for the MADRIX 5 user interface. The DVI output is simply positioned on the monitor output 2.
▪Your main monitor has a certain pixel resolution [e.g., 1920 x 1080]. Learn more »DVI
▪Position MADRIX 5 on your main monitor. Use the normal window size, maximize the window, or use Full Screen mode for MADRIX 5.
▪Go to the menu Previews > External Preview 1 > DVI to activate the DVI output.
▪Go to the menu Previews > External Preview 1 > Preview Settings...
▪Set up Left and Top under DVI Window Position. Make sure to use values that are outside of Monitor 1; Monitor 1 starts at 0,0 instead of 1,1 [e.g., 1920 and 0].
▪Activate Previews > External Preview 1 > Lock Position
▪Keep Always On Top is automatically applied/activated.
|
|
Graphics Card Output 1 [Monitor 1] - MADRIX 5 GUI [Maximized Window] |
Graphics Card Output 2 [Monitor 2] - Previews > External Preview 1 > DVI |
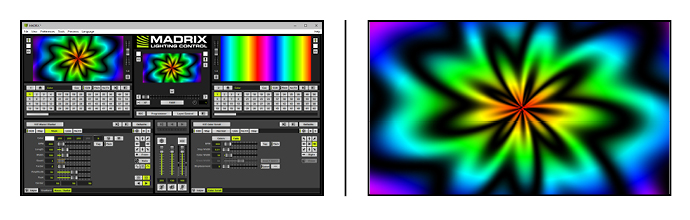
Example: Using Beamers/Projectors/TVs
▪You might want to bring MADRIX Effects to external equipment, such as projectors, beamers, or large TVs.
▪Often, the Full Screen DVI output is needed in this case.
▪Also, projectors, beamers, and TVs often require a high pixel resolution.
- The pixel resolution can be set up using the »Matrix Generator or »Patch Editor
- The higher the pixel resolution, the more computer performance is required. Learn more »System Requirements
▪Position MADRIX 5 on your main monitor. Use the normal window size, maximize the window, or use Full Screen mode for MADRIX 5.
▪Go to the menu Previews > External Preview 1 > Full Screen to activate the DVI output.
▪Click on the DVI output with your mouse to focus it. Now, perform a Right Mouse Click > Move To Next Screen
▪Activate Previews > External Preview 1 > Keep Always On Top
▪If required, activate Previews > External Preview 1 > Stretch Pixels
▪Activate other options as required. Learn more »DVI
|
|
Graphics Card Output 1 [Monitor 1] - MADRIX 5 GUI [Maximized Window] |
Graphics Card Output 2 - Previews > External Preview 1 > Full Screen |
| MADRIX 5.7. |
| [Ctrl & +/-] = Zoom In/Out | [Ctrl & 0] = 100% |
|
Previous Next
|
|
Enable Automatic Translation | Activer La Traduction Automatique | 启用自动翻译 |