Introduction
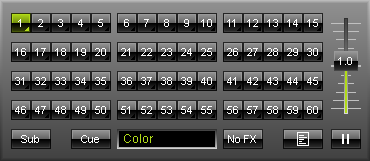
The chapter Storage Areas already introduced the controls you can find in Storage Area A and Storage Area B. This chapter focuses on how to work with Storage Places. It will also provide more details regarding Submaster and cue function.
Working With Storage Places
Overview
MADRIX provides 2 x 60 Storage Places to save your effects. They are located in Storage A and Storage B, which are positioned below the preview windows. The Storage Places are consecutively numbered from 1 to 60.
![]() Click the desired Storage Place number, choose an effect from the list of effects, and customize the effect according to your needs. You can learn more about how to set up an effect in the chapter Effects.
Click the desired Storage Place number, choose an effect from the list of effects, and customize the effect according to your needs. You can learn more about how to set up an effect in the chapter Effects.
After setting up your effect, the effect itself and all corresponding settings will be saved automatically in this Storage Place. You will see a green arrow displayed in the lower right corner of a Storage Place if you have chosen and modified an effect. This corner light indicates that this Storage Place is not empty.
![]() If you click a Storage Place, you activate it. After you did select it this way, the button will light up and change into a green-colored button. In this way you know, which Storage Place is currently used.
If you click a Storage Place, you activate it. After you did select it this way, the button will light up and change into a green-colored button. In this way you know, which Storage Place is currently used.
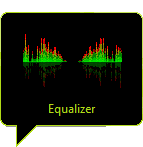 You can have a small preview of your effects if you hover with your mouse over a Storage Place. A thumbnail will show your effect.
![]() Also, remember to give your effect a name with the help of the description field.
Also, remember to give your effect a name with the help of the description field.
Please note that Storage Places on the other hand are saved in MADRIX setup files. Learn more in the chapter File Types.
![]() Using the "FX" button will present you with a number of choices to instantly change the visual outcome of the effect. This means you can quickly apply certain filters. Learn more in the chapter Layers.
Using the "FX" button will present you with a number of choices to instantly change the visual outcome of the effect. This means you can quickly apply certain filters. Learn more in the chapter Layers.
Context Menu
 The Storage Places are equipped with a context menu. Simply perform a right-click on a single Storage Place and the menu will appear. You may "Cue", "Open", "Save", "Copy", "Cut", "Paste", and "Clear" a Storage.
The same context menu is available in the menu:
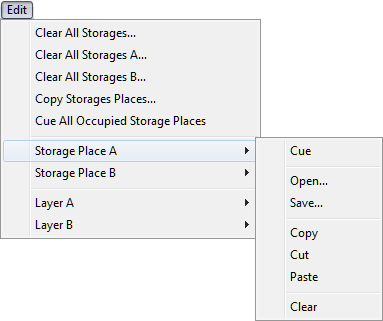
Cue
Cue will add the currently selected Storage Place to the Cue List.
Open Or Save
Single Storage Places can be saved. This means that you can save individual effects. They will be stored in the *.mef file format. Likewise, you can load a Storage Place you once stored by choosing "Open". Learn more about files in the chapter File Types.
Copy, Cut, And Paste
In total, 120 Storage Places are available to you. If you would like to duplicate or rearrange your setup of Storage Places, use these functions. Be also sure to read the section "Drag & Drop" below.
Here is an example: Select a Storage Place that contains an effect. Then, press copy, and select another Storage Place. Click paste. Now, your original effect will be copied from the original Storage to the target Storage. Both Storage Places will show the same effect.
Clear
If you would like to delete an effect and restore the blank Storage Place, choose the option "Clear".
Drag & Drop
The options "Copy and Paste" and "Cut and Paste" are also available using drag & drop.
Select a Storage Place and while holding the mouse button, drag it to another Storage Place. This performs a "Copy and Paste". Additionally, hold the "Shift" key during this procedure and a "Cut and Paste" will be performed. Both actions do work within one Storage Area or between both Storage Areas.
In addition, you can select a *.mef file in Windows and drag it to a Storage Place of your choice in MADRIX. Such a file is created when you save a Storage Place. Learn more about files in the chapter File Types.
Options From The Edit Menu
Clear
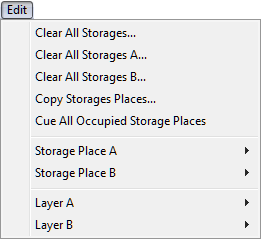
In the Edit menu you can "Clear all Storages", "Clear all Storages A", and "Clear all Storages B". This actions will clear all settings on selected Storages. This means that all Storage Places will be deleted and restored to their default state. You will have to confirm your selection with "Yes".
Copy
With the item "Copy Storage Places" you can copy one, multiple, or all Storage Places from A to B or from B to A. You will see the following dialog open, when you select it.
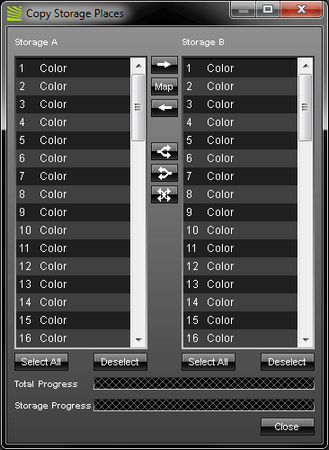
Storage A is shown in the left part and the Storage B in the right part.
![]() Use the "Select All" button to select all entries in the list of Storage A or B, respectively.
Use the "Select All" button to select all entries in the list of Storage A or B, respectively.
![]() Use the button "Deselect" to undo your selection. No Storage Place will be selected anymore.
Use the button "Deselect" to undo your selection. No Storage Place will be selected anymore.
In general, you should first select all Storages you want to copy. Navigate to the other list and choose the Storage Places where your selected Storages should be saved. Then, use one of the buttons described below.
Please use the "Ctrl" or "Shift" keys for multiple selection. Especially, in the case of copying images and videos it may take a while to copy all Storage Places. The two progress bars at the bottom of the window will show you the progress.
![]() Please select the Storages you want to copy and then click on the right arrow to copy them from A to B. In this process, the Storages will be assigned their previous numbering. In other words, Storages 1 to 8 of Storage A will be copied to 1 to 8 in Storage B.
Please select the Storages you want to copy and then click on the right arrow to copy them from A to B. In this process, the Storages will be assigned their previous numbering. In other words, Storages 1 to 8 of Storage A will be copied to 1 to 8 in Storage B.
![]() Please select the Storages you want to copy and then click on the right arrow to copy them from B to A. In this process, the Storages will be assigned their previous numbering. In other words, Storages 10 to 15 of Storage B will be copied to 10 to 15 in Storage A.
Please select the Storages you want to copy and then click on the right arrow to copy them from B to A. In this process, the Storages will be assigned their previous numbering. In other words, Storages 10 to 15 of Storage B will be copied to 10 to 15 in Storage A.
![]() With an activated Map button you can copy selected Storages defining their exact spot in the lists. Hence, you can copy one Storage Place to a different Storage Place in the other Storage. In this way, you can change the numbering. For example, you want to copy Storage Place A1 to Storage Place B50. Using only the arrow keys, as described above, this is not possible. Using the "Map" function makes it possible. When activated, the button will glow green.
With an activated Map button you can copy selected Storages defining their exact spot in the lists. Hence, you can copy one Storage Place to a different Storage Place in the other Storage. In this way, you can change the numbering. For example, you want to copy Storage Place A1 to Storage Place B50. Using only the arrow keys, as described above, this is not possible. Using the "Map" function makes it possible. When activated, the button will glow green.
![]() Use this button to copy one single Storage Place from Storage A to several Storage Places in Storage B. Simply select the effect in the list of Storage A and select multiple Storage Places in the right list. Then press this button.
Use this button to copy one single Storage Place from Storage A to several Storage Places in Storage B. Simply select the effect in the list of Storage A and select multiple Storage Places in the right list. Then press this button.
![]() Use this button to copy one single Storage Place from Storage B to several Storage Places in Storage A. Simply select the effect in the list of Storage B and select multiple Storage Places in the left list. Then press this button.
Use this button to copy one single Storage Place from Storage B to several Storage Places in Storage A. Simply select the effect in the list of Storage B and select multiple Storage Places in the left list. Then press this button.
![]() Select one single Storage Place in the left or right list and then press this button. The selected Storage Place will be copied to all other 119 Storage Places.
Select one single Storage Place in the left or right list and then press this button. The selected Storage Place will be copied to all other 119 Storage Places.
Cue
You can add all Storage Places that contain an effect to the Cue List with the item "Cue All Occupied Storage Places" .
Options From The File Menu
Similar to saving a single Storage Place, you can save or load an entire Storage Area. If 120 Storage Places are not enough, this might be a good possibility.
This options available from the File menu.
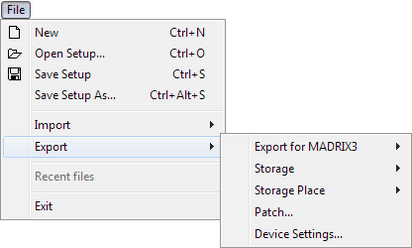
To save a Storage Area, go to "Export" -> "Storage" -> "Storage A" or "Storage B". The file will be a MADRIX Storage Setup File (*.mss). To load a Storage Area, go to "Import" -> "Storage" -> "Storage A" or "Storage B".
Submaster And Cue
![]() The Submaster can be found at the bottom of a Storage Area. The Submaster can be used to control the intensity of a selected Storage Place. It only works for the Storage Place that you did select. It does not control the main output. If you want to adjust the overall intensity, you need to use the Master Fader.
The Submaster can be found at the bottom of a Storage Area. The Submaster can be used to control the intensity of a selected Storage Place. It only works for the Storage Place that you did select. It does not control the main output. If you want to adjust the overall intensity, you need to use the Master Fader.
Upon clicking, the "Sub" button extends to a fader. Please make sure to press and hold the button at the same time. Afterwards, you can easily move the fader with your mouse. A range of 0 to 255 provides a precise adjustment of the intensity. A value of 0 renders the effect completely black.
![]() Using the "Cue" button will automatically add the selected Storage Place to the Cue List. The newly created Cue List entry will include all the applied parameters, like the description of the Storage Place or the fade duration and fade type of the crossfader in the Fade Area.
Using the "Cue" button will automatically add the selected Storage Place to the Cue List. The newly created Cue List entry will include all the applied parameters, like the description of the Storage Place or the fade duration and fade type of the crossfader in the Fade Area.
Using A Storage Place Macro
![]() Storage Place macros affect an entire Storage Place including all layers. You can find more details in the chapter Macros & Scripts.
Storage Place macros affect an entire Storage Place including all layers. You can find more details in the chapter Macros & Scripts.