This tutorial shows you how you can control a kinetic system, with 5 x 5 fixtures for example, with MADRIX.
Date: 03/2016
MADRIX Version: 3.5a (Created with)
Note: In this example, we are assuming that the movement channels of our 5 x 5 fixtures are occupying the first 25 DMX channels on DMX universe 1. And we are assuming that the color channels of our 5 x 5 fixtures are occupying the first 75 DMX channels on DMX universe 2.
1. |
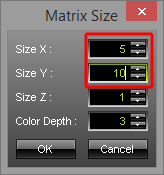
Start MADRIX and open the Patch Editor (press the F3 key on your keyboard). Change the Matrix Size to Size X = 5, Size Y = 10, and Size Z = 1
|
||||||||
2. |
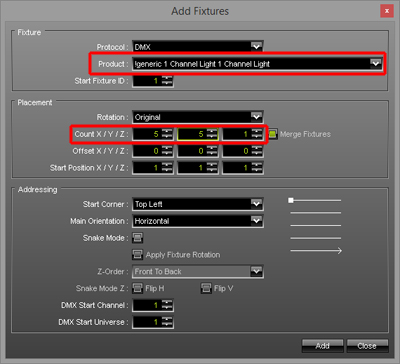
Now, we want to add the fixtures for the kinetic movement. We are going to add one-channel lights at the top of the patch, in this example. Please click the Add button and change the following settings in the Add Fixtures window:
Confirm by clicking Add
|
||||||||
3. |
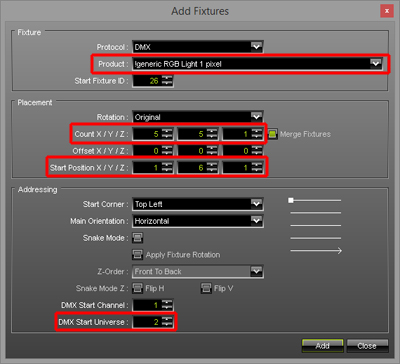
In this step, we want to add the fixtures to control the RGB lights of the kinetic system. In this example, we are going to 3-channel RGB lights below the fixtures that are used for the movement. Please open the Add Fixtures window again and change the following settings:
After you have adjusted the settings, click Add
|
||||||||
4. |
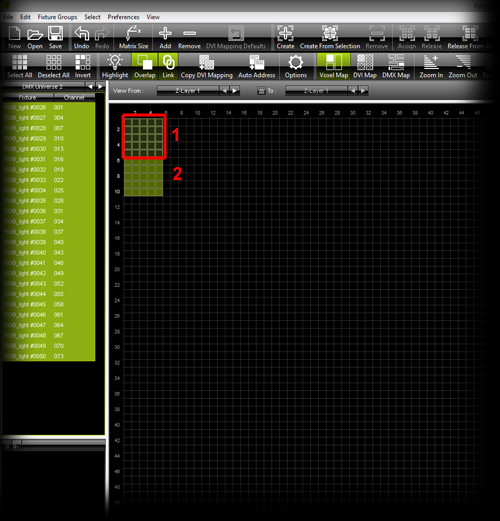
We have now added all necessary fixtures. The 1st area is responsible for the kinetic movement of the fixtures.
|
||||||||
5. |
In this step, we want to create two fixture groups. With the help of the fixture groups, you can control and assign the desired fixtures in MADRIX more easily. If you want to learn more about how to create fixture groups, please see this tutorial »Working With Fixture Groups Here in this example, we are going to call the first fixture group RGB and we are adding all fixtures of the second DMX universe to this group. To do so, please select all fixtures of the second DMX universe, click Create From Selection, and change the Name to RGB We are calling the second group Movement and will be responsible for controlling the movement of the fixtures. Please select all fixtures of the first DMX universe, click Create From Selection, and change the Name to Movement Please close the Patch Editor now.
|
||||||||
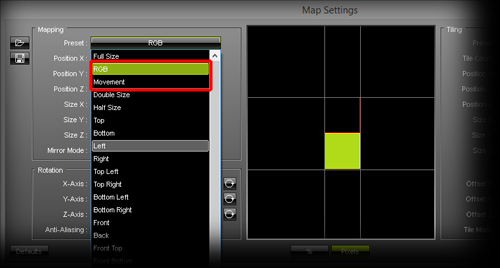
6. |
When you now click on Map, the Map Settings window will launch. There, you have the option to change the mapping to the newly created fixture groups very easily. Choose Mapping > Preset > RGB or Mapping > Preset > Movement
|
||||||||
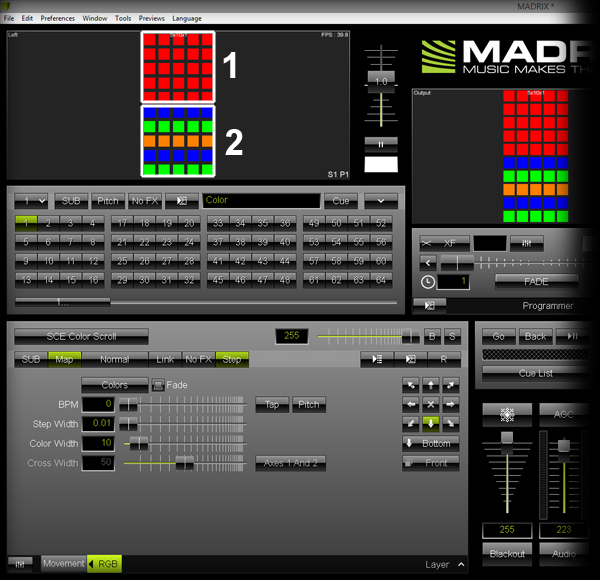
7. |
We want to create the first MADRIX Effect for the kinetic lighting system. In this example, we are going to use two Layers in MADRIX. The first layer is responsible for the movement and the second layer is responsible for the color of the LEDs. When you now have a look at the real fixtures in the installation, you should see scrolling colors on the LEDs and the winches should be extended to the maximum.
|

Congratulations! You have just learned how you can use MADRIX to control a kinetic lighting system.