This topic includes:
▪DMX-OUT Via Ethernet Network [Art-Net]
▪3] Fixture Patching In MADRIX 5
▪5] Adding Devices Automatically
▪7] Configuration Of DMX Output
▪9] Optimized Frames Or Full Frames
▪Additional Art-Net Device Settings
DMX-OUT Via Ethernet Network [Art-Net]
You can connect the STELLA over Ethernet network to the network card of your computer that runs the MADRIX 5 Software. Data is distributed to the STELLA over network cabling [Ethernet] and sent to the two ports [DMX 1 and DMX 2].
▪Put MADRIX STELLA into operation; as described above. Learn more »Putting The Device Into Operation
▪Connect MADRIX STELLA to your computer using Ethernet network cabling.
▪It is highly recommended to use Gigabit Ethernet network components [network card, switches, etc.].
▪Set up the corresponding settings in the »Configuration Using A Web Browser
Art-Net is a network-based protocol. MADRIX 5 will use the network card of your computer to send data.
▪It is required to set up the correct network settings in Windows, first.
▪You must use these IP address and Subnet mask settings. Otherwise, Art-Net might not work!
▪The IP addresses of your computer and your MADRIX STELLA devices need to be different.
▪Set up an individual IP address in the following IP address range:
- 2.0.0.1 ... 2.255.255.254 or
- 10.0.0.1 ... 10.255.255.254
▪Set up the corresponding Subnet mask
- 255.0.0.0
[Via factory default settings, MADRIX STELLA devices will have an IP address in the 10.x.x.x network range, such as 10.78.0.86, for example].
[Please note: Your devices and the sender, such as the PC that runs MADRIX 5, need to have the same subnet mask!]
▪Restart MADRIX 5, if you have changed the network settings in Windows while MADRIX 5 was running.
▪Learn more »Tips [Microsoft Windows / Networks / USB]
▪Example for PCs that are running MADRIX 5 :

3] Fixture Patching In MADRIX 5
▪Start the MADRIX 5 Software.
▪Configure the virtual LED matrix using the Matrix Generator or Patch Editor.
▪Go to the menu Preferences > Device Manager... > Art-Net
[Keyboard shortcut: F4 > Art-Net]
▪Activate the checkbox Enable [in the upper, right corner].

5] Adding Devices Automatically
MADRIX 5 can automatically add your MADRIX STELLA devices.
▪Click ![]()
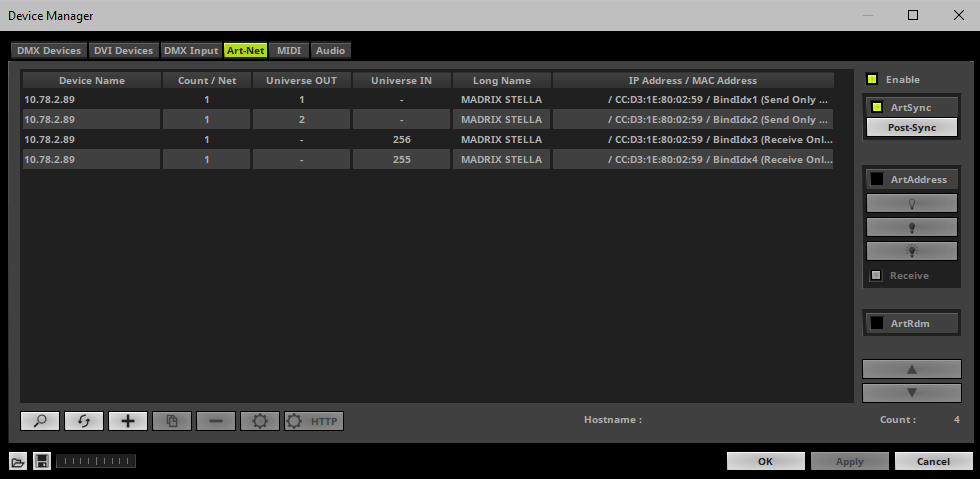
[MADRIX 5 will automatically search the network for connected MADRIX STELLA devices. Devices that are found will appear in the list. One entry will be created for each input universe and output universe.]
Each of your MADRIX STELLA devices and its ports need to be activated. By default, they are still deactivated.
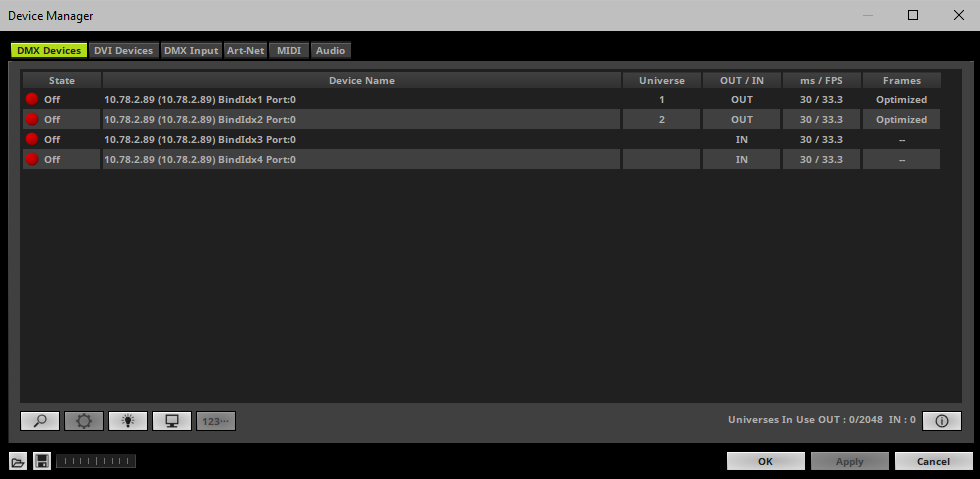
▪Go to the menu Preferences > Device Manager... > DMX Devices
[Keyboard shortcut: F4]
▪Select your devices and their ports in the list.
▪Right Mouse Click on the column State to set from Off to On [indicated by green light].
▪OUT and IN are set by default for the corresponding ports and universes.
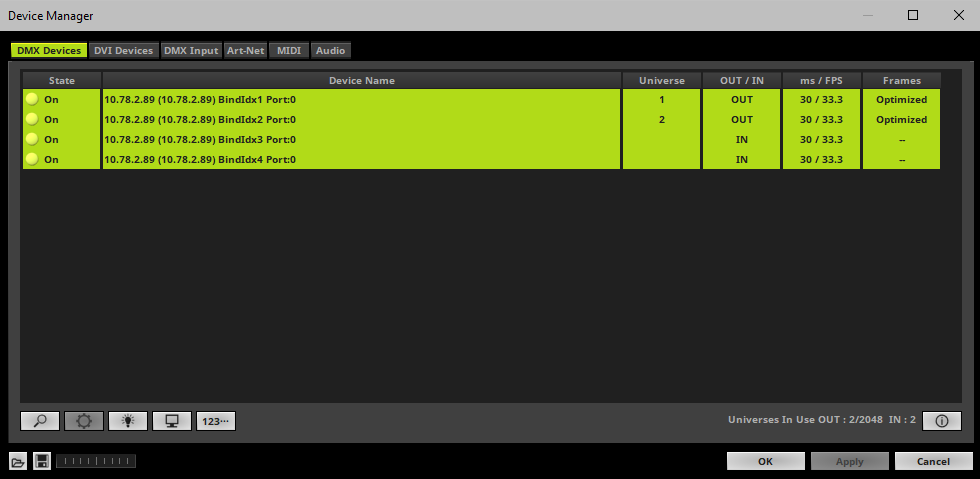
▪[In the screenshot above, one STELLA is connected. If more devices are connected, please use the different IP addresses of different devices to identify them in the Device Manager.]
7] Configuration Of DMX Output
▪Make sure that your output port is still selected under Preferences > Device Manager... > DMX Devices
▪When using your device as an output device, set up Universe
- Right Mouse Click or Left Mouse Double-Click on the column Universe and enter the required number.
▪This setting assigns a specific DMX universe [of the Patch] to the device or the port of the device.
▪Make sure to assign the correct universe according to your requirements.
Learn more »Glossary
▪By default, DMX universe 1 is assigned to DMX 1 and DMX universe 2 is assigned to DMX 2.
▪Make sure that your device is still selected under Preferences > Device Manager... > DMX Devices
▪Set up the frame time for your device.
- Right Mouse Click or Left Mouse Double-Click on the column ms / FPS and enter the required number.
- The frame time [in milliseconds; ms] affects the frame rate. The frame rate specifies how fast data is sent to the device or received from it [in Frames Per Second; FPS].
- Increase the frame time in order to decrease the frame rate [e.g., 40 ms = 25 FPS].
- Decrease the frame time in order to increase the frame rate [e.g., 20 ms = 50 FPS].
- The default value is 30 ms / 33.3 FPS.
- The minimum value is 1000 ms / 1 FPS.
- The maximum value is 5 ms / 200 FPS.
Please note: If you want to output high frame rates, make sure to set Main Mixing FPS in the Options to the same value in order to render the same frame rate [It is set to 50 FPS by default. Otherwise, frames will be duplicated].
Please note: If you want to input high frame rates, make sure to set DMX Controller Input FPS in the Options to the same value in order to process the same frame rate [It is set to 50 FPS by default. Otherwise, frames will be duplicated].
- Some LED fixtures might have problems with a low frame time / high frame rate. Then, it is recommended to increase the frame time / decrease the frame rate.
▪[When using Art-Net, the Frame Time [ms] can be individually set for each port. But it cannot be set individually for each port, when Sync Mode is activated. Learn more below.]
9] Optimized Frames Or Full Frames
▪Make sure that your device is still selected under Preferences > Device Manager... > DMX Devices
▪Choose how to send data.
- Right Mouse Click or Left Mouse Double-Click on the column Frames to choose between Optimized and Full
- Per DMX512 standard, MADRIX 5 only sends the number of DMX channels that is configured [optimized frames]. For example, if you are using 312 DMX channels on a DMX universe, only 312 DMX channels will be sent with every single frame on this universe.
- Activate Full Frames if devices should always send full frames on a particular universe, instead of optimized frames. Sending full frames means that always the full 512 DMX channels of a DMX universe will be sent with every frame [even when you are using less than 512 channels on the universe].
- Activating Full Frames is recommended if problems with the data output of your devices occur.
▪In addition, you can activate Full Frames for the device and each MADRIX STELLA port separately in the Device Configuration.
MADRIX STELLA can use the special sync mode of Art-Net.
▪Large LED projects require dependable data distribution. The MADRIX 5 Software and STELLA hardware allow you to fully synchronize data output for all output DMX ports and even across multiple STELLA devices to get an optimal image on the LEDs.
▪When Art-Net sync mode is activated, MADRIX 5 and MADRIX STELLA will automatically handle the synchronization of data.
Art-Net Sync Mode is highly recommended for MADRIX STELLA!
|
ArtSync - Allows you to activate or deactivate the usage of synchronisation commands/packages for Art-Net. In addition, you can choose between Post-Sync [default] and Pre-Sync. By default, the sync data is sent after the main DMX/Art-Net data. Pre-Sync would send it before the main DMX/Art-Net data. ▪Before activating sync, make sure that all activated Art-Net devices are available in your network! Else, the frame rate of Art-Net might drop. If you are not sure, do not enable any sync mode. ▪Disable ArtSync if you wish to HTP merge from two sources! ArtSync would then interfere with the merge and create unwanted results. |

Additional Art-Net Device Settings
It is very important to set up the correct settings of your devices!
Broadcast Mode Or Unicast Mode
MADRIX 5 can send Art-Net data in 2 ways to your Art-Net devices:
▪Broadcast Mode - Means that every packet sent from a single transmitter will be received by all recipients in the network. MADRIX 5 will send data to all devices in the network.
- Advantage: The same data [e.g., DMX universe 1 and 2] can be made available at different points of your setup.
- Disadvantage: A potentially huge number of data packages will be sent over the network. This can reduce the overall network performance and cause data issues or instability.
▪Unicast Mode - Means that the specific data will only be sent to the specified recipient.
- Advantage: Data traffic is reduced immensely, which means that a larger number of Art-Net devices can be used in one network. Reduced network traffic increases the performance and stability.
- Disadvantage: The network settings of all devices need to be 100% correct.
Unicast Mode is recommended in general.
▪Go to the menu Preferences > Device Manager... > Art-Net
[Keyboard shortcut: F4 > Art-Net]
▪Select your device in the list.
▪Click ![]()
▪A new window will open.
▪A] Choose Send Unicast Mode to activate Unicast Mode:
- Make sure to enter the correct IP Address of your device that should receive the Art-Net data.
- MADRIX 5 will send the corresponding data only to this device.
▪B] Choose Send Broadcast Mode to activate Broadcast Mode:
- Make sure to select the correct Network card of your computer that should send the Art-Net data.
- MADRIX 5 will send data to the whole Art-Net network.
▪Click Apply
Status Indicators [ArtAddress]

In order to use these features, Enable ArtAddress first.
▪Regarding sending ArtAddress commands to nodes, make sure that your nodes fully support this Art-Net feature.
You will also get notified by a message box. Confirm the message with OK or abort via Cancel.
▪MADRIX LUNA, MADRIX NEBULA, MADRIX PLEXUS, MADRIX STELLA, MADRIX ORION, and MADRIX AURA support ArtAddress.
▪MADRIX 5 itself can receive ArtAddress commands.
|
Mute Status Indicators - Switches off and disables all built-in status indicators of a device over Art-Net [ArtAddress > AcLedMute]. |
|
Operate Status Indicators Normally - Allows the built-in status indicators of a device to operate normally again, after having them switched off [ArtAddress > AcLedNormal]. |
|
Highlight Device - Activates the highlight mode [ArtAddress > AcLedLocate]. Select one or more interfaces and click the button. The corresponding status indicators of the selected interfaces will flash for a better identification or tests. This makes it easier to see them on site/stage. It considerably speeds up the procedure of programming or testing the selected interfaces. |
|
In addition to sending out commands to nodes, MADRIX 5 itself can receive ArtAddress commands. Receive - Activates that MADRIX 5 is able to receive ArtAddress commands. It is enabled by default. ▪AcLedMute and AcLedNormal will disable the identification of MADRIX 5. ▪AcLedLocate will enable the identification of MADRIX 5. You can further customize ArtAddress properties under menu Preferences > Options... > General |


| MADRIX STELLA User Manual 6.11. |
| [Ctrl & +/-] = Zoom In/Out | [Ctrl & 0] = 100% |
|
Previous Next
|
|
Enable Automatic Translation | Activer La Traduction Automatique | 启用自动翻译 |