Topics of this chapter:
Next to Preview Deck A and next to Preview Deck B you will find different controls that affect the outcome of the entire Deck A or Deck B. They are available to you per side, as explained below.


▪Submaster - Controls the intensity of the entire Deck A or Deck B.
▪It will affect the visual outcome on the left or right side, independently of which Storage, Storage Place, or Layer is selected.
▪Left Mouse Click And Hold - Select the required value by moving the fader with the help of your mouse. Release the mouse button to set up the specific value [The fader will disappear automatically].
▪A value of 255 means full intensity.
▪A value of 0 means no intensity and will render the effect completely black. A value of 0 is shown in red in order to make its severe affect on the visual outcome clear. The button itself pulsates in red as well.
▪The tooltip shows the currently set value.

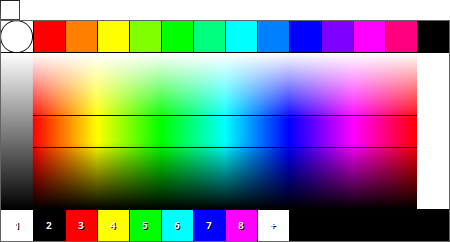
▪Color Filter - Filters the colors of the entire Deck A or Deck B.
▪Left Mouse Click And Hold - Select the color using the Color Picker to activate the Color Filter.
- You can also use Global Colors. Learn more »[Global] Colors And Intensity
▪Right Mouse Click - Calls up the context menu.
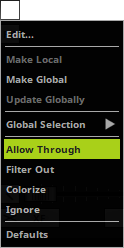
▪Edit... - Calls up the Color Fader Box.
Make Local - Converts a Global Color to a Local Color. Learn more »[Global] Colors And Intensity
Make Global - Converts a Local Color to a Global Color. Learn more »[Global] Colors And Intensity
Update Globally - Allows you to change a modified Global Color everywhere by updating it globally. Learn more »[Global] Colors And Intensity
Global Selection - Allows you to choose a Global Color as this color. Learn more »[Global] Colors And Intensity
▪Choose from the following modes:
Allow Through - Lets only the color that is chosen through and filters every other color out.
Filter Out - Removes the color that is chosen and lets all other colors through.
Colorize - Applies the chosen color as tint color.
Ignore - Allows you to quickly deactivate the filter, especially when controlling it remotely via a lighting console [instead of needing to set it to Allow Through with color White].
▪Defaults - Restores the default color. The default value is Allow Through with color White, which means that no filter is active.

▪Filters FX - Special filters can be applied to an entire Effect Pipeline Deck A or Deck B to quickly change your visuals.
▪Learn more »Filters [FX]
Overview

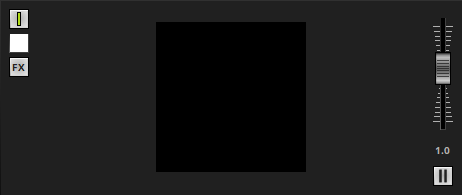
▪Speed Master Deck A/Deck B - Allows you to speed up or slow down effects.
▪Each Speed Master influences the speed of the entire Deck A or Deck B.
▪The Speed Masters work as a multiplier of the current speed of an effect [that includes the BPM of a Layer, the Pitch of a Layer, and the Pitch of a Storage Place.]
▪A value of 0 is shown in red in order to make its severe affect on the visual outcome clear.
▪Example: A Speed Master of 2.0 will double the current speed.
How To Use
▪Move the fader upwards to increase the speed.
▪Move the fader downwards to decrease the speed.
▪The default value is 1.0 [which is normal speed].
▪A value of 0.0 will stop the effects.
▪The highest value is +10.
▪The lowest value is -10.
▪Negative values will reverse the direction of effects [if possible].
▪Double-click or right-click on the Speed Master button to reset to the value of 1.0
Pause

▪Pause - Will halt the effect.
▪Left Mouse Click And Hold - Pauses the effect as long as you hold the mouse button [temporarily].
▪Left Mouse Double-Click - Pauses the effects permanently. A single click deactivates the permanent stop again.
Options
You can define the value range of the Speed Masters in the Options.
Learn more »User Interface
| MADRIX 5.7. |
| [Ctrl & +/-] = Zoom In/Out | [Ctrl & 0] = 100% |
|
Previous Next
|
|
Enable Automatic Translation | Activer La Traduction Automatique | 启用自动翻译 |