This topic includes:
Any DMX input signal can be used to control MADRIX 5 remotely. While you can use preconfigured DMX protocols, you can also set up such a configuration according to your needs with the help of the DMX-IN Remote Editor. This topic describes how to use the DMX-IN Remote Editor.
▪Make sure to configure your DMX device first.
[For example, DMX devices can be consoles, DMX desks, fader boards, other DMX interfaces, etc.]
▪Set up DMX Input.
▪Learn more »DMX-IN / Art-Net Remote / sACN Input
▪Go to the menu Preferences > Device Manager... > DMX Input
▪ Click Edit... to open the DMX-IN Remote Editor
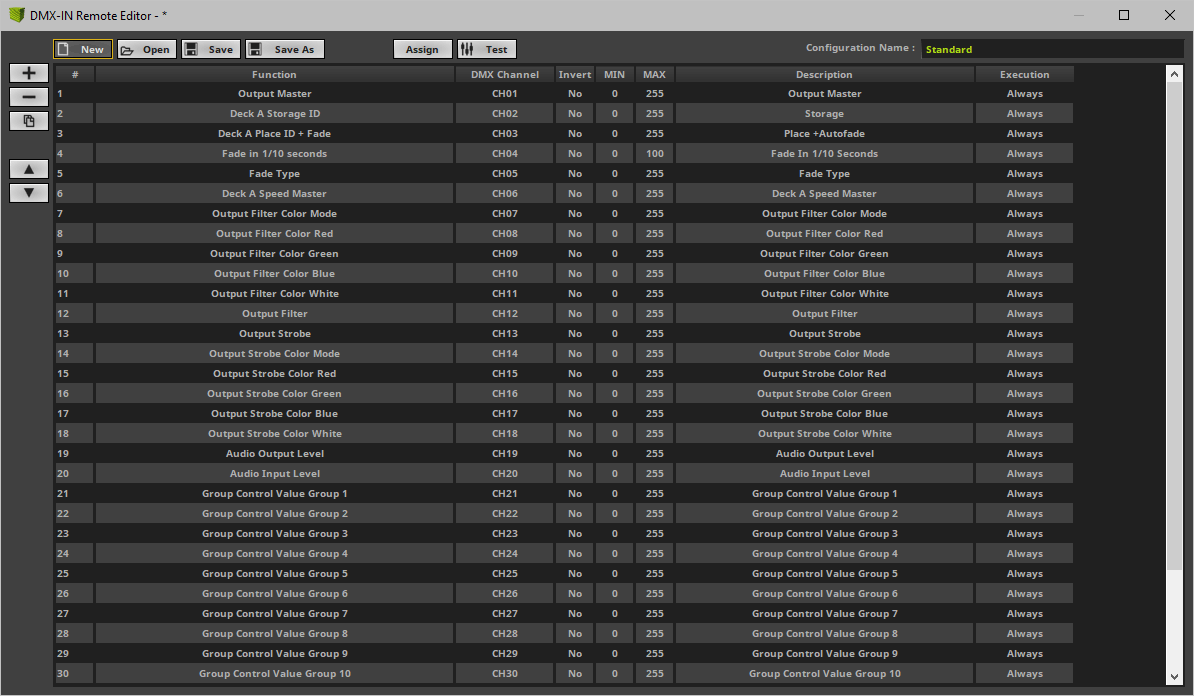
▪A new window will open.
▪If you are creating a new DMX protocol, the list will be empty.
▪If you are modifying an existing DMX protocol map, the list will already contain all preconfigured settings.

|
Add - Adds a new item to the list. |
|
Duplicate/Copy - Copies and duplicates the currently selected list item. The new item will be added to the list right after the selected item. You can change its settings afterwards. |
|
Navigation - Allows you to select the next or previous list item. |
|
New - Creates a new configuration while deleting all previous list items with your permission. |
|
Open - Loads a previously saved DMX Remote Configuration file into the DMX-IN Remote Editor from an external file [of the file type *.mdrx]. |
|
Save - Saves the current DMX Remote Configuration to an external file [of the file type *.mdrx]. |
|
Assign - Allows you to assign a control of your DMX controller to a function in MADRIX 5. |
|
Test - Allows you to test single list items and their functionality on the MADRIX 5 user interface, while having the DMX-IN Remote Editor still opened. - Test is also useful for testing modifiers. Learn more Modifiers |
|
Configuration Name - Allows you to type in an individual description for your DMX Remote Configuration. |
Ctrl + A |
Selects all items in the list. |
Ctrl + E [hold] |
Activates Assign, while holding this shortcut. |
Ctrl + N |
Creates a new configuration. |
Ctrl + O |
Opens a configuration. |
Ctrl + S |
Saves a configuration. |
Ctrl + T [hold] |
Activates Test, while holding this shortcut. |
Del |
Removes selected items from the list. |
Arrow Up |
Navigates upwards in the list. |
Arrow Down |
Navigates downwards in the list. |
Double-click on an item |
Calls up the context menu for the column. |
Double-click on a head row of the list |
Sorts the list alphabetically according to the column [ascending or descending]. |
Overview
▪Each list item represents 1 DMX remote functionality using 1 DMX control [i.e., button, fader, etc.].
▪Configure each list item as required.
▪Configure each column of an list item.
▪Add or remove list items to add or remove the functionality you require.
Function |
|
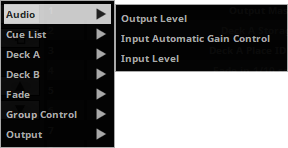
1] Create a new item with + 2] Select the general topic [e.g., Audio]. 3] Select the exact function you wish to configure [e.g., Volume]. |
DMX Channel |
|
A] Click Assign, select one or more list items and use a control on your DMX controller. In most cases, MADRIX 5 will automatically recognize the DMX Channel, Control Type, and Interaction. B] Or first select one or more list items and perform a double-click with your mouse on the column DMX Channel. Second, enter the correct DMX channel [e.g., CH01 for channel 01]. |
Invert |
|
1] Select one or more list items and perform a double-click with your mouse on the column Invert. 2] The items will change between No and Yes: |
MIN, MAX, |
|
▪Select one or more list items and perform a double-click with your mouse on the column MIN, MAX, or Description. Enter the desired value or text. ▪MIN - Defines a minimum value for this functionality. The default value is 0. ▪Description - Allows you to enter a text to describe the functionality. |
Execution |
|
1] Select one or more list items and perform a double-click with your mouse on the column Execution. 2] The items will change between Always and On Value Change: More Information: Although MIDI and DMX-IN can both be used for similar remote control, both standards function differently. Regarding MIDI: Regarding DMX: Regarding Default Values: |
Special Functions
Please note: The following items are implemented in specific ways in order to achieve useful functionality.
Specific Functions
▪Deck A/B > Storage Place > Chaser Play / Pause / Stop
- Stop will be active for all values until 84 [0 - 84].
- Pause will be active for all values from 85 to 169 [85 - 169].
- Play will be active for all values from 170 to 255 [170 - 255].
- Execution is set to On Value Change by default.
- It should be left this way and not be set to Always!
- If a Chaser should only be controlled via remote control, you should disable AS [Autostart] within the Chaser.
▪Deck A/B > Storage Place > Chaser Step
- Execution is set to On Value Change by default.
- It should be left this way and not be set to Always!
- If a Chaser should only be controlled via remote control, you should disable AS [Autostart] within the Chaser.
▪Cue List > Play / Pause / Stop
- Stop will be active for all values until 84 [0 - 84].
- Pause will be active for all values from 85 to 169 [85 - 169].
- Play will be active for all values from 170 to 255 [170 - 255].
▪Global Colors > Global ID
- Controls Global Colors [not Global Color Lists].
- Allows you to choose up to 64 individual selectors.
- Each selector can have an individual ID assigned to it.
- Valid values range from 1 to 255. Value 0 means no selection.
- That means you can control up to 64 different IDs.
[Selectors 1 - 64 do not necessarily control IDs 1 - 64. Instead you can choose the ID with this function.]
▪Global Colors > Global ID / Red / Green / Blue / White / Alpha
- Controls the corresponding color channels for the corresponding selector, which in turn has the Global Color selected via Global ID.
- Valid values for the color channels range from 0 to 255.
Custom Default Values For MAX
The following functions have their default MAX values set according to the number of items their functionality provides. For example, Output Filter Color Mode has 3 modes and a MIN / MAX range of 0 / 2, which is a total of three:
▪Output > Filter Color > Mode
- Mode 1 [Allow Through] will be active for all values until 85 [<= 85].
- Mode 2 [Filter Out] will be active for all values from 86 to 170 [86 <= 170].
- Mode 3 [Colorize] will be active for all values from 171 to 255 [171 <= 255].
The following functions work similarly:
▪Deck A/B > Filter Color > Mode
▪Deck A/B > Filter
▪Deck A/B > Storage Place > Filter
▪Deck A/B > Storage Place > Layer > Mix Mode > Layer 1 - 8
▪Deck A/B > Storage Place > Layer > Filter > Layer 1 - 8
▪Fade > Type
▪Output > Filter Color > Mode
▪Output > Filter
▪Output > Strobe Color > Mode
Saving Your Configuration
▪Please save your configuration after you have configured all functions!
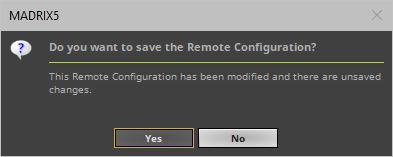
▪If you are closing the DMX-IN Remote Editor and have not yet saved, the MADRIX 5 Software will remind you to save the file.
▪If you do not save, your configuration will be discarded and is lost.

▪The MADRIX 5 Setup file does not include the external DMX Remote Configuration file, but will store the directory and a reference link in order to reload it when the Setup is loaded again.
Example 1
▪You wish to use single buttons of your DMX controller for each Storage Place.
▪Use + to create a new function.
▪Select Deck A > Place ID +Fade
▪Use Assign to match your button to this function. Disable Assign again when done.
▪Set MAX to 0 in order to trigger Storage Deck A S1 P1 [Storage 1 Place 1].
▪Repeat the steps and set up MAX for each Storage Place you wish to control.
- MAX will always have a value that is -1 compared to the actual Storage Place index number [e.g., set MAX to 6 in order to control S1 P7].
▪Use Deck B > Place ID+Fade and repeat the steps accordingly to control the Storage Places on the right side.
Example 2
▪You wish to use single buttons of your DMX controller for each Cue List entry.
▪Use + to create a new function.
▪Select Cue List > Goto
▪Use Assign to match your button to this function. Disable Assign again when done.
▪Set MAX to 0 in order to trigger Cue 1.
▪Repeat the steps and set up MAX for each Cue you wish to control.
- MAX will always have a value that is -1 compared to the actual Cue List index number [e.g., set MAX to 6 in order to control Cue 7].
| MADRIX 5.7. |
| [Ctrl & +/-] = Zoom In/Out | [Ctrl & 0] = 100% |
|
Previous Next
|
|
Enable Automatic Translation | Activer La Traduction Automatique | 启用自动翻译 |


