Topics of this chapter:
| ▪ | Note |
MADRIX natively supports the ROBE Protocol for ROBE StageQube 324™ LED panels.
| ▪ | To use ROBE StageQube 324, you need to have a separate DHCP server. |
| ▪ | This can be a software or hardware DHCP server, which handles the IP addresses of the ROBE LED panels and the MADRIX computer. |
| ▪ | It is recommended that the DHCP server binds MAC addresses to IP addresses. |
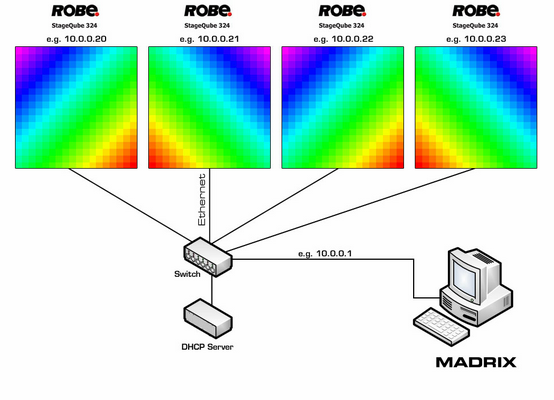
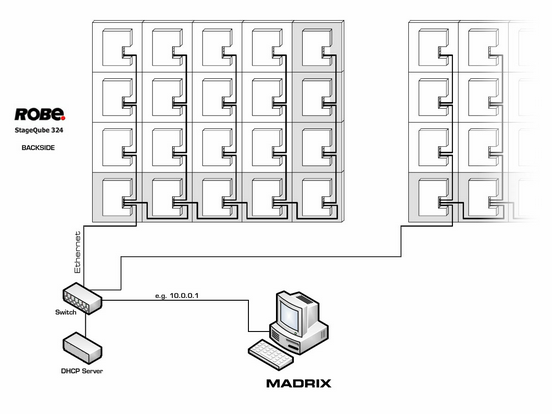
There are several steps required to set up ROBE products in MADRIX. This chapter is only part of the process. You need to set up other configurations as well [such as virtual LED matrix, DMX Devices, MADRIX Effects, Audio, etc.].
It is recommended to only use 1000 MBit/s network components. That means 1000 MBit/s network cards in your computer, 1000 MBit/s switches and a DHCP server with support of 10/100/1000 MBit/s if your setup looks like the configuration shown above.
1] Configure network settings in Windows.
2] Enable ROBE Drivers in MADRIX.
3] Activate devices.
4] Configure devices.
5] Set up the correct DMX universe.
6] Set up the Frame Time.
1] Windows Network Settings
The protocol from ROBE is a network-based protocol. MADRIX will use the network card of your computer to send data.
| ▪ | It is required to set up the correct network settings in Windows, first. |
| ▪ | You must use these IP address and Subnet mask settings. |
| ▪ | The IP addresses of your computer and your ROBE devices need to be different. |
| ▪ | Set up an individual IP address in the following IP address range: - 10.0.0.1 ... 10.255.255.254 |
| ▪ | Set up the corresponding Subnet mask - 255.0.0.0 |
| ▪ | Restart MADRIX, if you have changed the network settings in Windows while MADRIX was running. |
| ▪ | Check the settings of the Windows Firewall. |
| ▪ | Learn more »Tips [Microsoft Windows / Networks / USB] |
2] Enabling Drivers In MADRIX
| ▪ | Go to Preferences > Options... > Devices Network [Keyboard shortcut: Ctrl+Alt+O > Devices Network] |
| ▪ | Activate Enable Network Driver |
| ▪ | Choose the correct network/network card from the drop-down list. - Always make sure that you have selected the correct network. Otherwise, the network device might still be found. But no data can be sent. |
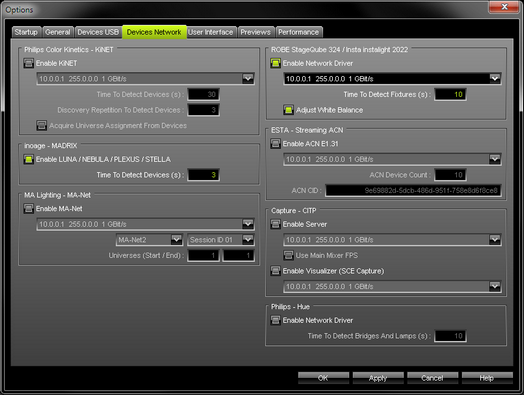
| ▪ | Time To Detect Devices (s) - Defines how long MADRIX searches the network for devices during startup. Type in a value in seconds. - We recommend to utilize at least a value of 10 to allow for a sufficient search. Higher values are recommended for larger installations. |
| ▪ | Adjust White Balance - Activate and MADRIX automatically performs this automatic calibration on startup. Connected panels will adjust their white value to the maximum value possible in the installation to ensure a similar color temperature. If the adjustment takes longer than 100 seconds, MADRIX will send data nevertheless. Uncheck this option if you want to deactivate it. |
3] Activating Device
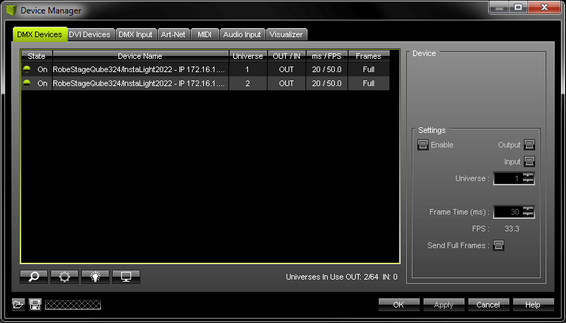
| ▪ | Go to Preferences > Device Manager... > DMX Devices [Keyboard shortcut: F4] |
| ▪ | MADRIX automatically adds network devices it has found during startup to the list. |
| ▪ | Click - MADRIX disconnects all DMX512, Art-Net, and other devices and starts to search for new or newly connected devices. - Do not rescan for devices if all of your interfaces have been found correctly. |
| ▪ | Select your devices in the list. |
| ▪ | Activate Enable |
| ▪ | Activate Output |
| ▪ | Click Apply |
4] Configuration Of Devices
| ▪ | Select a device in the list and click |
| ▪ | A new window will open. |
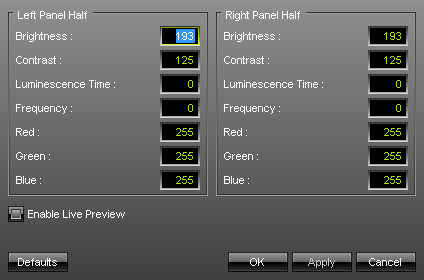
Set up the following settings for your device [for the Left Panel Half as well as the Right Panel Half]:
| ▪ | Brightness - Defines the maximum output intensity. |
| ▪ | Contrast - Defines the color contrast. |
| ▪ | Luminesce Time - Defines the luminesce tine of the panel. |
| ▪ | Frequency - Defines the frequency of the panel. |
| ▪ | Red - Defines the maximum red color intensity. |
| ▪ | Green - Defines the maximum green color intensity. |
| ▪ | Blue - Defines the maximum blue color intensity. |
| ▪ | Enable Live Preview - Activates the reception of parameters live from the device. |
| ▪ | Defaults - Restores the default settings. |
5] DMX Universe
| ▪ | Make sure that your device is still selected. |
| ▪ | Set up Universe - Enter the specific DMX universe number |
| ▪ | This setting assigns a specific DMX universe [of the Patch] to the device or the port of the device. |
| ▪ | Make sure the correct universe is assigned according to your requirements. Learn more »Glossary |
| ▪ | Click Apply |
6] Frame Time
| ▪ | Make sure that your device is still selected. |
| ▪ | Set up Frame Time (ms) - The Frame Time affects the Frame Rate. The Frame Rate specifies how fast data is sent to the device or received from it [Frames Per Second; FPS]. - Increase the Frame Time in order to decrease the Frame Rate [e.g., 40ms = 25 FPS]. - Decrease the Frame Time in order to increase the Frame Rate [e.g., 20ms = 50 FPS]. - The default value is 30 ms / 33.3 FPS. - Some LED fixtures might have problems with a high Frame Rate. Then, it is recommended to increase the Frame Time / to decrease the Frame Rate. |
| ▪ | Click Apply |
|
Rescan For Devices - MADRIX disconnects all DMX512, Art-Net, and other network devices and starts a new search for devices. |
|
Highlight - Activates the highlight mode for the selected interface and universe under Preferences > Device Manager... > DMX Devices. Select one or more interfaces and click the button. The corresponding fixtures at the selected interfaces will flash for a better identification or tests. This makes it easier to see them on stage. It considerably speeds up the procedure of programming or testing the selected DMX512/Art-Net interfaces. |
|
DMX Watcher - Opens the DMX Watcher to monitor your DMX output or input under Preferences > Device Manager... > DMX Devices |
If wish to resize the window of the Device Manager to see more devices in the list, simply move your mouse pointer to the bottom of this window. Then, select the border and hold the left mouse button, while moving your mouse downwards.
| ▪ | Keep in mind that network devices, if activated, cause network traffic! |
| ▪ | When using a network-based output protocol and when the Startup option Start MADRIX After Booting Windows is used, it is highly recommended to also activate the Startup option Start With Timeout (s) with a value of 30 or higher. |
| ▪ | It is not recommended to use communication over the Insta/ROBE protocols and KiNET in the same network! |
| ▪ | It is not recommended to operate the ROBE protocol and access to the World Wide Web/Internet in the same network! It is recommended to run it in a separate network without internet access. |
Remember to configure your light matrix in the »Matrix Generator or »Patch Editor
Make sure to save your MADRIX Setup after the configuration process.