This topic includes:
The MADRIX Backup System is a type of network communication between two or more MADRIX computers in order to set up a reliable backup solution.
| ▪ | A backup solution should get involved as soon as the main control solution fails. |
| ▪ | Regarding the MADRIX Backup System, so-called keep-alive messages are sent by one MADRIX computer to other computers to check if the connection between the computers is working properly. |
| ▪ | If the Master fails, i.e. if the Master does not send keep-alive messages in a certain time interval [in seconds], the Slave is automatically activated and sends the output data to the LEDs. |
| ▪ | Similarly, the Slave is sending keep-alive messages. |
| ▪ | The MADRIX Backup System works in combination of the Cue List in order to synchronize Master and Slave for backup purposes. |
| ▪ | Go to Preferences > Backup System... |
| ▪ | A new window will open. |

1] Make sure that all requirements are met.
2] Set up both computers and the network.
3] Configure the Master.
4] Configure the Slave.
5] Configure the MADRIX Setup and Cue List.
6] Test if all systems are working correctly.
1] Requirements
| ▪ | Make sure that all computers are equipped with a MADRIX KEY [i.e. a MADRIX software license]. |
| ▪ | Make sure that all computers are using the same MADRIX software version. |
2] Setup
Set up both computers and the network according to the instructions below:
How To Connect Master And Slave

| ▪ | You can utilize your network card with an Ethernet port to connect two ore more computers using a network switch. |
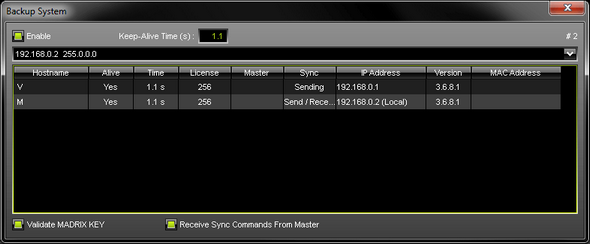
| ▪ | Set up the IP addresses from the computers like in the picture above. |
| ▪ | Both computers have to be in the same network address area [e.g., 192.168.0.1 to 192.168.0.254]. |
Example 1: How To Use The Backup System And Art-Net

| ▪ | It is recommended to always use two separate networks with two network cards if you want to sync Master and Slave and use Art-Net at the same time. |
| ▪ | Minimum requirements for this setup are: - 2 computers - 2 Ethernet switches - 1 or more Art-Net devices - Ethernet cables - DMX cables. |
| ▪ | Apart from that, both computers need to have two network cards installed. The setup for the first network is 192.168.0.X and the second is 2.0.0.X - The former will be used as the backup system, the latter is transferring Art-Net data. |
Example 2: How To Use The Backup System And Art-Net [Low-Budget Alternative]
")
| ▪ | In addition, you may use a variation of the example above. |
| ▪ | Depending on your installation, it can be possible to do the setup without the second network. It is a smaller budget alternative and in this case only the Art-Net network will be used. |
| ▪ | At the same time this means that traffic from both Art-Net and the backup system will be transferred over this single network. In larger installations this might cause network problems due to high data traffic! |
| ▪ | Connecting this backup system to the internet is not recommended because problems with the internet connection are likely to occur [such as connection errors, dropouts, etc.]. WiFi-nodes are also not recommended. The Art-Net data will simply interfere with the internet data in the 2.0.0.X network. |
| ▪ | If your Art-Net interfaces support the 10.0.0.X network, you may establish an internet connection since the Art-Net data may be blocked by your router and does not interfere with the internet connection. |
Such an installation is at your own risk.
Example 3: How To Use The Backup System And USB DMX512 Interfaces

| ▪ | If you are going to use an USB DMX512 interface, you can work with one network card to sync Master and Slave. |
| ▪ | Minimum requirements for this set-up are: - 2 computers - 1 Ethernet switch - 1 DMX merger - 2 DMX512 devices - Ethernet cables - DMX cables |
| ▪ | Apart from that, both computers need to have a network card installed. The set-up for this network is 192.168.0.X. Only this card/network will be used for the backup system. |
3] Configuration Of The Master
Configure the Master using the following options and settings:
| ▪ | Enable - Activates the backup system. |
| ▪ | Keep-Alive Time (s) - Defines the time range between keep-alive messages [in seconds]. Valid values range from 0.1 to 25.6. The default and recommended value is 1.1. [If the network connection is working correctly, you will see Yes in the column Alive. If the connection is lost, you will see Timeout.] |
| ▪ | Drop-Down List - Allows you to choose the correct network card if your computer or laptop is equipped with more than one network card. |
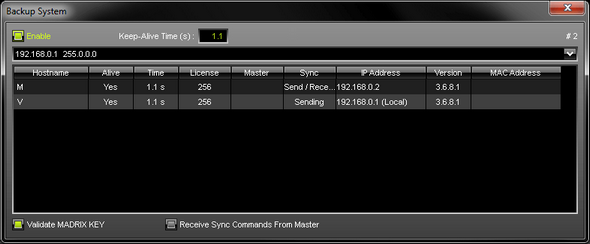
| ▪ | (Local) - Specifies that this is your local computer on which you are currently working. |
| ▪ |
4] Configuration Of The Slave
Configure the Master using the following options and settings:
| ▪ | Enable - Activates the backup system. |
| ▪ | Keep-Alive Time (s) - Defines the time range between keep-alive messages [in seconds]. Valid values range from 0.1 to 25.6. The default and recommended value is 1.1. [If the network connection is working correctly, you will see Yes in the column Alive. If the connection is lost, you will see Timeout.] |
| ▪ | Drop-Down List - Allows you to choose the correct network card if your computer or laptop is equipped with more than one network card. |
| ▪ | (Local) - Specifies that this is your local computer on which you are currently working. |
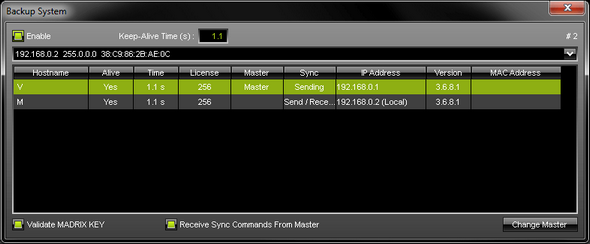
| ▪ | Validate MADRIX KEY - MADRIX automatically monitors if the MADRIX KEY is is plugged into the Master. |
| ▪ |
Please activate:
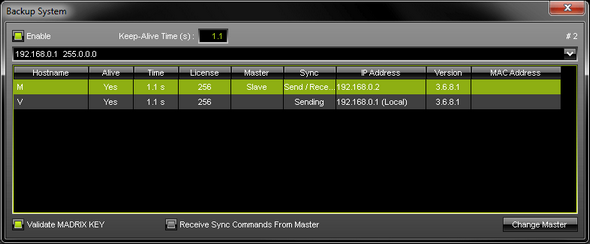
| ▪ | Receive Sync Commands From Master - Activates that the computer receives synchronization signals from the Master. |
Now, select the Master in the list and click:
| ▪ | Change Master - Allows you to select another computer in the list of found network computer and set this computer as the Master. You are not allowed to select your local computer as Master. You will have to choose a remote computer. |
The Master will be activated as Master in the Backup System of the Slave:
The Slave will be activated as Slave in the Backup System of the Master:
Result:
| ▪ | If the Backup System is activated, the Slave will not output any data as long as the Master is properly connected and alive in the network. |
| ▪ | If the Master is disconnected and receives a timeout, the Slave will start sending data when it receives the timeout message. |
5] Setup And Cue List
| ▪ | Finally, make sure that Master and Slave have the correct configuration of devices, patch, and effects. Ideally, you can load the same MADRIX Setup on both computers. |
| ▪ | Make sure that all computers are using the same Cue List. [As a minimum requirement, the number of Cues needs to be identical.] |
6] Tests
Perform the following tests in order to ensure that all systems are working correctly:
| ▪ | Test if the Master is controlling the LED installation correctly. |
| ▪ | Test if the Slave is controlling the LED installation correctly. |
| ▪ | Test if the Backup System is working correctly, if the Cue List is being synchronized between Master and Slave, and especially if the Slave is sending data in case the Master is disconnected and receives a timeout. |