|
This topic includes:
Introduction
You can use the Recording window to create MADRIX Record files [of the file type *.mrec].
This file type can be used in 2 ways:
| ▪ | A] *.mrec files can be converted to create Stand-alone Shows for MADRIX PLEXUS.
Learn more »MADRIX PLEXUS |
| ▪ | B] *.mrec files can be played just like a video using SCE Video [as described in this topic].
Learn more »SCE Video |
Overview
| ▪ | Go to Window > Recording...
[Keyboard shortcut: Ctrl+Alt+R] |
Records
Working With Records
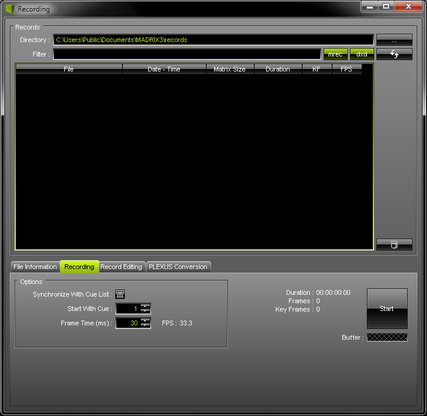
Directory

|
| ▪ | Defines a directory on your harddisk/computer. All record files will be saved in this folder. By default, a useful folder is automatically already chosen for you [For example C:\Users\USERNAME\Documents\MADRIX\records]. |
| ▪ | Use ... to choose a different folder. |
|
Filter
|
| ▪ | Simply enter a name/word and the filter will only show files that include these characters in their file name. Delete any input to show all files again. |
|
List
|
| ▪ | Files, i.e. records, will be displayed in the large list of the Recording window. If you did not create any records yet, the list is empty [as shown above]. |
|

|
| ▪ | Shows all MADRIX Record files [of the file type *.mrec] in the list that could be found in the specified directory. When activated, the button is green. Disable the option to hide all Record files. |
|

|
| ▪ | Show all DMX Data files [of the file type *.dxd] in the list that could be found in the specified directory. When activated, the button is green. Disable the option to hide all DMX Data files. |
|

|
| ▪ | Refreshes the list of records. Please make sure to select your preferred records directory first. |
|
File
|
| ▪ | Shows the name of the record and its file type [of the file type *.mrec or *.dxd]. Double-click on the list entry to change the name of the file. |
|
Date - Time
|
| ▪ | Shows the time and date when the record was created. |
|
Matrix Size
|
| ▪ | Shows the size of the virtual matrix [Matrix Size] used for this record. Learn more »Patch Editor |
|
Duration
|
| ▪ | Shows the length of the record, i.e. how long it is. The format is HH:MM:SS:FF [Hours:Minutes:Seconds:Frames]. |
|
KF
|
| ▪ | Stands for Key Frames. MADRIX will automatically optimize the file size of records if recorded frames are identical. Hence, the total number of frames can be different to the number of recorded key frames. For example, a color change [without a fade] might use only two colors. In this case, the record may have 400 frames in total, but just 2 key frames. |
|
FPS
|
| ▪ | Stands for Frames Per Second. Shows the number of frames recorded per second of the record file. |
|

|
| ▪ | Deletes selected files from your harddisk. You can also use the Del key on your keyboard. |
|
Window Size
In order to increase the size of the Recording window, please drag the bottom border of the window until the best size is reached. In this way you can see more files in the list.
File Information
| ▪ | Select a file in the list. |
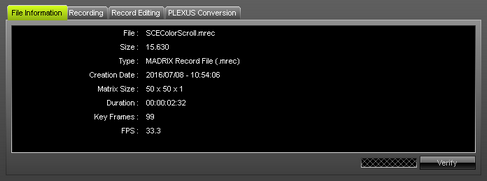
| ▪ | Go to the tab File Information to show detailed information about the file you have created. |
Recording
Overview
| ▪ | Go to the tab Recording to create a new record. |
Initial Configuration
Please configure your virtual LED matrix with the help of the »Matrix Generator or »Patch Editor to define the correct resolution for your record.
Important Note
| ▪ | Only the Main Output will be recorded. Make sure that your content is displayed on Preview Output before you start to record. |
Options
Configure the following options before recording:
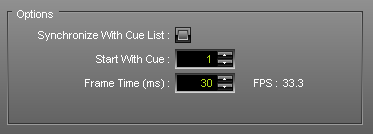
| ▪ | Synchronize With Cue List - Creates a record according to your preprogrammed Cue List. If this option is activated, the Cue List will automatically start to play when the Recording is started [by pressing the button Start]. |
| ▪ | Start With Cue - Defines which Cue List entry should be used first, when you wish to use the function Synchronize With Cue List |
| ▪ | Frame Time (ms) - Defines the frame rate of the record.
- Please adjust the settings according to the requirements of your LED fixtures and devices!
- A frame rate [FPS] that is too high might cause problems [e.g., visual issues on your LEDs]. |
Creating A Record File
Make sure to configure all available options before recording [see above].

|
Step 1]
| ▪ | Click Start to start recording. MADRIX will begin to record the Main Output. |
Note:
- When recording without a Cue List, you can change Storage Places, use the crossfader, change the Opacity, use the Master, etc. in order to customize your record.
- When creating a Record file to be played via SCE Video, SCE Video will ignore intensity changes by the Master. However, a Blackout will be recorded and played back as such by SCE Video.
|

|
Step 2]
| ▪ | Various information will be displayed during recording.
Duration - Is displayed in HH:MM:SS:FF [Hours:Minutes:Seconds:Frames].
Frames - Displays the total number of recorded frames.
Key Frames - Displays the number of key frames. MADRIX will automatically optimize the file size of records if recorded frames are identical. Hence, the total number of frames can be different to the number of recorded key frames. For example, a color change [without a fade] might use only two colors. In this case, the record may have 400 frames in total, but just 2 key frames. |
|

|
Step 3]
| ▪ | Simply click Stop to end the process.
- Please wait a few seconds to let MADRIX process the data. Afterwards you will need to enter a name for the new record. |
|
|
Step 4]
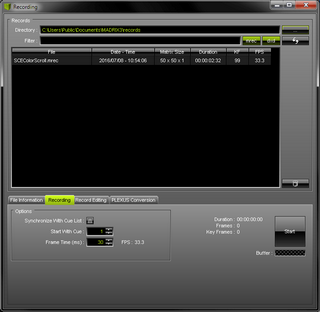
| ▪ | Afterwards, you will see your record in the list. |
|
Record Editing
After creating a record, you can edit the record.
| ▪ | Select your Record file in the list. |
| ▪ | Select the tab Record Editing |
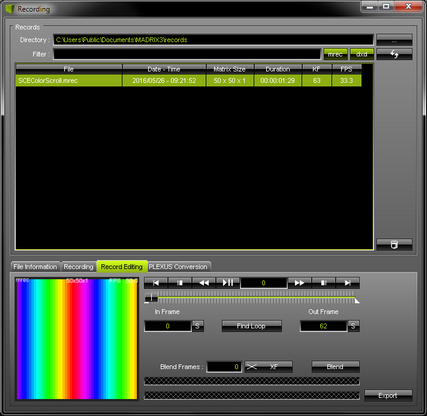
| ▪ | A small preview window is provided in the lower left to inspect the record. |
| ▪ | Please note: If you see the message !NO MADRIX KEY! in the preview window, that means that you are using MADRIX in demo mode. However, this is no problem. Your record will NOT include this text!
|
| ▪ | Use the provided controls to edit your record:
|

|
| ▪ | Use the slider to select a specific frame. |
| ▪ | Use the small, white triangles to manually set up the In Frame [start frame] and the Out Frame [end frame] for the record. |
|

|
| ▪ | This field displays the current frame that is also shown in the small preview window. Enter a number to jump directly to this frame. |
|

|
| ▪ | Start or stop the preview playback. |
|

|
| ▪ | Rewind or forward one frame per click. |
|

|
| ▪ | Skip directly to the In Frame or the Out Frame. |
|

|
| ▪ | Skip to the beginning or the end of the record. |
|

|
| ▪ | Enter a number or use the slider to select a specific frame. Then, use the S button to set the In Frame [start frame]. |
|

|
| ▪ | Enter a number or use the slider to select a specific frame. Then, use the S button to set the Out Frame [end frame]. |
|

|
| ▪ | MADRIX will search the Record File in order to find a segment that is loopable. It will automatically set the In Frame and Out Frame afterwards. Use the button Export to export your loop. Before that, you can also insert Blend Frames. |
|

|
| ▪ | Insert Blend Frames into your record if you want to.
- First, enter the number of frames you wish to use. This defines the length.
- Second, choose the fade mode [XF: Cross-Fade, WF: White-Fade, BF: Black-Fade, Learn more »Crossfader And Main Output].
- Third, click Blend.
- Fourth, use Play/Pause to preview the edited record.
- Fifth, use the button Export to export your loop.
Note: The beginning of your record will be cut by the defined frame number. This is indicated by a red line below the slider.
Example: If you enter 100 frames, MADRIX will create the fade using the first 100 frames and the last 100 frames. Those frames will blend into each other. To have a smooth fade, the record is then cut by 100 frames and starts at frame 101. |
|

|
| ▪ | Use this button to export the edited record. Choose a name in the second step. |
|
PLEXUS Conversion
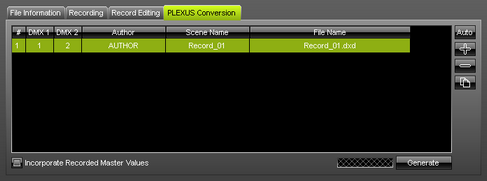
| ▪ | Use this tab to convert MADRIX Record files [of the file type *.mrec] into DMX Data files [of the file type *.dxd].
Learn more »MADRIX PLEXUS |
How To Play Back A Record File Using SCE Video
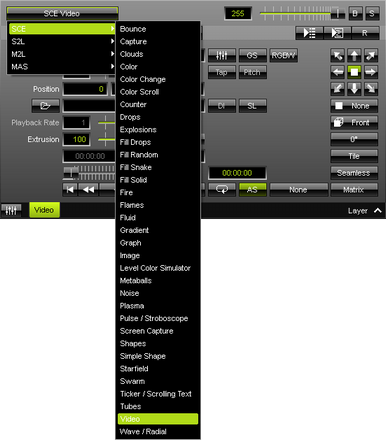
1] Select the effect SCE Video.
2] The controls of the SCE Video effect become available as a result.
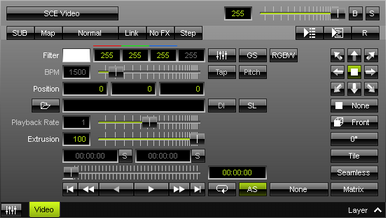
3] Load your MADRIX Record file [of the file type *.mrec].
 Use Open and select the file you wish to play. Use Open and select the file you wish to play.
4] The SCE Video effect will play your Record File.
|


![]() Use Open and select the file you wish to play.
Use Open and select the file you wish to play.


