This topic includes:
| ▪ | Note |
Certain DVI hardware is equipped with proprietary protocols. MADRIX has implemented a range of products that are natively supported because of this.
MADRIX currently supports the following DVI device types:
| ▪ | Colorlight 5A |
| ▪ | Colorlight A8 |
| ▪ | Colorlight T9 |
| ▪ | EuroLite T9 |
| ▪ | ColourSmart Link |
Before you can use MADRIX, please make sure that you have configured your LED fixtures and hardware correctly.
There are several steps required to set up proprietary DVI products in MADRIX. This chapter is only part of the process. You need to set up other configurations as well [such as virtual LED matrix, DMX Devices, MADRIX Effects, Audio, etc.].
| ▪ | Only use a GIGABIT network card [1 GBit/s or 1000 MBit/s]. 100 MBit/s network cards or lower will not work! |
| ▪ | It is only recommended to use a wired network connection. Using wireless transmission will not work! |
1] Install the correct driver.
2] Activate the DVI device in MADRIX.
3] Configure various settings.
1] Installing The WinPcap Driver
| ▪ | To use DVI devices with MADRIX, you have to install the correct driver first. |
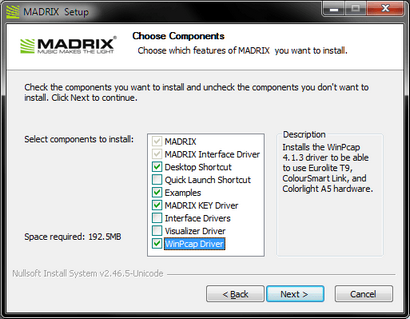
| ▪ | During the MADRIX installation process, make sure to select the check box WinPcap Driver |
| ▪ | If you have already installed MADRIX without this component, re-install MADRIX. |
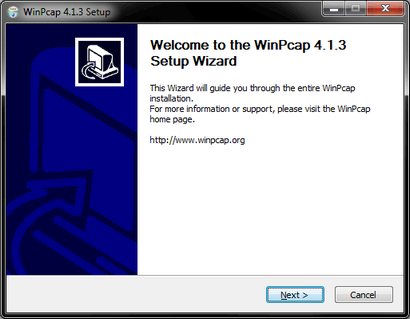
| ▪ | The WinPcap driver will be installed using a second installer. Confirm this setup wizard to install the driver. |
| ▪ | Learn more »Installation Process |
2] Activating The DVI Device
| ▪ | Go to Preferences > Device Manager... > DVI Devices [Keyboard shortcut: F4 > DVI Devices] |

| ▪ | A] Add devices automatically. - Click [MADRIX will automatically search for connected devices. It will also search across multiple networks if there is more than one network card is available.] [Note: Automatic search will default to EuroLite T9 for all T9 devices found, incl. ColourSmart Link, EuroLite T9, and Colorlight T9.] |
| ▪ | B] Add devices manually. - Click - A small selection list will be opened above the button.  - Select your DVI device type now. - A new window will open [Device Configuration]. |
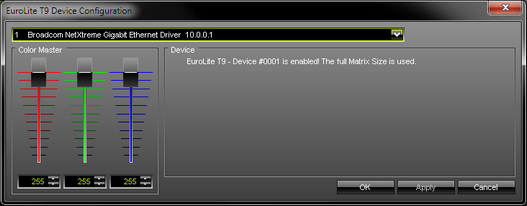
1] If the drop-down list at the top of the Device Configuration window does not contain an entry,
there is either no network card available or the WinPcap driver is not installed properly.
| ▪ | If you are receiving this error message, please resolve these issues and run the MADRIX installer again to install the required drivers [WinPcap Driver]. |

2] If everything is installed properly, select the network device that communicates with your DVI fixture in the drop-down list at the top of the Device Configuration window.
| ▪ | Do not change any other settings here [such as, Color Master] unless you are an experienced user. - Advanced users may adjust the color settings via the Color Master if the DVI device renders colors incorrectly. - When adding Colorlight 5A devices, you may choose an additional Screen Number. Set up the same index number as is configured in your 5A device. Leave the default setting if you are not sure. |
| ▪ | Click OK |
| ▪ | The new DVI device will appear in the list after is has been added automatically or manually. |

3] Settings
There are different Settings available for further configuration. By default, all settings should be set up correctly already.
| ▪ | If you change a setting, always click Apply to confirm the changes. |
| ▪ | Enable - Activates or deactivates the currently selected DVI device. This is activated by default. It needs to be activated in order to work correctly. |
| ▪ | Use Full Size - Displays the full Matrix Size on the device. This is activated by default and the recommended setting. - Deactivate if you want to set up a certain cut-out and specify which details of your matrix will be shown. You can choose the start coordinates and the end coordinates of this area. Left and Top define the start coordinates in a coordinate system that starts with 0,0 in the top left corner. Right and Bottom define the end coordinates. |
Scaling is not available.
Your virtual LED matrix will not be stretched or compressed in order to fit the DVI device or vice versa.
| ▪ | Set Frame Time - Activate in order to set a different frame time in milliseconds. By default, the DVI device is set to be an Event type with a frame rate of 50 FPS. - If you manually set a new frame time, the output might judder. - It is not recommended to set a higher frame rate than 50 FPS. But if your hardware controller requires a frame rate that is lower than 50 FPS, adjust the value to these requirements. Then, the type of your device will be set to Frame in the list. |
| ▪ |
| ▪ |
| ▪ |
Remember to configure your light matrix in the »Matrix Generator or »Patch Editor
Make sure to save your MADRIX Setup after the configuration process.
Device Type |
Comments |
All DVI Device Types |
1] Please do not use a network hub or switch. Please only use a direct network connection. 2] Use only Gigabit network cards. 3] Only connect via network cabling. A wireless connection [WiFi] will not work! 4] A maximum of 75 m of network cabling is recommended. When covering higher distances, data issues can occur. 5] Please note that the hardware controller needs to be configured correctly, before MADRIX can be used. 6] The configuration cannot be rotated. If you have rotated fixtures in your installation, please use the rotation features provided by each MADRIX effect. 7] Do not use different DVI device types on the same network! Always use a separate network for each proprietary DVI device type. |
EuroLite T9 |
1] Before using MADRIX, please make sure that you have configured your EUROLITE LED fixture and hardware correctly. The configuration is described in the EUROLITE user manual. Repeat the steps if necessary. 2] You can only create and use one single DVI device in MADRIX per network card. This means that a maximum of 56 controllers connected in series can be used per one network card with a maximum of 128x128 pixels for each controller. 3] Please note: Configure only one hardware controller at a time with the software EUROLITE LED Show T9. Please do not connect several controllers while setting the parameters. 4] See web link »www.eurolite.de for the latest documentation. |
If you are encountering problems, please work through the following checklist:
| ▪ | Check if all network cables are connected correctly. Please do not use a network hub or switch. |
| ▪ | Check if your hardware is working without MADRIX. |
| ▪ | Check if you have installed the WinPcap Driver during the installation of MADRIX. |
| ▪ | Check if your light matrix is configured correctly in the Matrix Generator or Patch Editor |
| ▪ | Go to the menu Preferences > Device Manager... > DVI Devices. Check if you have added a new DVI device. |
| ▪ | Check if Enable and Use Full Size are activated for your device under Preferences > Device Manager... > DVI Devices |
| ▪ | Configure your hardware controller again if this seems to be necessary. |
| ▪ | Always configure only one hardware controller. Do not connect two or more controllers while setting the parameters. |
| ▪ | When using LED Show T9, 1] repeat the steps described in the manual. 2] make sure to click Send two times in order to save the parameter set on your PC and on your controller. 3] download the configuration file again [for example, Presets T9.DAT] and use this default configuration file to configure your controller again. 4] uninstall the software and then install it again. Reconfigure all settings. |