This topic includes:
▪DMX-IN Via Ethernet Network [Art-Net Remote]
▪4] Adding Devices Automatically
▪5] Configuration Of Art-Net Input
▪6] Activating Your Art-Net Input Device
DMX-IN Via Ethernet Network [Art-Net Remote]
You can connect MADRIX LUNA via Ethernet network directly or indirectly to the network card of your computer that runs the MADRIX 5 Software. Data is sent into the LUNA via DMX-IN [XLR] and from the LUNA to MADRIX 5 via Ethernet network.
▪Connect your external DMX controller to the DMX-IN port of MADRIX LUNA.
▪Connect MADRIX LUNA to power.
[Please see safety instructions in the MADRIX LUNA Technical Manual & Quick Start Guide!]
▪Connect MADRIX LUNA directly or indirectly to your computer via network cabling.
▪It is highly recommended to only use Gigabit Ethernet network components [network card, switches, etc.].
Art-Net is a network-based protocol. MADRIX 5 will use the network card of your computer to receive data.
▪It is required to set up the correct network settings in Windows, first.
▪You must use these IP address and Subnet mask settings. Otherwise, Art-Net might not work!
▪The IP addresses of your computer and your MADRIX LUNA devices need to be different and each nees to be unique.
▪Set up an individual IP address in the following IP address range:
- 2.0.0.1 ... 2.255.255.254 or
- 10.0.0.1 ... 10.255.255.254
▪Set up the corresponding Subnet mask
- 255.0.0.0
[Via factory default settings, MADRIX LUNA devices will have an IP address in the 10.x.x.x network range, such as 10.206.224.100, for example].
[Please note: Your devices and the sender, such as the PC that runs MADRIX 5, need to have the same subnet mask!]
▪Restart MADRIX 5, if you have changed the network settings in Windows while MADRIX 5 was running.
▪Learn more »Tips [Microsoft Windows / Networks / USB]
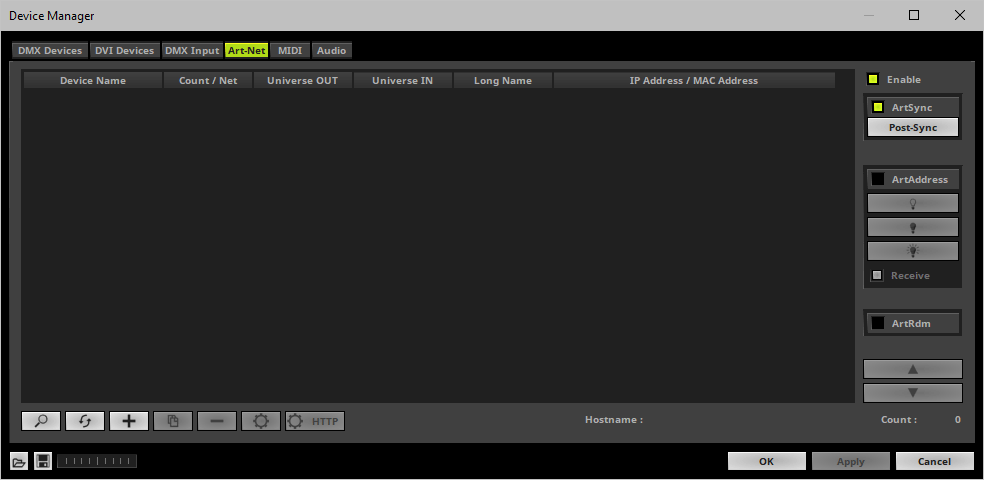
▪Go to the menu Preferences > Device Manager... > Art-Net
[Keyboard shortcut: F4 > Art-Net]
▪Activate Enable [in the upper, right corner].
4] Adding Devices Automatically
MADRIX 5 can automatically add your MADRIX LUNA devices.
▪Click ![]()
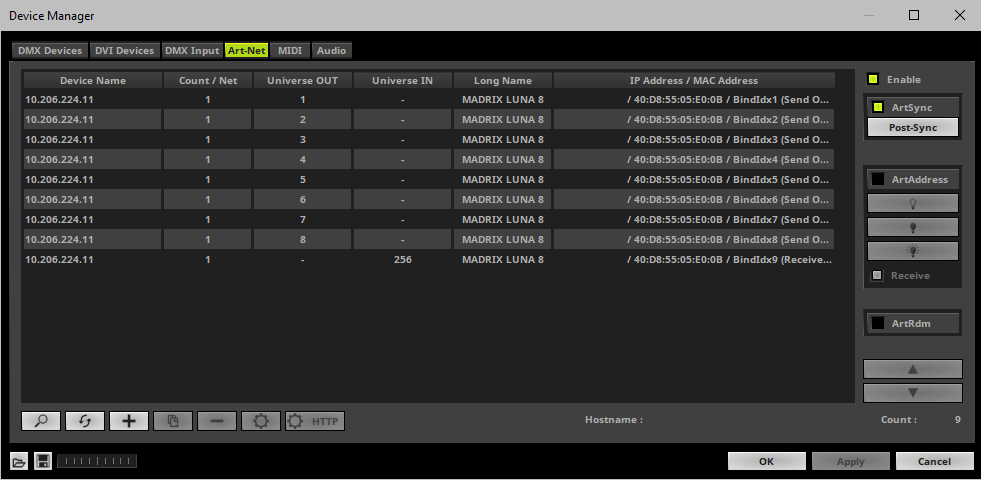
[MADRIX 5 will automatically search the network for connected MADRIX LUNA devices. Devices that are found will appear in the list. A number of entries will be created in the list for each LUNA device.]
[The Art-Net standards only supports a maximum of 4 output ports per device. Since LUNA 8 features 8 ports plus 1 IN port, 3 list items are created in MADRIX 5, for example. Two entries will be shown for LUNA 4. Five entries will be shown for LUNA 16.]
5] Configuration Of Art-Net Input
▪Select your LUNA input device in the list [Universe IN].
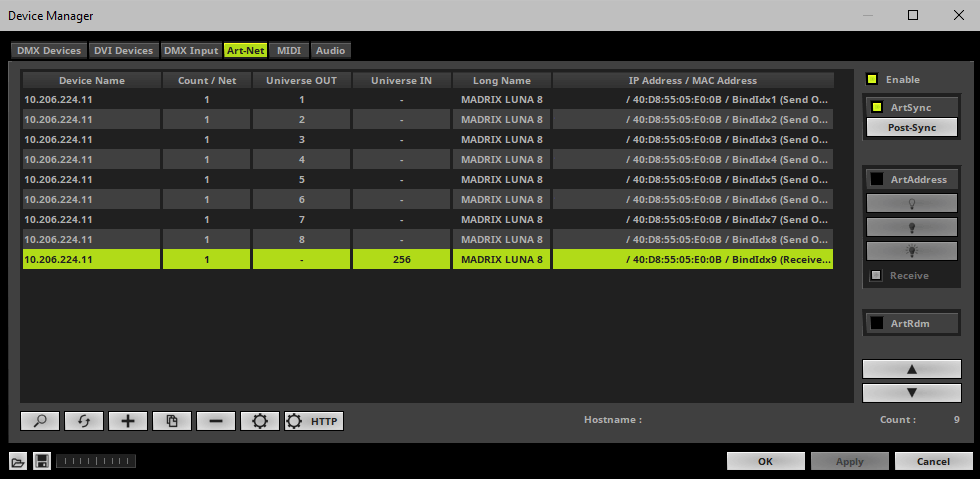
▪Click ![]()
▪A new window opens [Art-Net Device Configuration].
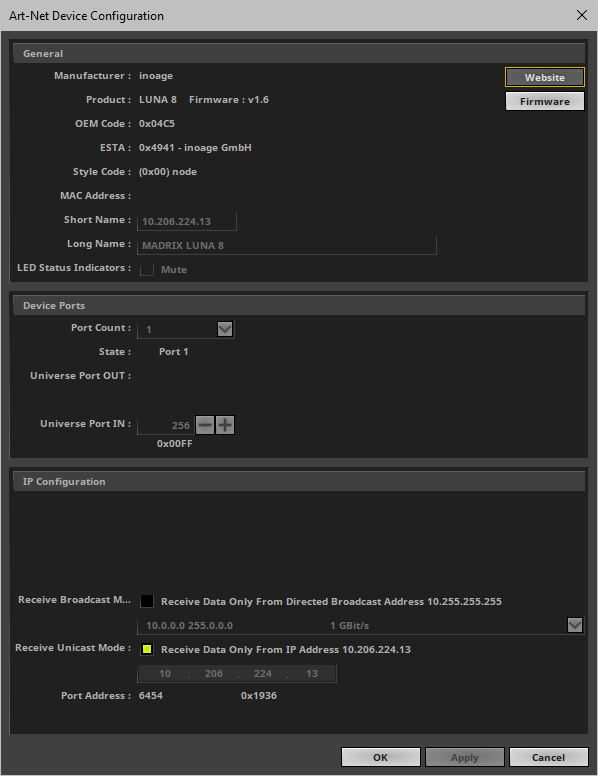
▪Universe Port IN
- By default, MADRIX LUNA sends DMX-IN data to Art-Net universe 256. You can change these settings in the Web Configuration or MADRIX Device Configuration window if required.
- If you have changed the settings, enter the exact same Art-Net universe here!
▪Activate Receive Direct IP Mode and enter the IP Address of your MADRIX LUNA. Confirm with Apply
[E.g., 10.206.224.14]
▪[You can also activate Receive Broadcast Mode. In this mode, MADRIX 5 will receive any DMX data that is sent in the network on this particular Art-Net universe.]
▪Click OK
6] Activating Your Art-Net Input Device
You need to activate the Art-Net input device. It is still deactivated.
▪Go to the menu Preferences > Device Manager... > DMX Devices
[Keyboard shortcut: F4]
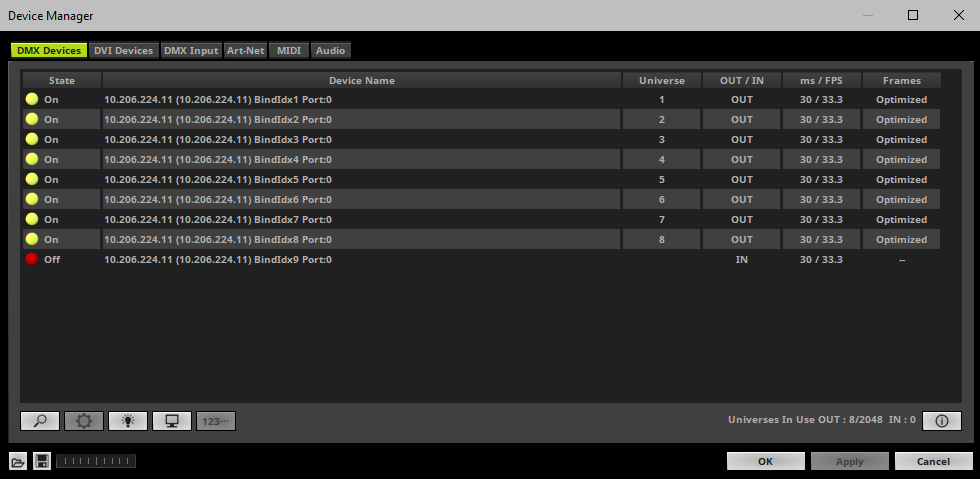
▪Select the LUNA input device in the list.
▪Right Mouse Click on the column State to set from Off to On for data input [indicated by green light].
▪IN is automatically activated.
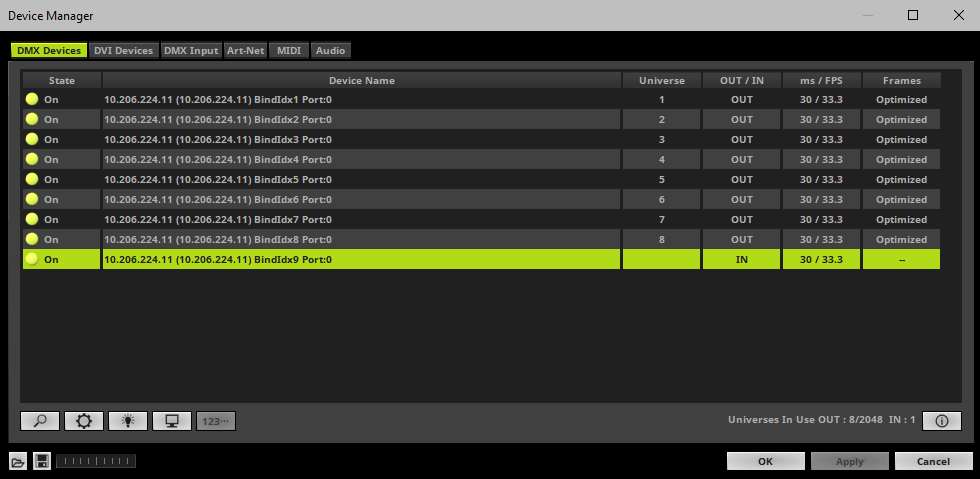
▪If required, change the frame time.
- Right Mouse Click or Left Mouse Double-Click on the column ms / FPS and enter the required number.
- The frame time [in milliseconds; ms] affects the frame rate. The frame rate specifies how fast data is sent to the device or received from it [in Frames Per Second; FPS].
- Increase the frame time in order to decrease the frame rate [e.g., 40 ms = 25 FPS].
- Decrease the frame time in order to increase the frame rate [e.g., 20 ms = 50 FPS].
- The default value is 30 ms / 33.3 FPS.
- The minimum value is 1000 ms / 1 FPS.
- The maximum value is 5 ms / 200 FPS.
Please note: If you want to output high frame rates, make sure to set Main Mixing FPS in the Options to the same value in order to render the same frame rate [It is set to 50 FPS by default. Otherwise, frames will be duplicated].
Please note: If you want to input high frame rates, make sure to set DMX Controller Input FPS in the Options to the same value in order to process the same frame rate [It is set to 50 FPS by default. Otherwise, frames will be duplicated].
- Some LED fixtures might have problems with a low frame time / high frame rate. Then, it is recommended to increase the frame time / decrease the frame rate.
▪Go to the menu Preferences > Device Manager... > DMX Input
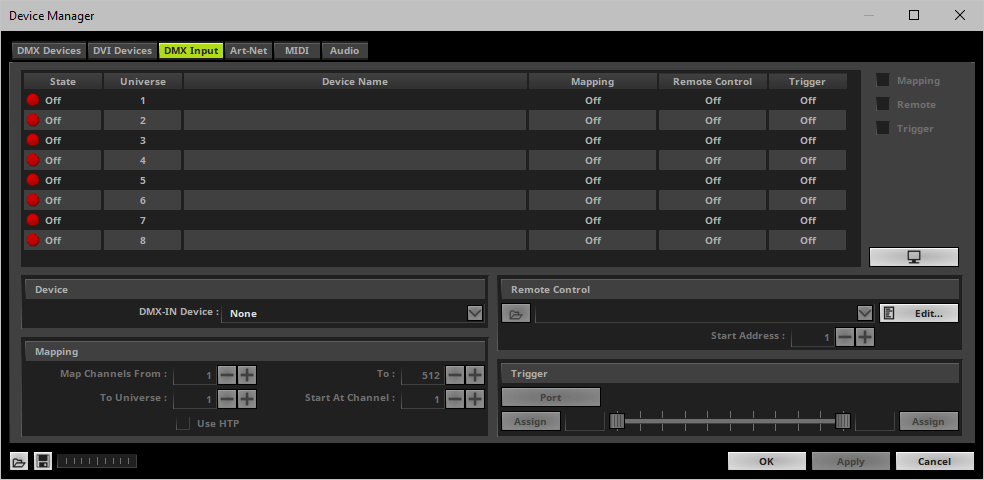
▪Select your preferred DMX Universe in the list.
[By default, DMX universe 1 to 8 are listed. If you wish to increase the number of DMX-IN universes, you can change the setting under Options > Peformance.
▪Choose your DMX-IN Device in the section Device. Select the Art-Net input device via its IP address.
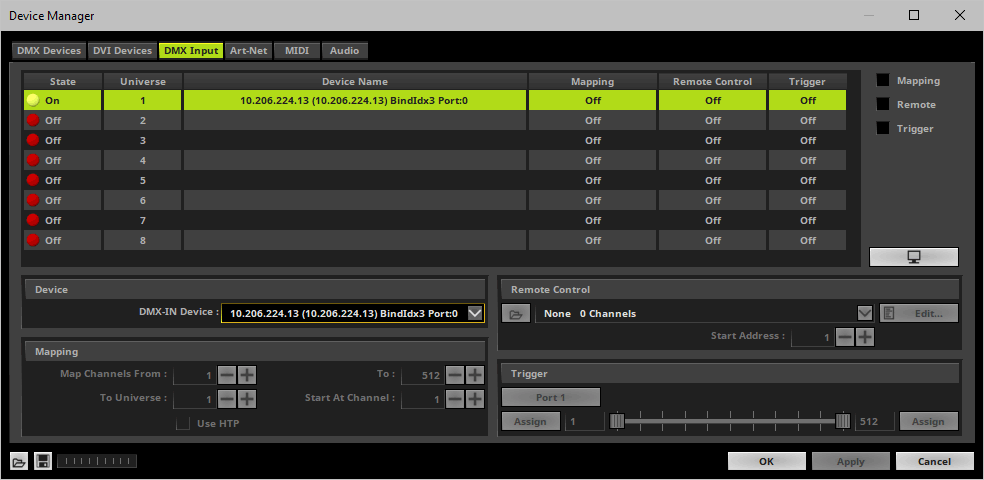
▪Art-Net input is now activated. MADRIX 5 can already receive DMX data.
▪Now, choose how to use incoming data as explained below.
Data
▪At this point, MADRIX 5 is now already receiving any incoming data.
▪You can now use this data, for example for Scripts and Macros.
▪If you want to monitor incoming signals, select your DMX universe/DMX device in the list and click 
Mapping
▪Use Mapping, if you want to route incoming DMX signals through MADRIX 5 to your output [DMX-Thru].
▪First, select your device in the list.
▪Activate Mapping
▪This feature maps incoming data to the specified DMX universe and channels.
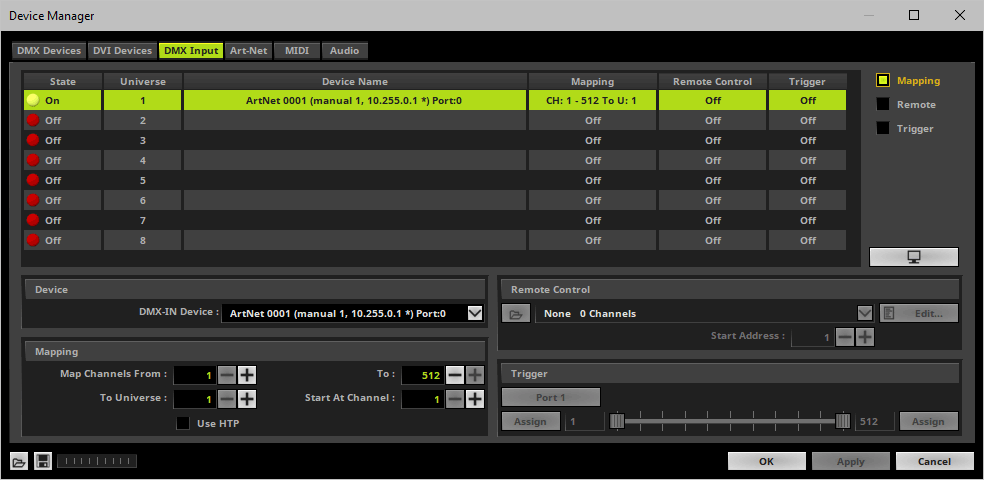
▪Configure the following settings in the section Mapping
- Map Channels From - Defines which incoming channels are used. This is the start channel to specify the range of channels.
- To - Defines which incoming channels are used. This is the end channel to specify the range of channels.
- To Universe - Defines onto which output DMX universe MADRIX 5 should map the specified range of incoming channels.
- Start At Channel - Defines the first DMX channel of the output DMX universe MADRIX 5 should use.
- Use HTP - Activates the Highest Takes Precedence feature. You can map incoming data to a DMX address range that MADRIX 5 already controls. Use HTP and MADRIX 5 will compare incoming values with the DMX data it sends to the DMX output. As a result, MADRIX 5 will only use the highest of both values on a particular channel and send it to the output.
▪Click Apply to confirm.
Remote Control
▪Use Remote Control, if you want to control the MADRIX 5 Software remotely
▪First, select your device in the list.
▪Activate Remote
▪Select one of the built-in protocols in the section Remote Control as explained below
or create your own remote configuration.
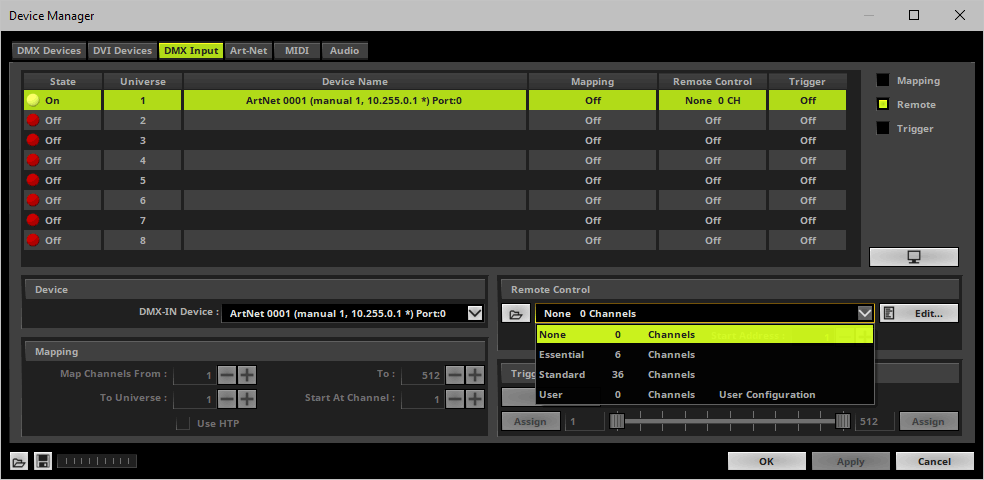
|
Open - Loads a previously saved MADRIX 5 DMX Remote Configuration file [of the file type *.mdrx]. |
|
Protocols - Choose from a pre-configured protocol [configuration]. |
|
DMX-IN Remote Editor - Allows you to modify a configuration or create a new configuration. |
|
Start Address - Defines on which particular DMX channel the protocol should start. The whole protocol will be mapped to this new address area. |
|
DMX Watcher - Opens the DMX Watcher to monitor your DMX output or input. |
Trigger
▪Use Trigger, if you want to use incoming signals for the MADRIX 5 TRI Effects.
▪First, select your device in the list.
▪Activate Trigger
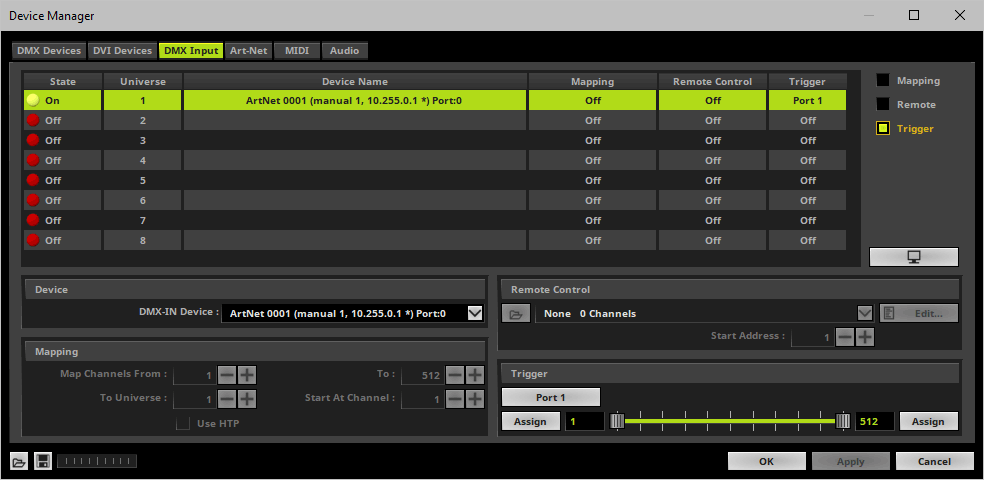
|
Port - Defines the port [Port 1 - 8] that is assigned to this DMX-IN Device. MADRIX 5 allows you to send trigger signals from up to 8 different devices [8 ports] and assign a MADRIX 5 TRI Effect the corresponding port. |
|
Value Range - Defines the range of incoming DMX values that can be used as trigger signal. |
|
Assign Minimum Value - Automatically assigns the minimum value when using the controller. |
|
Assign Maximum Value - Automatically assigns the maximum value when using the controller. |
| MADRIX LUNA User Manual 2.05. |
| [Ctrl & +/-] = Zoom In/Out | [Ctrl & 0] = 100% |
|
Previous Next
|
|
Enable Automatic Translation | Activer La Traduction Automatique | 启用自动翻译 |


