Introduction
 You can activate a DVI window without a frame. Go the menu "Previews" -> "Preview DVI" -> and click "DVI". This borderless DVI window is particularly useful for on-screen capturing.
You can also simply drag & drop a DVI window to change its position. Move this window around by clicking and holding it using the left mouse button.
Settings - Context Menu
Overview
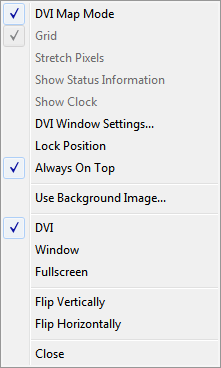
The context menu makes various options and settings available to the user.
To open the context menu, perform a right mouse-click inside the DVI window. In addition, you can navigate to the menu "Previews" -> "Preview DVI", where the same context menu appears.

DVI Map Mode
Activate "DVI Map Mode" if you configured an individual DVI Patch including DVI Maps. Learn more in the chapter DVI Patch.
Grid
You can activate and deactivate a "Grid" by choosing this option inside the context menu.
Stretch Pixels
The function "Stretch Pixels" activates scaling of your preview to the maximum size of your preview window.
Show Status Information
"Show Status Information" can be used to display some extra information regarding this preview window, such as the size of the matrix or the frame rate.
Show Clock
"Show Clock" inserts the time into the window.
DVI Window Settings
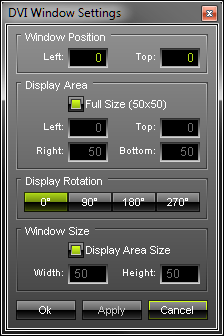
"DVI Window Settings" calls up a new dialog.

Use "Window Position" to define the exact position of the DVI window. The coordinate system used for this starts with 0,0 at the top left of the entire screen/monitor. In this way, "Left:" defines the X coordinate and "Top:" represents the Y coordinate. Valid values range from -10,000 to 10,000.
"Display Area" specifies what is shown in the DVI window. Activate "Full Size" and your full matrix will be displayed. Or you can select a certain cut-out and specify which details of your matrix will be shown. You can choose the start coordinates and the end coordinates of this area. "Left:" and "Top:" define the start coordinates in a coordinate system that starts with 0,0 in the top left corner. "Right:" and "Bottom:" define the end coordinates. The end coordinates cannot be higher than the full size of the matrix. For example, for a matrix with 50x50 pixels, the maximum value of "Right:" and "Bottom:" is 50.
"Display Rotation" allows you to rotate the DVI preview window by 90 degrees, 180 degrees, or 270 degrees clock-wise. This rotation applies to the "Display Area".
"Window Size" determines the actual size of the DVI window. Activate "Display Area Size" to set the size of the window to the pixel count of the display area, which determines what is shown of your matrix. Using different values than the size of the display area will stretch or compress the content.
Please press "Apply" to activate the changes you have made.
The standard configuration of these "DVI Window Settings" includes an activated "Display Area Size" and activated "Full Size". These settings represent a standard 1:1 DVI window.
Lock Position
You can lock this window at a particular position. Right-click and choose "Lock Position" from the context menu.
Always On Top
If you want the window to be in the front of all windows at all times, activate the entry "Always On Top".
Use Background Image...
Only applies to "Window" and "Fullscreen" mode.
DVI, Window, Fullscreen
"DVI" activates the borderless DVI Window. "Window" activates the framed DVI window. "Fullscreen" activates DVI output in fullscreen mode.
Flip Vertically & Flip Horizontally
"Flip Vertically" and "Flip Horizontally" will flip the output accordingly. It turns over the image.
Close
Click "Close" to close this Window.
Further Configuration
Further settings can be accessed in the MADRIX Options -> Performance.