Introduction
The ENTTEC Datagate Mk2 is the second revision of the ENTTEC Datagate. It is an Art-Net node and can thus be used with MADRIX.
This chapter describes how to configure the Datagate to output 8 DMX universes with MADRIX.
Basic Information
This guide was created using
| • | MADRIX 2.13a |
| • | Datagate Mk2 Firmware V1.0 - 0434 (03/Feb/2011) |
| • | Datagate Mk2 User Quick Start Manual (Firmware V1.0, 10-Jun-2010) |
Art-Net is an Ethernet-based protocol using communication over network. The protocol has a predefined range of network addresses:
· |
2.0.0.1 ... 2.255.255.254 or |
· |
10.0.0.1 ... 10.255.255.254 |
Artistic Licence (the creators of Art-Net) recommend to use 2.x.x.x (10.x.x.x is regarded to be an alternative). The subnet mask should be 255.0.0.0 You must use this address area. Otherwise Art-Net might not work.
Network Switches - Gigabit Ethernet
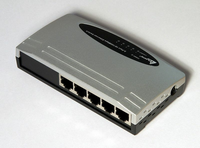 We recommend using only Gigabit Ethernet network switches. Gigabit Ethernet (GbE or 1 GigE) is a term describing various technologies for transmitting Ethernet frames at a rate of a gigabit per second, as defined by the IEEE 802.3-2008 standard. You might encounter problems if you try to use slower network switches.
Step 0) Getting Started
Please make sure to set up the Datagate Mk2 as described in No. 1 to 4 in the chapter "Getting Started" of the ENTTEC Quick Start Manual.
Power up your MADRIX computer as well.
Step 1) IP Address Of The Device
The IP address of your device needs to be checked (or configured) first.
To check the IP address of the device, use the 4-button menu system on the front panel of the device:
On the device, press "MENU" (i.e. the LEFT button). Navigate to "3-Status" and press "ENTER". Choose "2-Network" and press "ENTER". In this menu, called "IP Settings", you can check the IP address and the Subnet Mask. Per factory default settings, the test device is configured as follows:
IP: 2.0.0.14
Mask: 255.0.0.0
These settings are compatible with Art-Net and can thus be used. Please make a note for both addresses.
As described above (About Art-Net), different settings may be used. This is not necessary if the factory default settings can be used.
Sometimes, the Datagate Mk2 may switch to DHCP network settings after performing a "Factory Reset". In this case or if the factory default settings are not compatible, please manually change the IP address.
To change the IP address of the device, use the 4-button menu system on the front panel of the device:
On the device, press "MENU" (i.e. the LEFT button). Navigate to "2-Setup" and press "ENTER". Choose "1-Change IP" and press "ENTER". Select "2-Use Static IP" and press "ENTER".
Now, use the UP, DOWN button to change the value. Use the RIGHT button to switch to the next entry. Use the LEFT button to switch back to the last entry.
By selecting the 1. entry and pressing "MENU", you will be taken back to the last menu.
By selecting the 4. entry and pressing "ENTER" again, you apply the settings.
Step 2) IP Address Of Your Computer
After checking the IP address of the device, you will need to set up the network settings of your computer. This allows your computer to communicate with the Datagate Mk2.
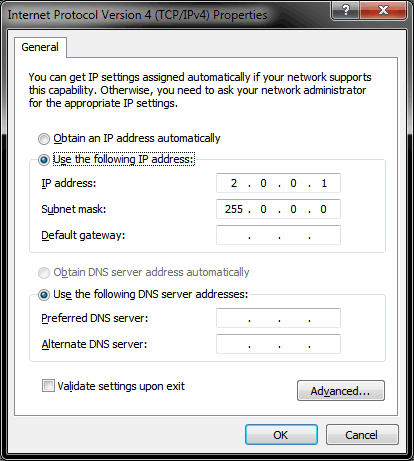
Please navigate to the "Control Panel" of Windows and choose "Network and Sharing Center". Configure your Local Area Connection (by selecting "Properties" and "Internet Protocol Version 4 (TCP/IPv4)"
(The entries may be labelled differently depending on the Windows operating system your are using).
Now, configure the IP address and Subnet Mask according to the Art-Net specifications.
Your Datage Mk2 and your computer need to have two different IP addresses. The Subnet Mask must remain the same.
For example, set up:
IP address: 2.0.0.1
Subnet mask: 255.0.0.0
Step 3) Load Datagate Mk2 Profile
The Datagate provides several stored profiles. In order to use Art-Net and 8 DMX output ports, please do the following:
On the device, press "MENU" (i.e. the LEFT button). Choose "1-Load Profile" and press "ENTER". Select "Art-Net to DMX" and press "ENTER".
Wait until the device has activated the profile.
Step 4) Activating Art-Net in MADRIX
Please start MADRIX now.
In MADRIX, go to the menu "Preferences" -> "Device Manager". Select the "Art-Net" tab.
Enable Art-Net by activating the checkbox next to the label "Art-Net" in the upper left corner. The small box will light up green.
(When Art-Net is activated, you will also see the entry "ArtNetRemote". Please ignore this entry for now.)
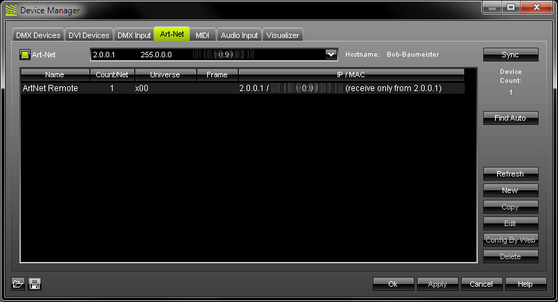
Now, press the "New" button to add new Art-Net device(s).
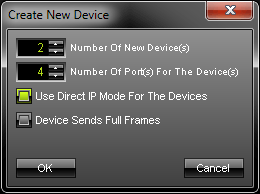
Please select 2 for the "Number Of New Device(s)".
Enter 4 for the "Number of Port(s) For The Device(s)".
Select "Use Direct IP Mode For The Devices".
Press "OK".
Step 5) Configuration Of Art-Net Devices
You just created two Art-Net devices with 4 ports each in Step 4.
(The Art-Net standard only "knows" a maximum of 4 ports per device. As such, the Datagate Mk2 and many others, include two 4-port devices.)
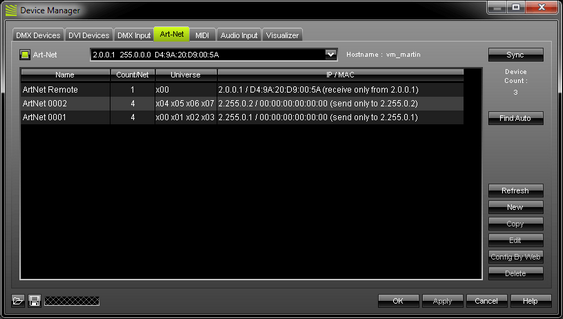
In addition, you will now have to configure each device.
Please select the device "ArtNet 0001" in the list. Press the button "Edit" afterwards.
A new dialog will open.
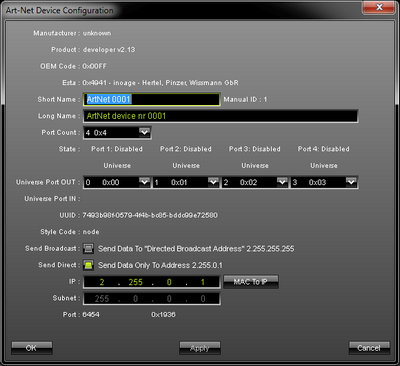
In this window, please change the "Short Name", the "Long Name", and the "IP" address. Then, press "OK".
For example, you can set up:
Short Name: Datagate Mk2 - 1
Long Name: Datagate Mk2 Device 0001 Ports 1 to 4
IP: 2.0.0.14
Please note: The IP address in this dialog must be the same address that was noted or configured in Step 1!
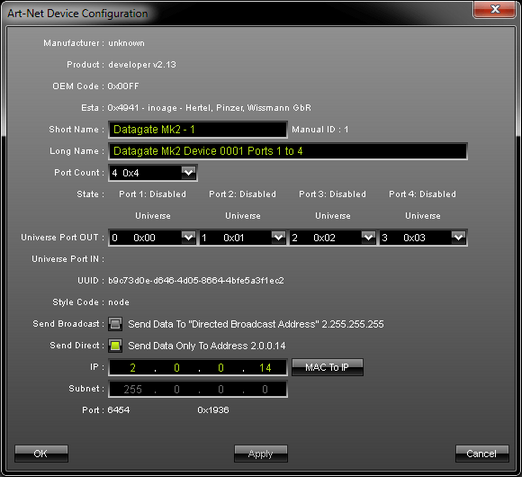
Note: The first device has Universe Port OUT : 0 0x00, 1 0x01, 2 0x02, and 3 0x03.
Repeat the steps for the second device "ArtNet 0002".
For example, you can set up:
Short Name: Datagate Mk2 - 2
Long Name: Datagate Mk2 Device 0002 Ports 5 to 8
IP: 2.0.0.14
Please note: The second device also has the same IP address as the first device.
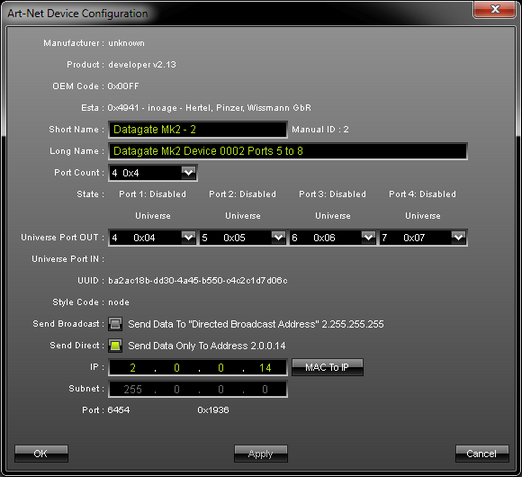
Note: The second device has ports 4 0x04, 5 0x05, 6 0x06, and 7 0x07.
Step 6) Activating DMX Devices
Basically, Art-Net can be described as DMX over Ethernet. Hence, you will need to activate the DMX devices/ DMX ports in the next step.
In MADRIX, go to the menu "Preferences -> Device Manager". Select the "DMX Devices" tab.
(Please ignore the entry ArtNet Remote.)
As you can see, all DMX devices are switched "Off".
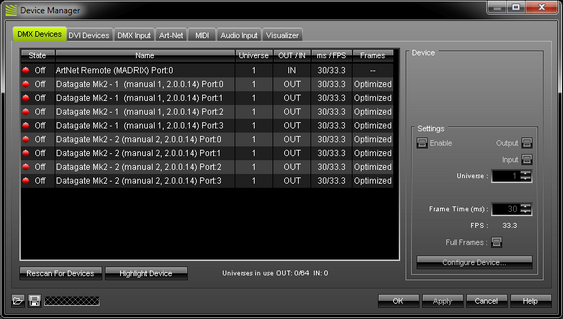
Now, select all entries with the "Short Name" you used above. In this example, we will select all entries with the label "Datagate Mk 2".
(To select all entries, make use of the Ctrl or Shift keys on your keyboard while using the mouse.)
In the next step, activate "Enable" and press "Apply".
(You can also enable entry after entry instead of enabling all at once.)
In addition, the correct Universe needs to be assigned to each DMX device/ DMX port.
Select an entry in the list and change the "Universe". Then, press "Apply".
Repeat the step for all 8 ports.
This list will help you assign the correct Universe:
DMX Device/ DMX Port |
DMX Universe |
Datagate Mk 2 -1 ... Port:0 |
1 |
Datagate Mk 2 -1 ... Port:1 |
2 |
Datagate Mk 2 -1 ... Port:2 |
3 |
Datagate Mk 2 -1 ... Port:3 |
4 |
Datagate Mk 2 -2 ... Port:0 |
5 |
Datagate Mk 2 -2 ... Port:1 |
6 |
Datagate Mk 2 -2 ... Port:2 |
7 |
Datagate Mk 2 -2 ... Port:3 |
8 |
Please note: This is a standard configuration that is useful most of the time. You are free to configure the devices according to your requirements.
Your configuration should look like this:
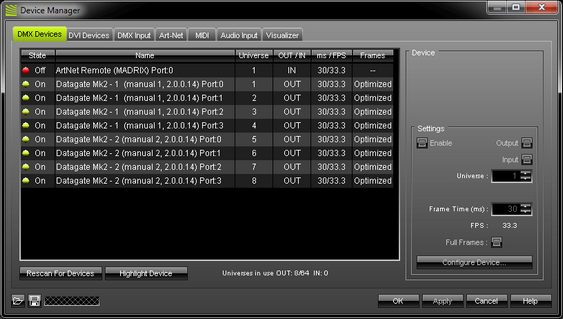
The standard configuration is now complete. Press "OK" to leave the Device Manager.
Further Settings
Connection Problems
If you are experiencing connection problems, i.e. you are unable to connect both computer and Datagate Mk2, it is recommended to disable the Windows Firwall if possible.
Find Auto
You may want to choose the "Find Auto" option in the tab "Art-Net" of the "Device Manager".
(Navigate to the menu "Preferences" -> "Device Manager" -> tab "Art-Net".)
However, it is highly recommend to follow the step by step instructions given above. It is not recommend to use "Find Auto".
When you use "Find Auto", MADRIX will find the Datagate Mk2. But ports 1 to 4 will be configured as outputs and ports 5 to 8 will be configured as inputs. And you will not be able to change the settings of this automated device.
Full Frames Or Optimized Frames?
In Step 4, we chose to create devices that send "Optimized Frames". We decided this by not activating "Device Sends Full Frames".
In order reduce network traffic, MADRIX is sending optimized Art-Net data (Optimized Frames). For example, if you are only using 240 DMX channels, MADRIX normally sends data for 240 DMX channels. When using full frames, MADRIX will send frames including all 512 DMX channels every time (even if you are only using 240 DMX channels).
To reduce network traffic, we suggest using optimized frames.
But some Art-Net nodes might not support optimized frames. This is why full frames are recommended if problems occur.
To enable "Full Frames", please navigate to the menu "Preferences" -> "Device Manager" -> tab "DMX Devices". Select all your Art-Net device(s) and enable "Full Frames" if required. Press "Apply" afterwards.
Broadcast Or Direct IP Mode?
In Step 5, "Send Direct" (Direct IP Mode) was used. However, you may want to choose Broadcast mode.
Using the Art-Net protocol in broadcast mode means that every packet sent from a single (MADRIX) transmitter will be received by all recipients in the network. This can be very useful, e.g. if you wish universes 1 and 2 to be available on several points of the set-up. The disadvantage is that through broadcasting a potentially huge number of packages will be sent over the network.
2 Modes: "Send Broadcast" and "Send Direct"
If "Send Broadcast" is activated, MADRIX will send data to the whole Art-Net network. (Broadcast Mode)
If "Send Direct" is activated, MADRIX forwards data directly to the listed IP address. (Direct IP Mode)
To reduce network traffic, we suggest using Direct IP mode.
To use Broadcast mode, activate "Send Broadcast" in Step 5.
Sync Mode
![]() An automatic sync mode for Art-Net devices is implemented in MADRIX. In this way you can activate or deactivate the usage of sync packages.
An automatic sync mode for Art-Net devices is implemented in MADRIX. In this way you can activate or deactivate the usage of sync packages.
This Sync Mode is not conform to Art-Net. To work properly it needs to be implemented by the manufacturer. Please check the manual of your Art-Net node if this option is available to you.
Before activating sync, make sure that all activated Art-Net devices are available in your network! Else, the frame rate of Art-Net might drop. If you are not sure, do not enable any sync mode.
Even if your Art-Net hardware does not support Pre Sync or Post Sync mode, it might be advisable to activate it in MADRIX. In this way, data packages will be sent one after another and will not get mixed up. The data will be sent more precisely. But please make sure that all of your interfaces are available in the network.
To enable Sync Mode, please navigate to the menu "Preferences" -> "Device Manager" -> tab "Art-Net".
Select your device and click "Sync" and a new dialog will open. Now, choose if you want to activate sync packages to be sent before data is sent ("Pre Sync"). Or you can send sync packages after Art-Net data has been sent ("Post Sync"). Then, press "OK". Repeat the steps for all devices.
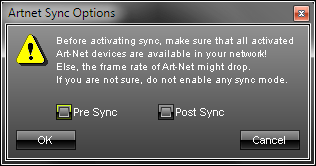
If you want to disable sync mode, click "Sync" again and uncheck the mode that is selected. Then, press "OK".
![]() The button "Config By Web" allows you to configure your Art-Net device remotely with the help of a web browser if this feature is supported by your device.
The button "Config By Web" allows you to configure your Art-Net device remotely with the help of a web browser if this feature is supported by your device.
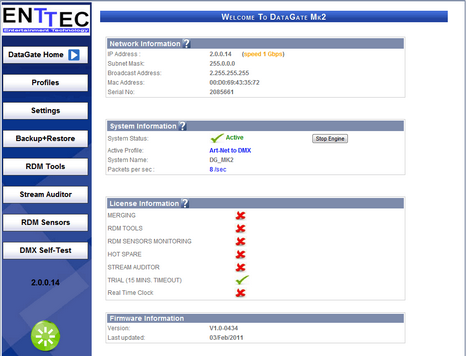
You can configure your ENTTEC Datagate Mk2 with your browser.
To use the Config By Web feature, please navigate to the menu "Preferences" -> "Device Manager" -> tab "Art-Net".
1) Select the Datagate Mk2 device.
2) Click the button "Config By Web".
3) You will see a warning message. Press "OK" to continue.
4) Your default browser will open. It will show the ENTTEC Datagate Mk2 graphical web interface for further configurations.
Refresh Rate
You may want to choose a different refresh rate for each output port of your Datagate Mk2.
Setting up the refresh rate can help in different cases. For example, if you have different DMX512 devices attached. When each device uses different DMX512 output frames, you might want to sync all to a specific frame rate. Or your LED fixtures might have problems with a faster frame rate. Then, you can increase the frame time.
You have two different options to do so.
On the one hand, navigate to the menu "Preferences" -> "Device Manager" -> tab "DMX Devices" to change the FPS (Frames Per Second) in MADRIX. Select the corresponding ports and change the "Frame Time". A higher Frame Time reduces the FPS and vice versa. The FPS value will be adjusted automatically according to the Frame Time. Press "Apply" afterwards.
On the other hand, your Datagate Mk2 can be configured individually using the web interface. Use the "Config By Web" feature as described above. Select "Profiles". Click on the profile "Art-Net to DMX". A new tab or window will open and you will be able to adjust the "Rate" for every single "DMX Port". The default value is 35. Adjust the rate for all ports if required.
More Information
For more information, please consult the chapter Art-Net.
Important Notes
Please remember to configure your light matrix in the Matrix Generator or Patch.
Please make sure to save your MADRIX Setup after the configuration process.