Introduction
The Datagate fully supports the Art-Net protocol. It can be configured to output anything between 1 and 8 DMX universes.
How Do I Configure The ENTTEC Datagate?
You can use the software "Node Management Utility (NMU)" from ENTTEC to easily configure the Datagate with your computer. Please check with ENTTEC if this tool is available.
4-Port DMX
To set the Datagate to output 4 universes of DMX, press the "Menu" button next to the LCD display on the front panel until it reads "1-Activate Profile". Hit "Enter", then "Scroll" until the "Art-Net" profile is displayed. Hit "Enter" to select and the Datagate will display "Profile Activate". The Art-Net profile configures ports 1-4 as outputs for DMX universe 1-4, and ports 5-8 as DMX inputs.
8-Port DMX
To set the Datagate to output 8 universes of DMX, follow the initial instructions above to access the "1-Activate Profile" menu on the Datagate. Afterwards, select the "Enet -> DMX" profile, then change the protocol type on each of the 8 channels to Art-Net instead of the default ESP. This will enable 8 output ports.
To change the protocol type, hit the "Menu" button until it displays "2-Edit Profile", hit "Enter" then "Scroll" until the display reads "2-3 EthernetConfig". Hit "Enter" again, then "Scroll" until "2-3-2 Protocol" is displayed. Hit "Enter", then "Scroll" until the display reads "Art-Net", then hit "Enter" once more. This will set the Datagate to output DMX universes 1-8 on ports 1-8.
Broadcast Or Direct IP Mode?
Using the Art-Net protocol in broadcast mode means that every packet sent from a single (MADRIX) transmitter will be received by all recipients in the network. This can be a very useful feature, e.g. if you wish universes 1 and 2 to be available on several points of the set-up. The disadvantage is that through broadcasting a potentially huge number of packages will be sent over the network.
To reduce network traffic, we suggest using Direct IP mode ("Send Direct").
Please note: In the following example we will configure a Datagate with ports 1–8 to use DMX universes 1–8 in broadcast mode.
How Do I Configure MADRIX?
In order to configure MADRIX, please go to the MADRIX menu "Preferences -> Device Manager". Activate the "Art-Net" tab and enable Art-Net. Press the "New" button to add new Art-Net device(s).
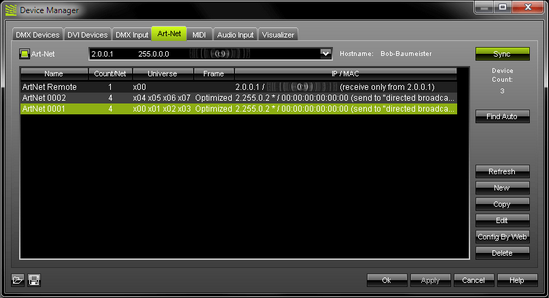
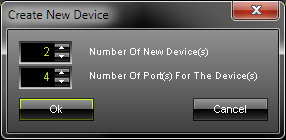
Inside this dialog you can set the number of devices and number of ports for each new device. Now you will see your new Art-Net 0001 device (Art-Net 0002, ...) included in the list with x ports.
Select a device and press "edit" to configure this Art-Net device.
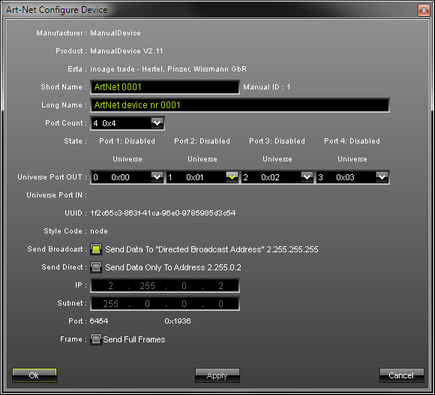
Here you can set up your Art-Net device. First, please click on "Port Count" and select the port count to be "4 0x4".
Up to this point we have used the broadcast option.
Please note: You can also use Direct IP mode by activating the switch "Send Direct". In that case you will have to type in the IP address of your Datagate.
Accordingly, you will see your newly created Art-Net 0001 (Art-Net 0002, ...) device listed with 4 ports. Repeat this step and create a new Art-Net device by clicking the "New" button.
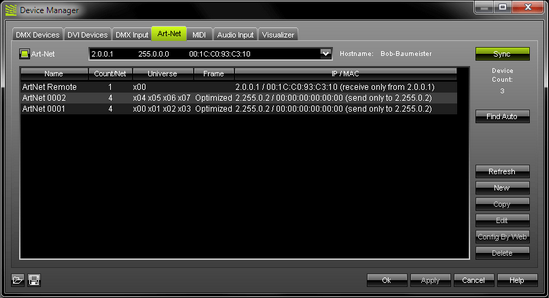
If you did repeat the step, you will now see two Art-Net devices (Art-Net 0001 and Art-Net 0002) in the list. You can modify these Art-Net devices by selecting the Art-Net device first and then clicking the "Edit" button.
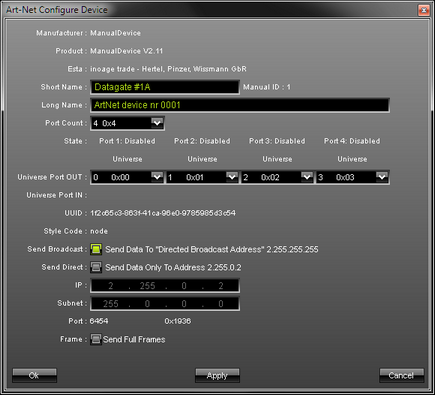
As shown above, we have changed the short name from Art-Net 0001 to Datagate #1A in this example.
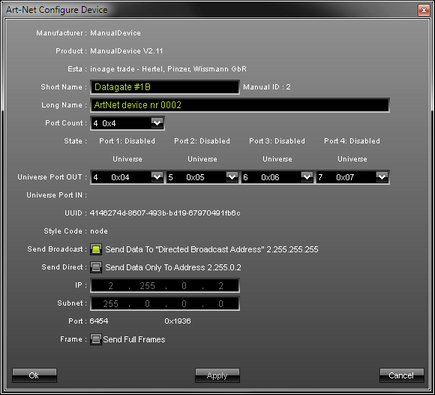
This modification is repeated for the Art-Net 0002 device changing the short name from Art-Net 0002 to Datagate #1B.
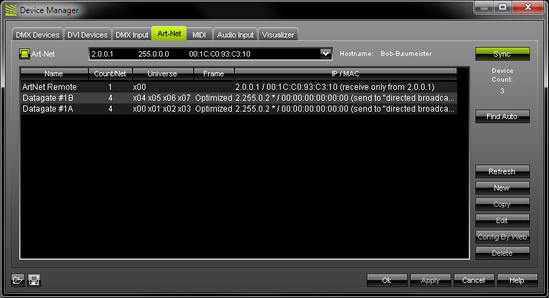
Now you will see the two Art-Net devices, Datagate #1A and Datagate #1B, in the list.
Result:
Datagate #1A with the first 4 DMX universes and
Datagate #1B with the next 4 DMX universes.
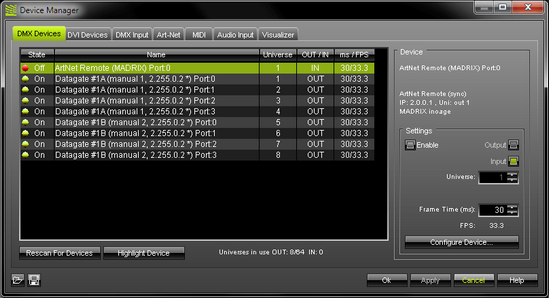
In the next step open the tab called "DMX Devices". Here, you have to enable each Art-Net device by activating the "Enable" switch. You will also have to assign the DMX universe.
In this example we have used all 8 ports of the Datagate and activated them for output.
Datagate #1A Port:0 is the DMX universe 1
Datagate #1A Port:1 is the DMX universe 2
...
...
Datagate #1B Port:3 is the last DMX universe 8

Important Notes
For more information please consult the chapter Art-Net.
Please remember to configure your light matrix in the Matrix Generator or Patch.
Please make sure to save your MADRIX Setup after the configuration process.