In this tutorial we will learn how to create Storage Place Parameter Chaser in MADRIX 5.
Date: 06/2021
MADRIX Version: 5.4b (Created with)
Corresponding Video Tutorial: »Using Storage Place Parameter Chaser To Fade-In Effect Layers
Task:
We have to create a kind of Fade-In effect with different fade times per effect layer.
The whole lighting effect consists of 2 Effect Layers.
The first one is a SCE Gradient with two colors. The two colors are Red and Black. Furthermore the Direction should be set to Shape Circle Implode.
The second Effect Layer consists of the SCE Starfield with white stars and a Rotation of 50.
All other effect setting should be left default.
Always when the Storage Place will be activated no output should be visible for 0.5 seconds. After this time the SCE Gradient Effect Layer should be enabled with 2 seconds Fade Time.
After another 3 seconds the SCE Starfield Effect Layer should be enabled with 2 seconds fade time.
After fading in the different Effect Layers the effect should run without automatic changes until it will be deactivated by selecting another Storage Place.
1. |
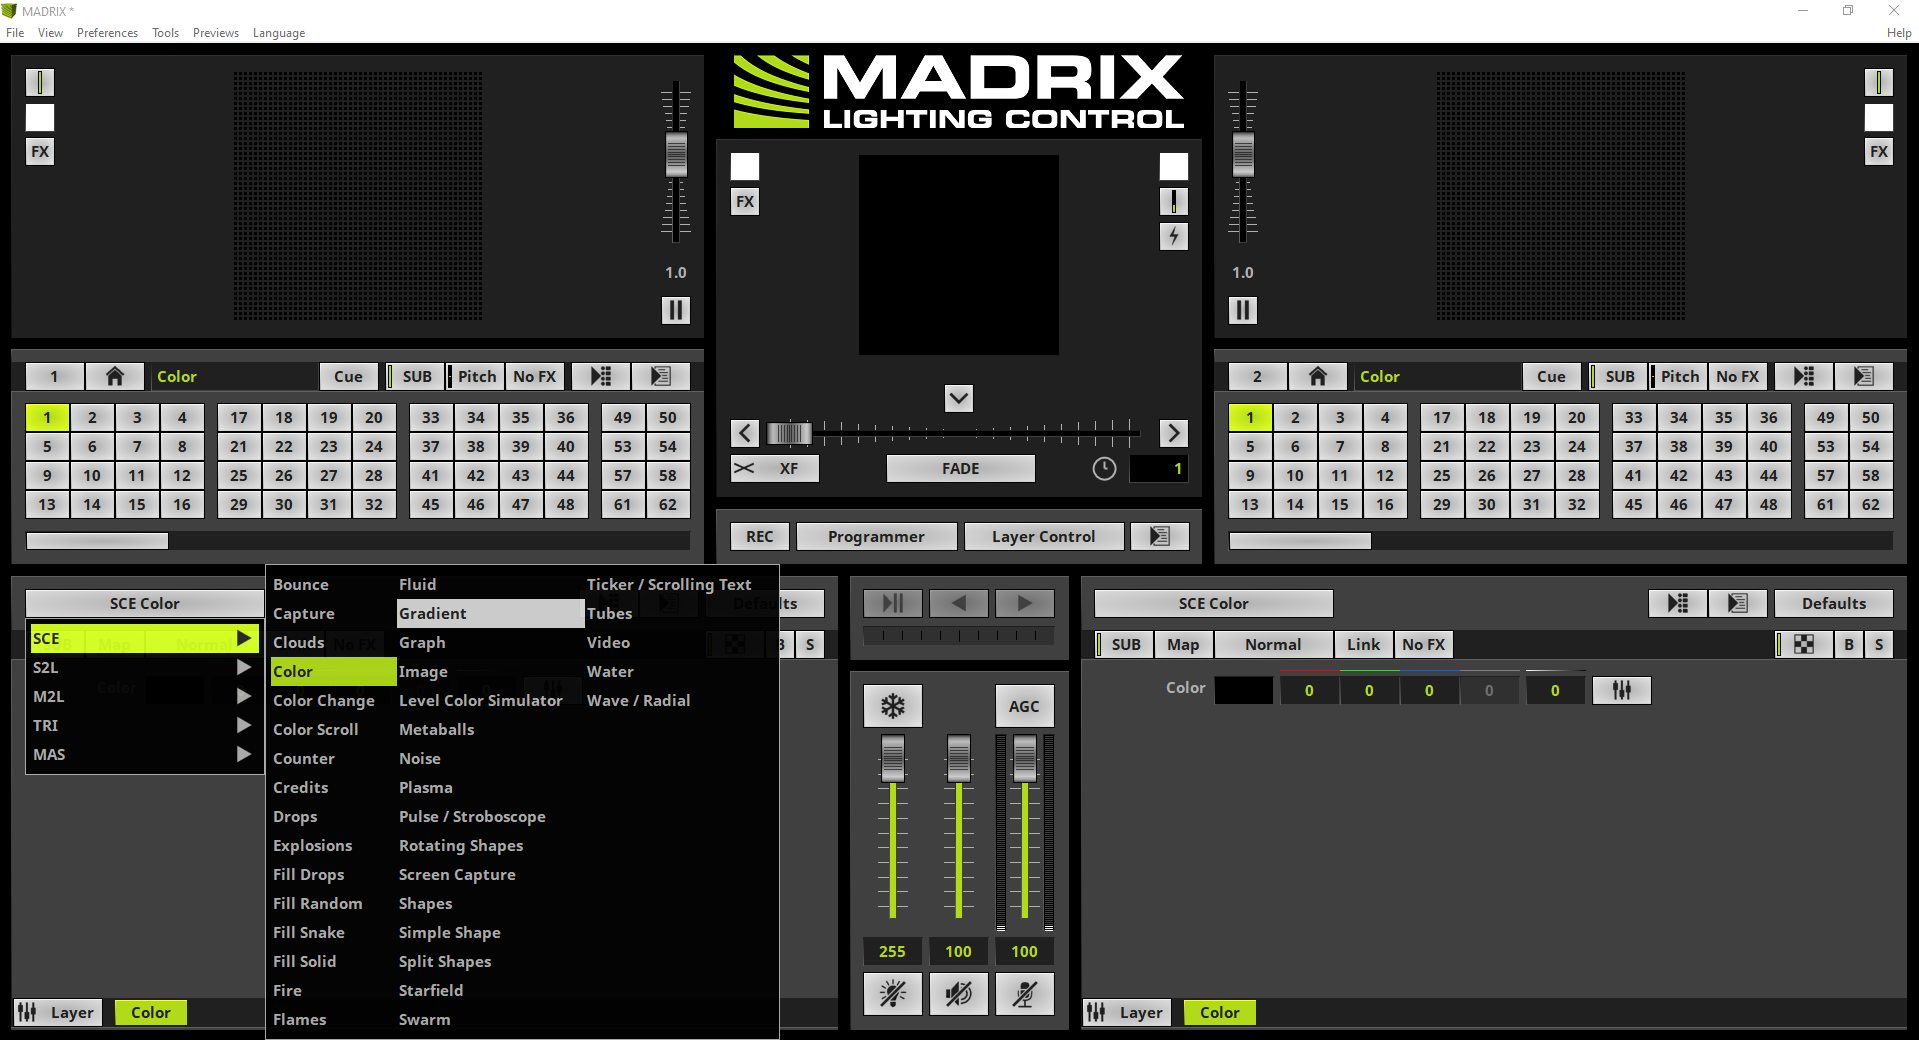
In the first step we enable the SCE Gradient effect.
|
2. |
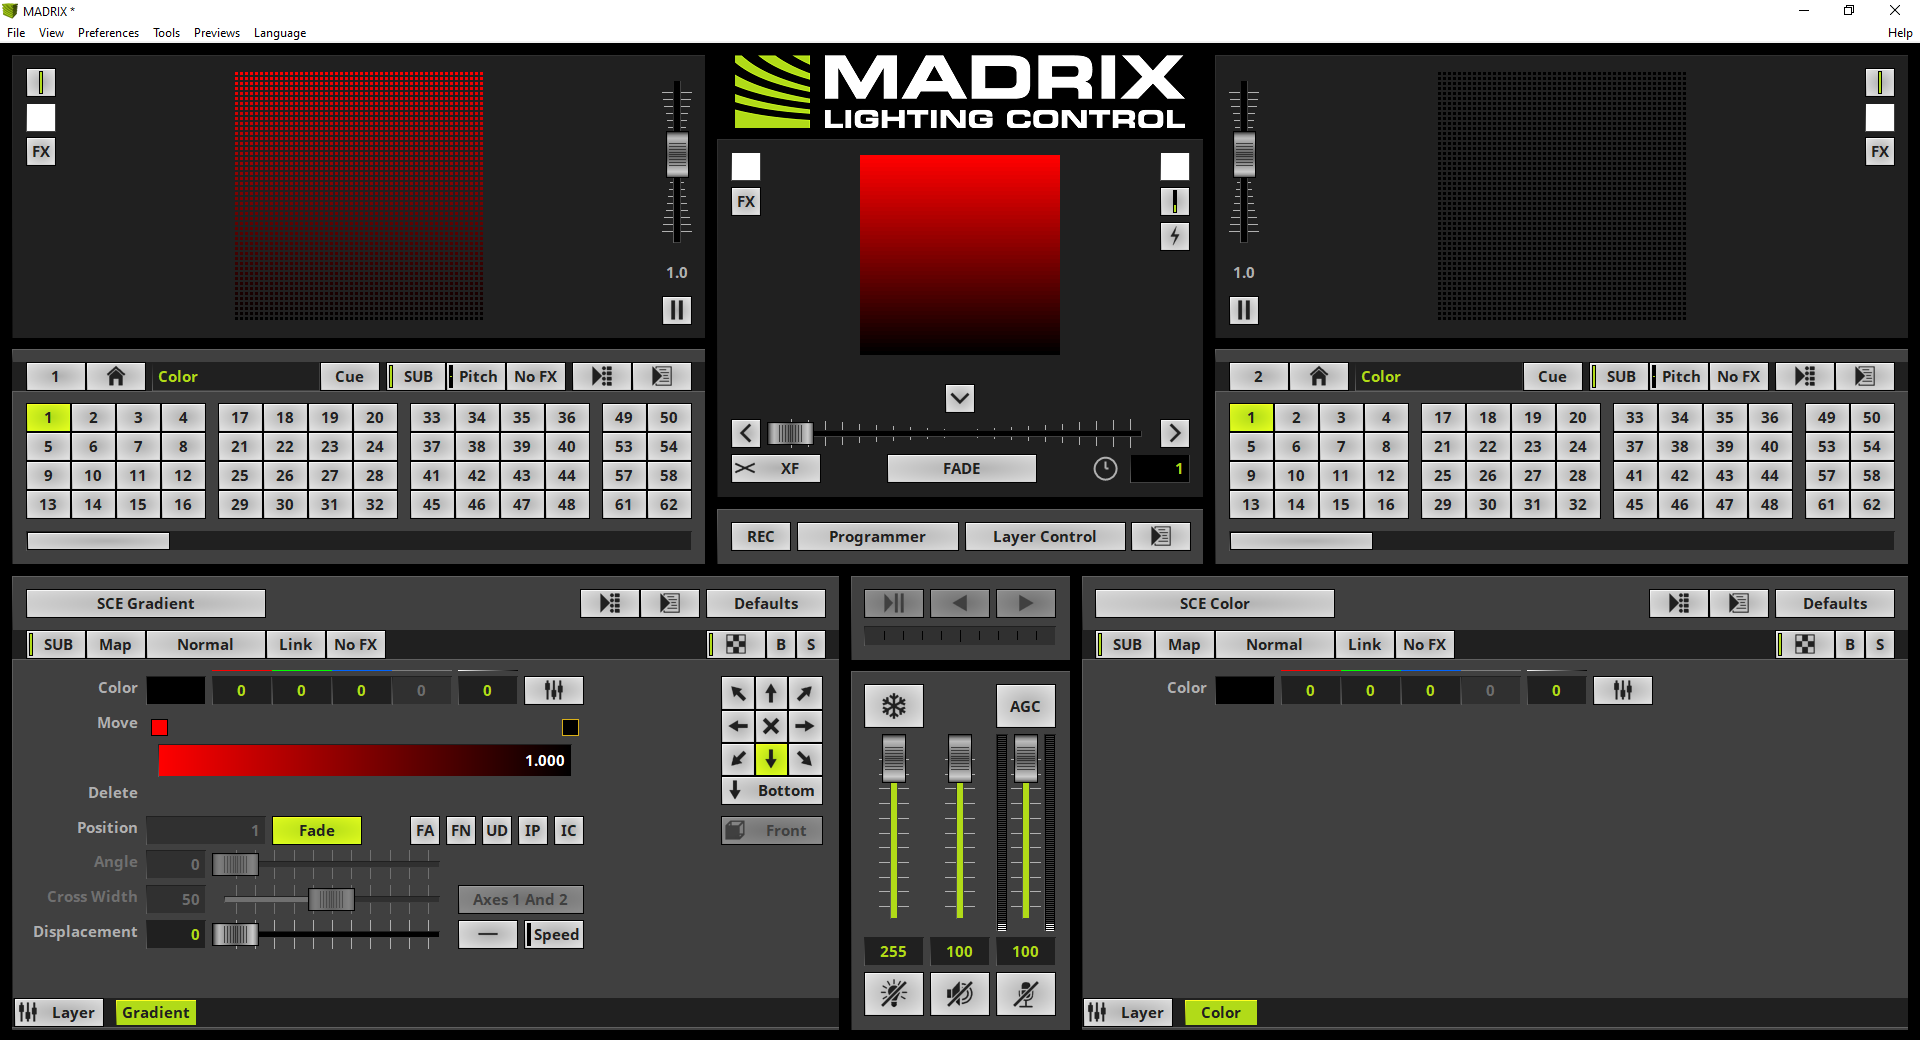
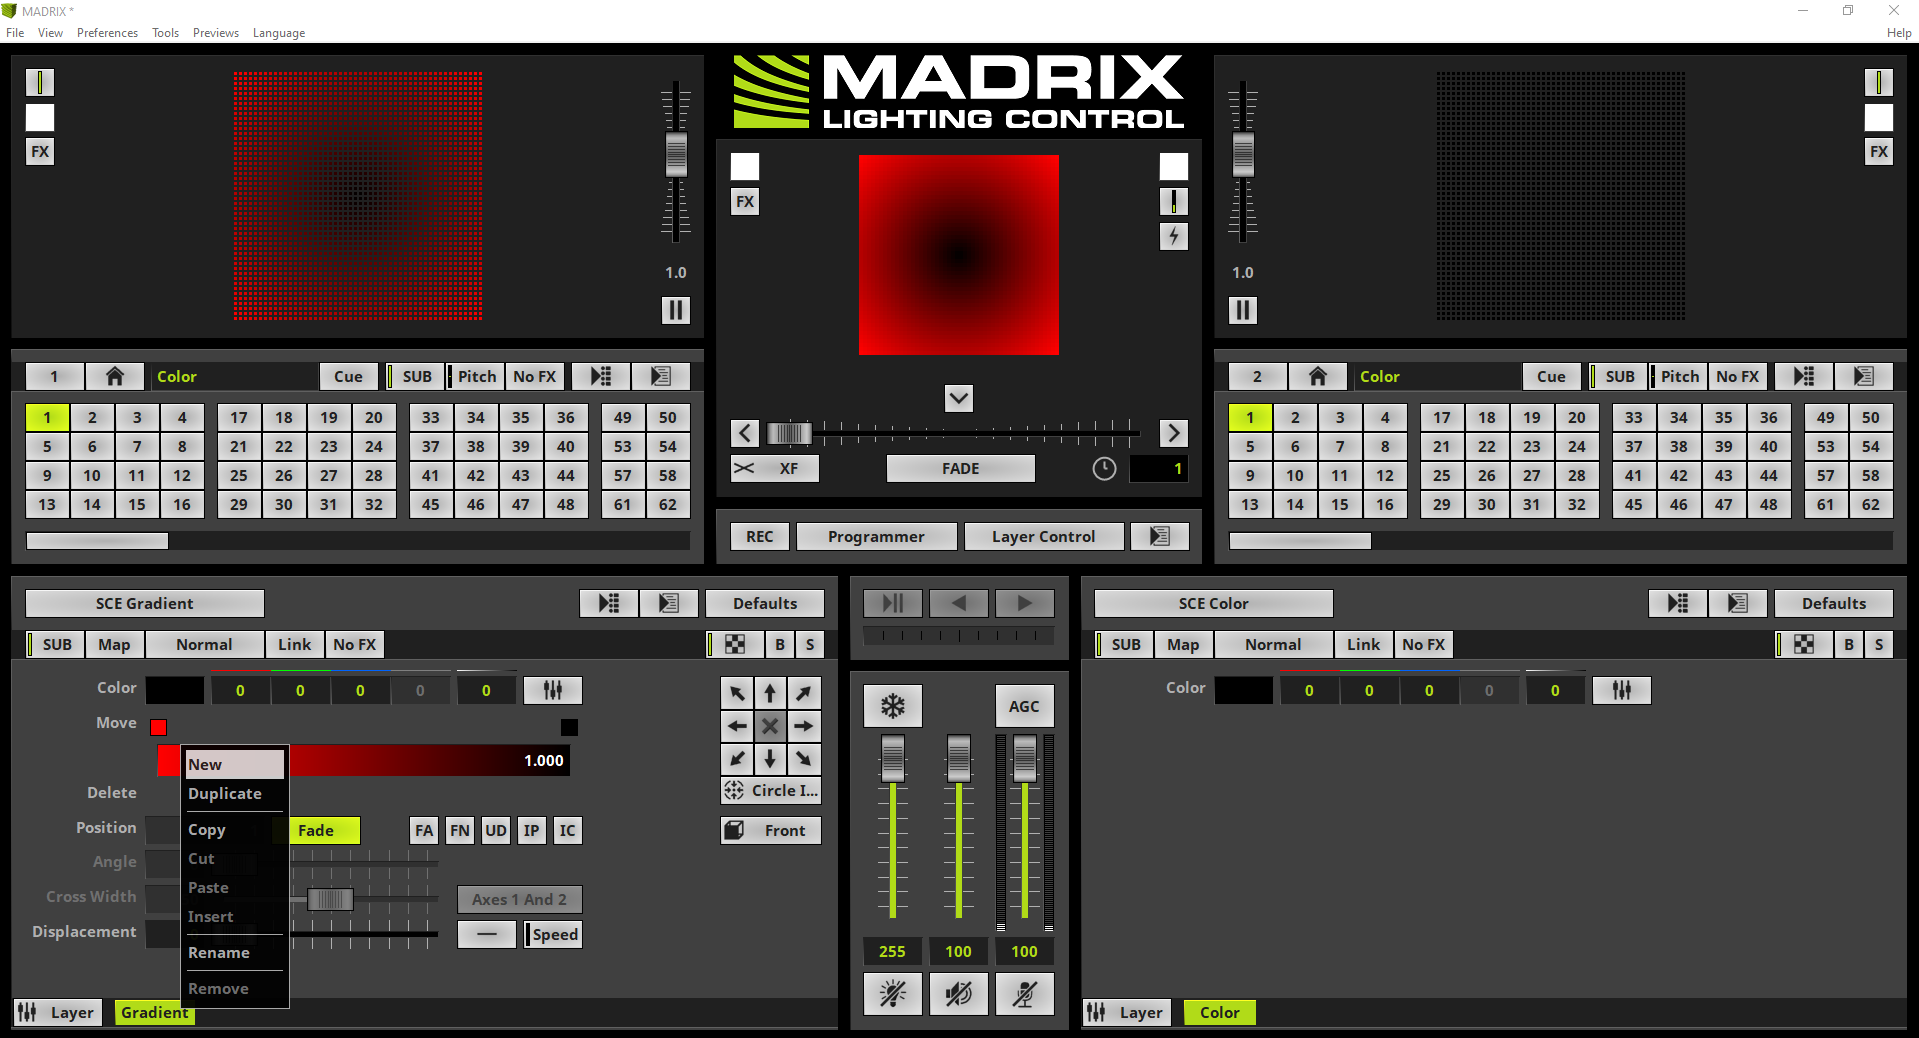
According to our task the Gradient should only consists of two colors. The first one should be red and the second color black. Therefor we delete all colors in the color gradient control with the help of the Delete boxes below the gradient. To change the first color we select the color via the Move box and change the color to red. After chancing the first color we select the second Move box and set the color to black. Note: If you don't know how change, add or delete colors in a MADRIX color gradient, please have a look at the chapter »Using Colors and Intensity of the MADRIX User Manual.
|
3. |
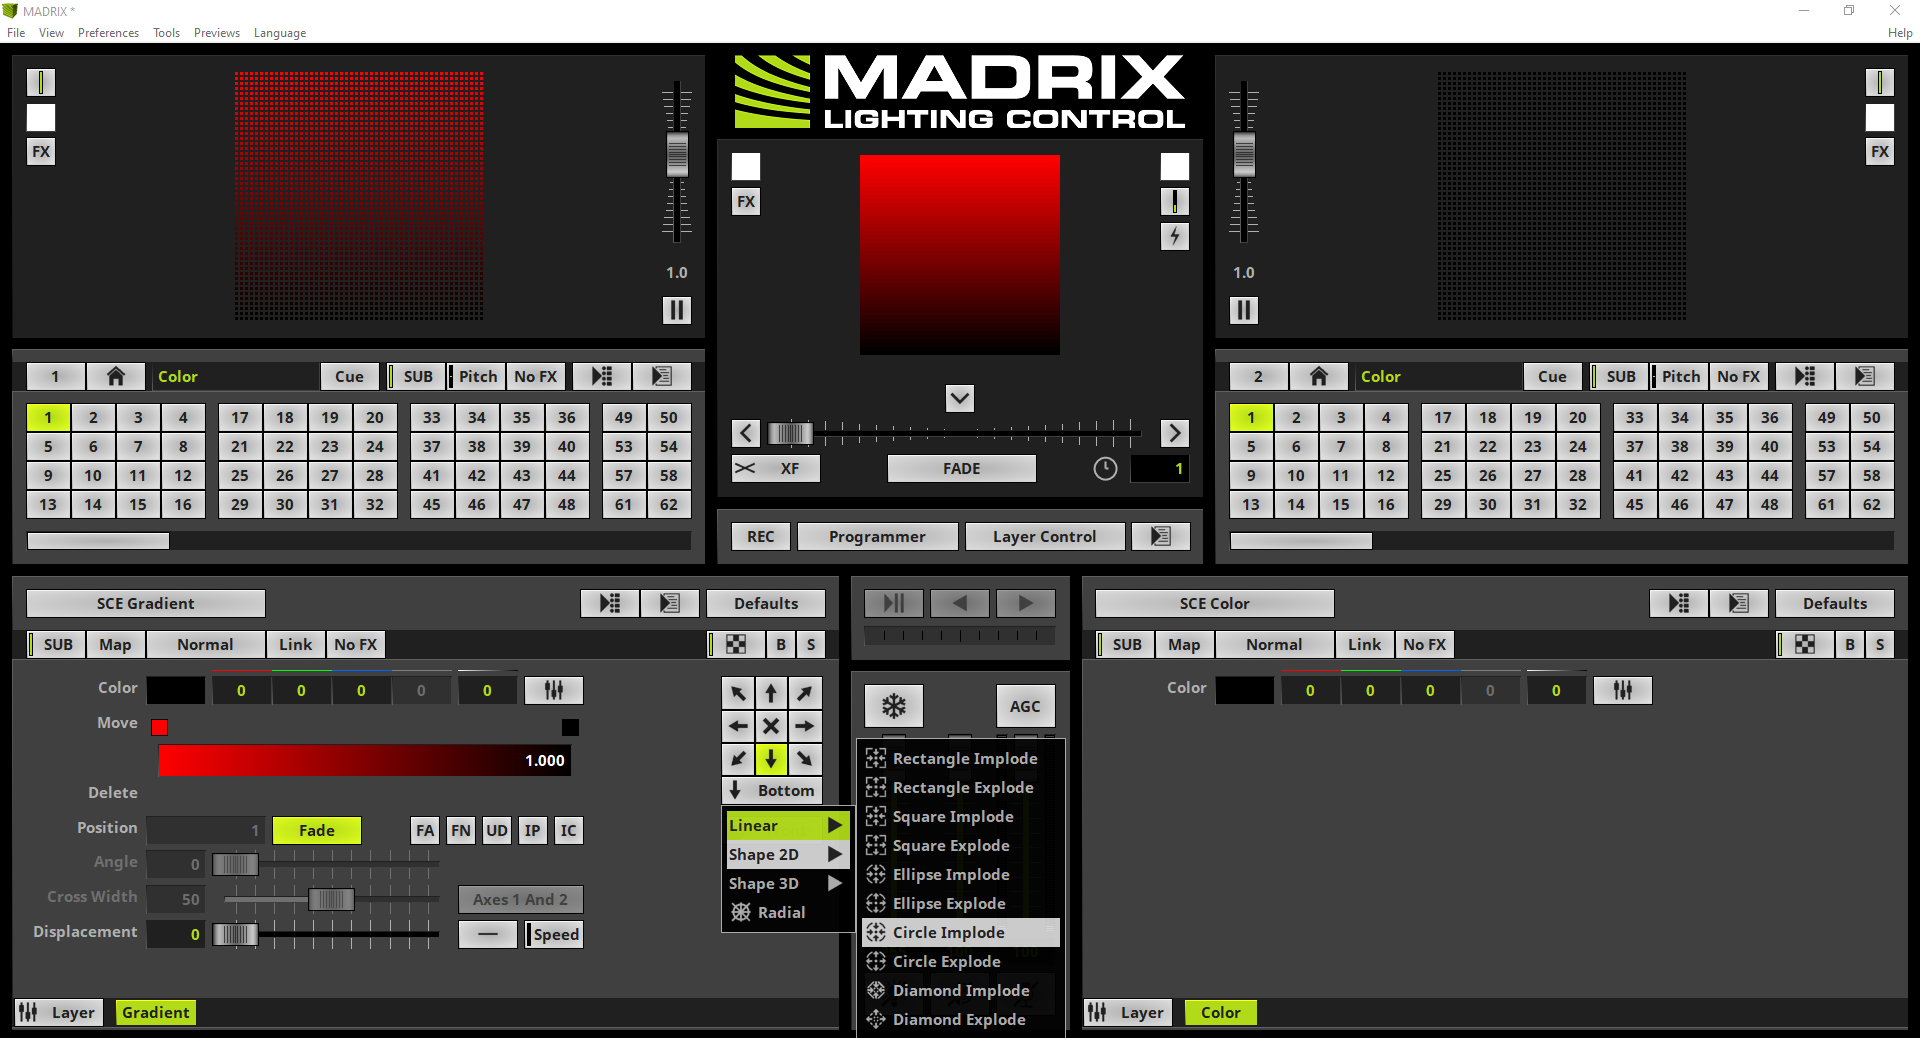
The task requires the representation of the Gradient as Circle Implode at the matrix. To activate the Circle Implode we click the Direction button, navigate to Shape 2D > Circle Implode and select it.
|
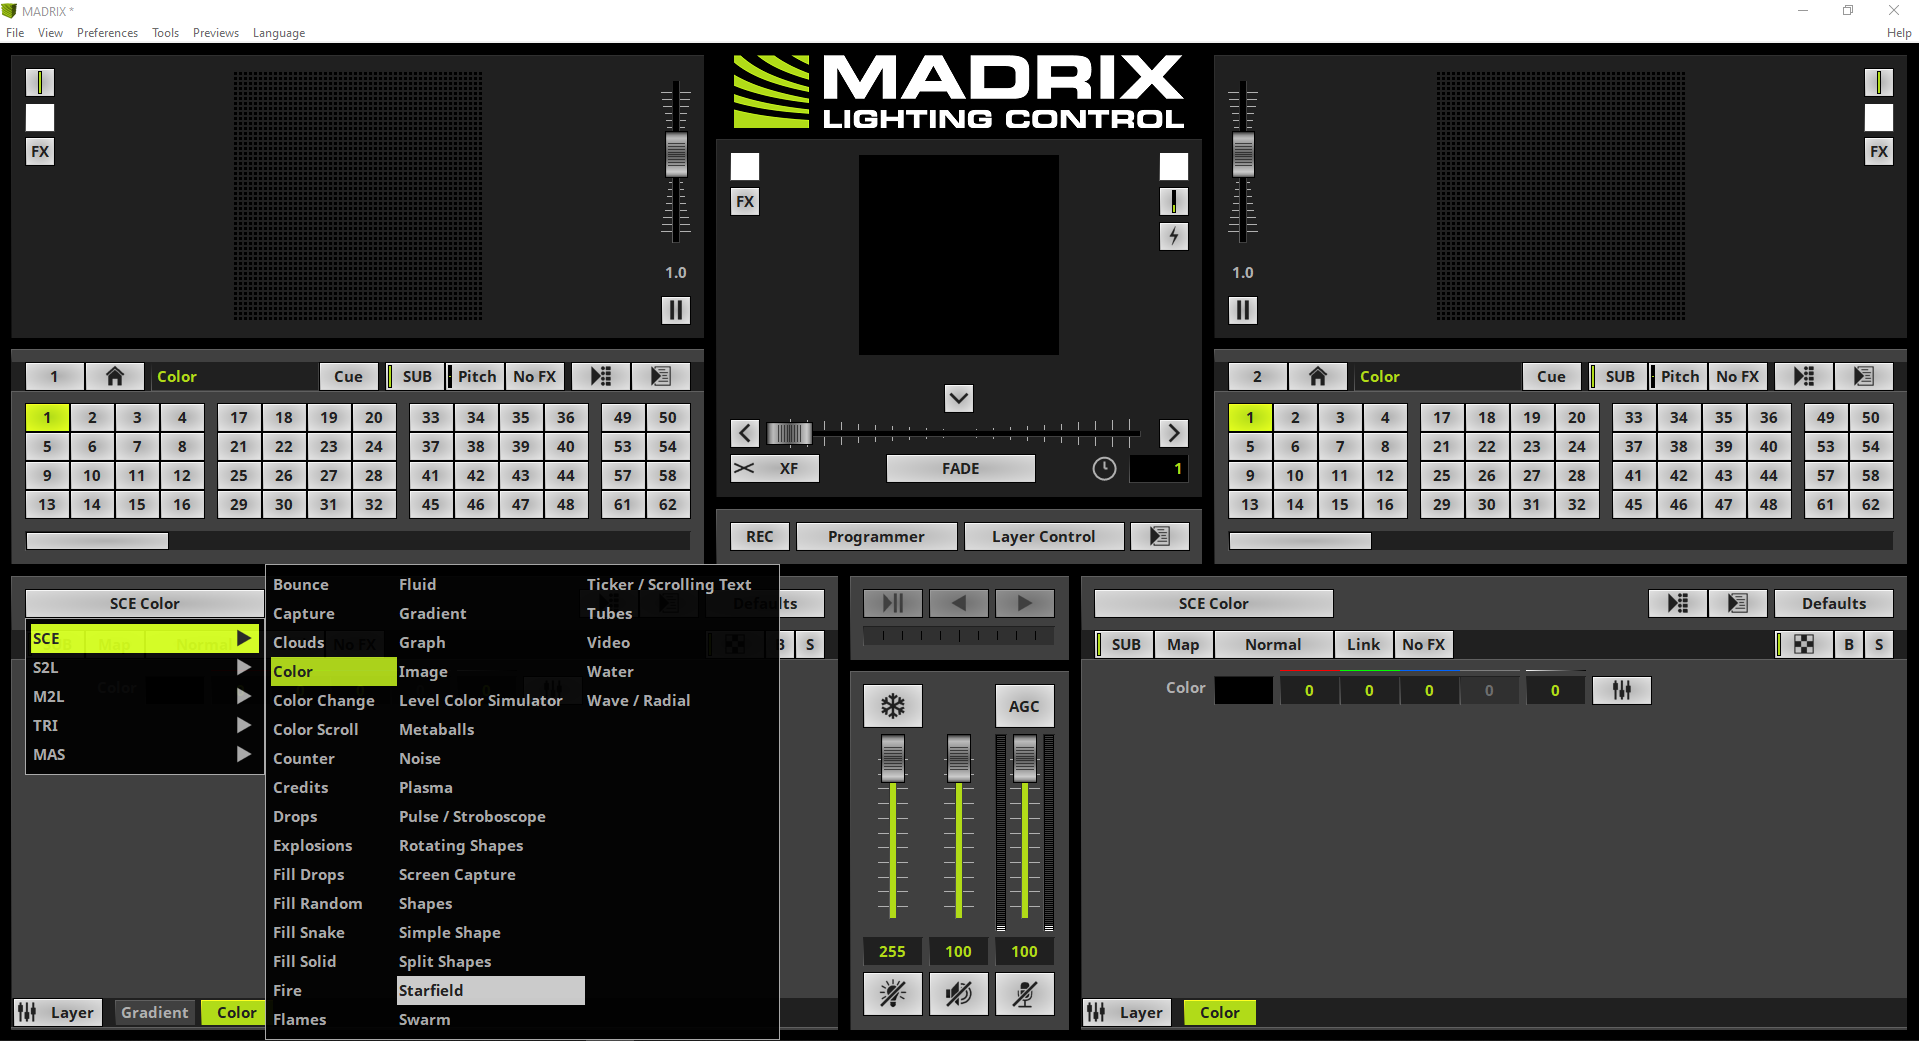
4. |
Now we add a new Effect Layer for the SCE Starfield effect. Therefor we perform a right click at the Gradient Effect Layer and select New in the context menu.
|
5. |
To activate the SCE Starfield we open the Effect selection and select the SCE Starfield effect.
|
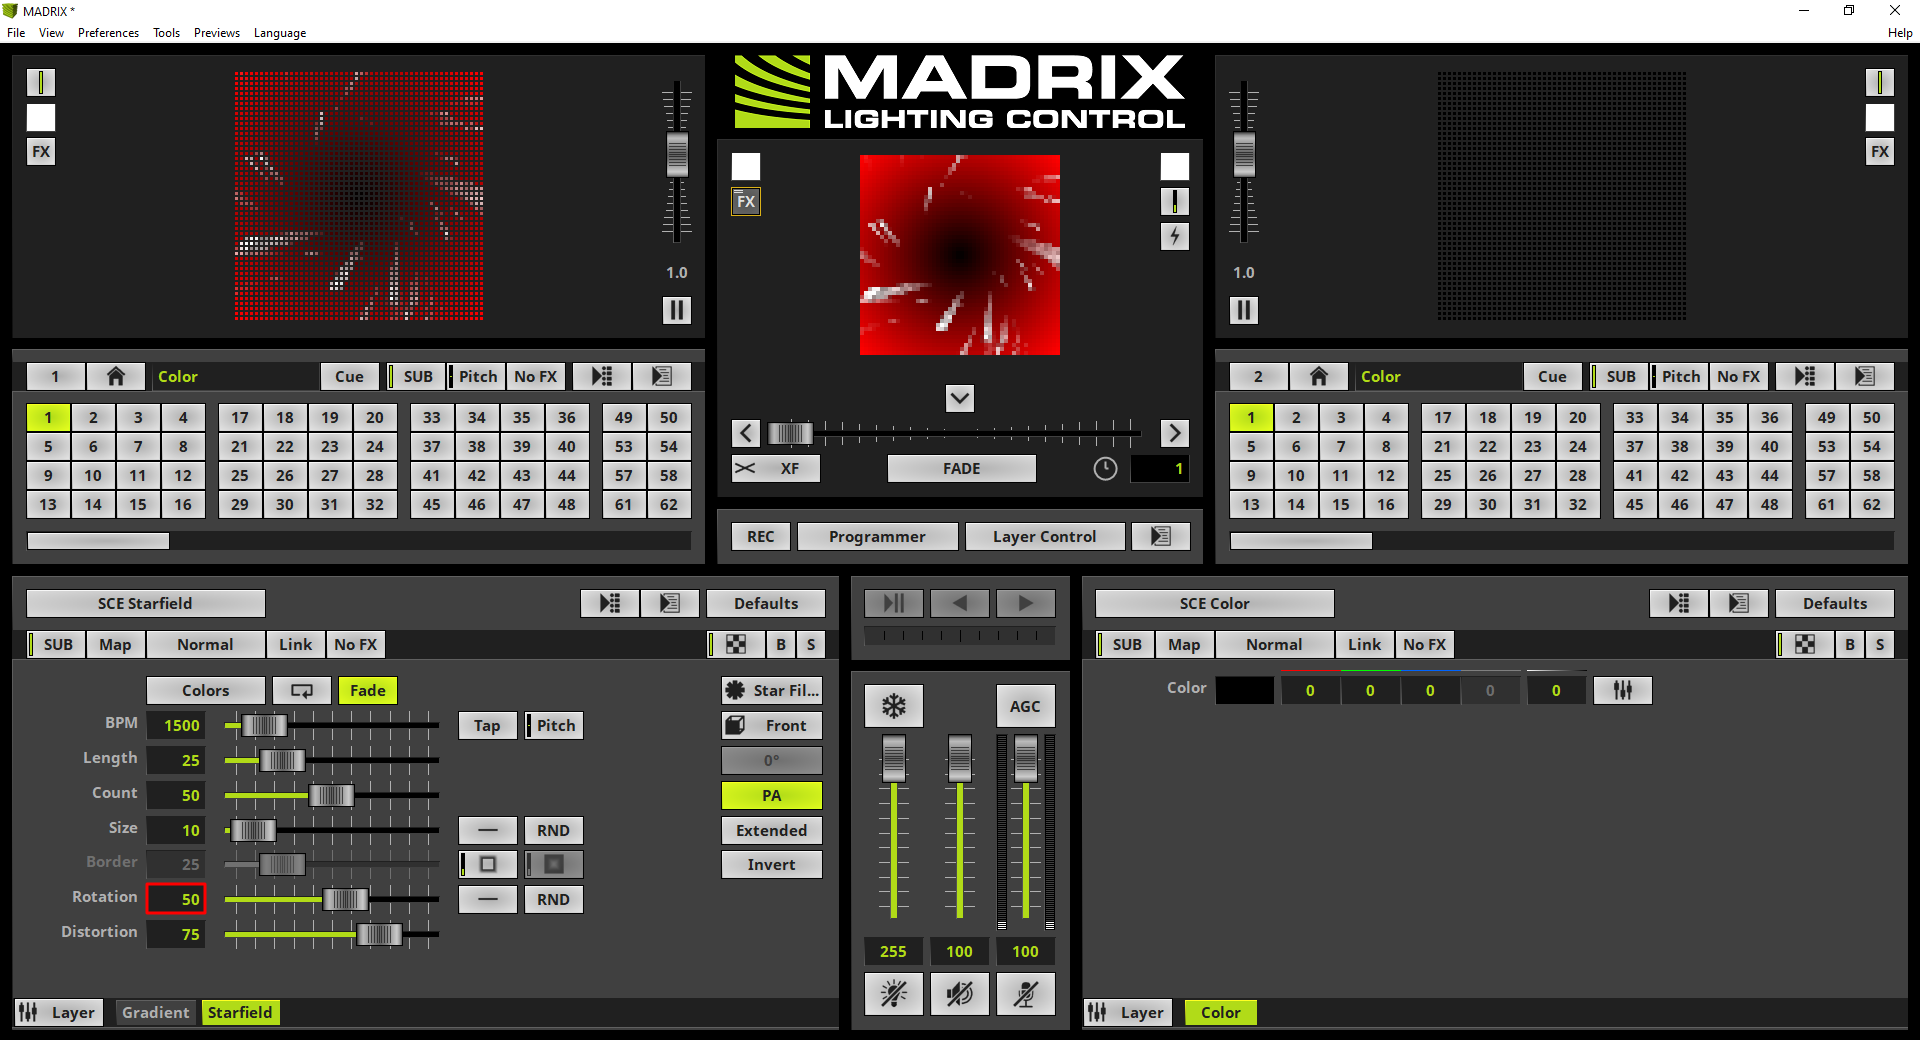
6. |
Now the SCE Starfield effect is running in front of the SCE Gradient effect. According to our task we have only to change the Rotation value to 50.
|
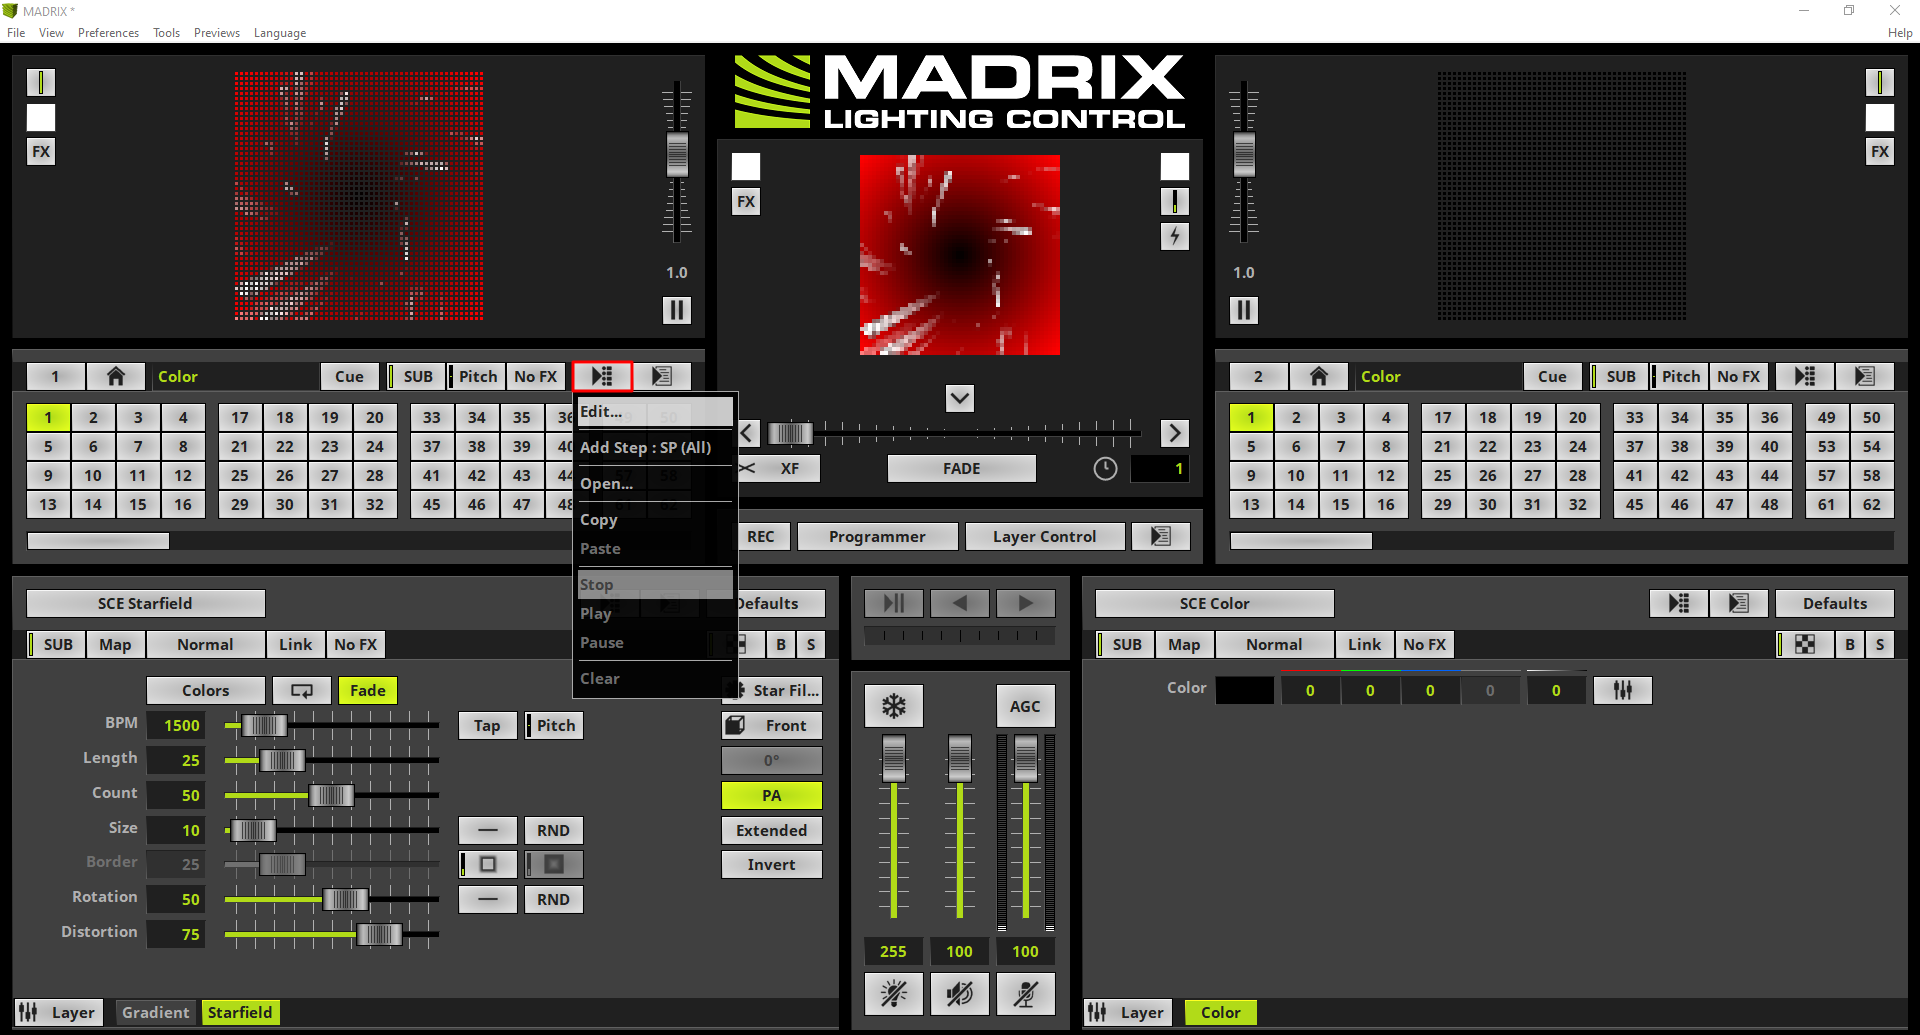
7. |
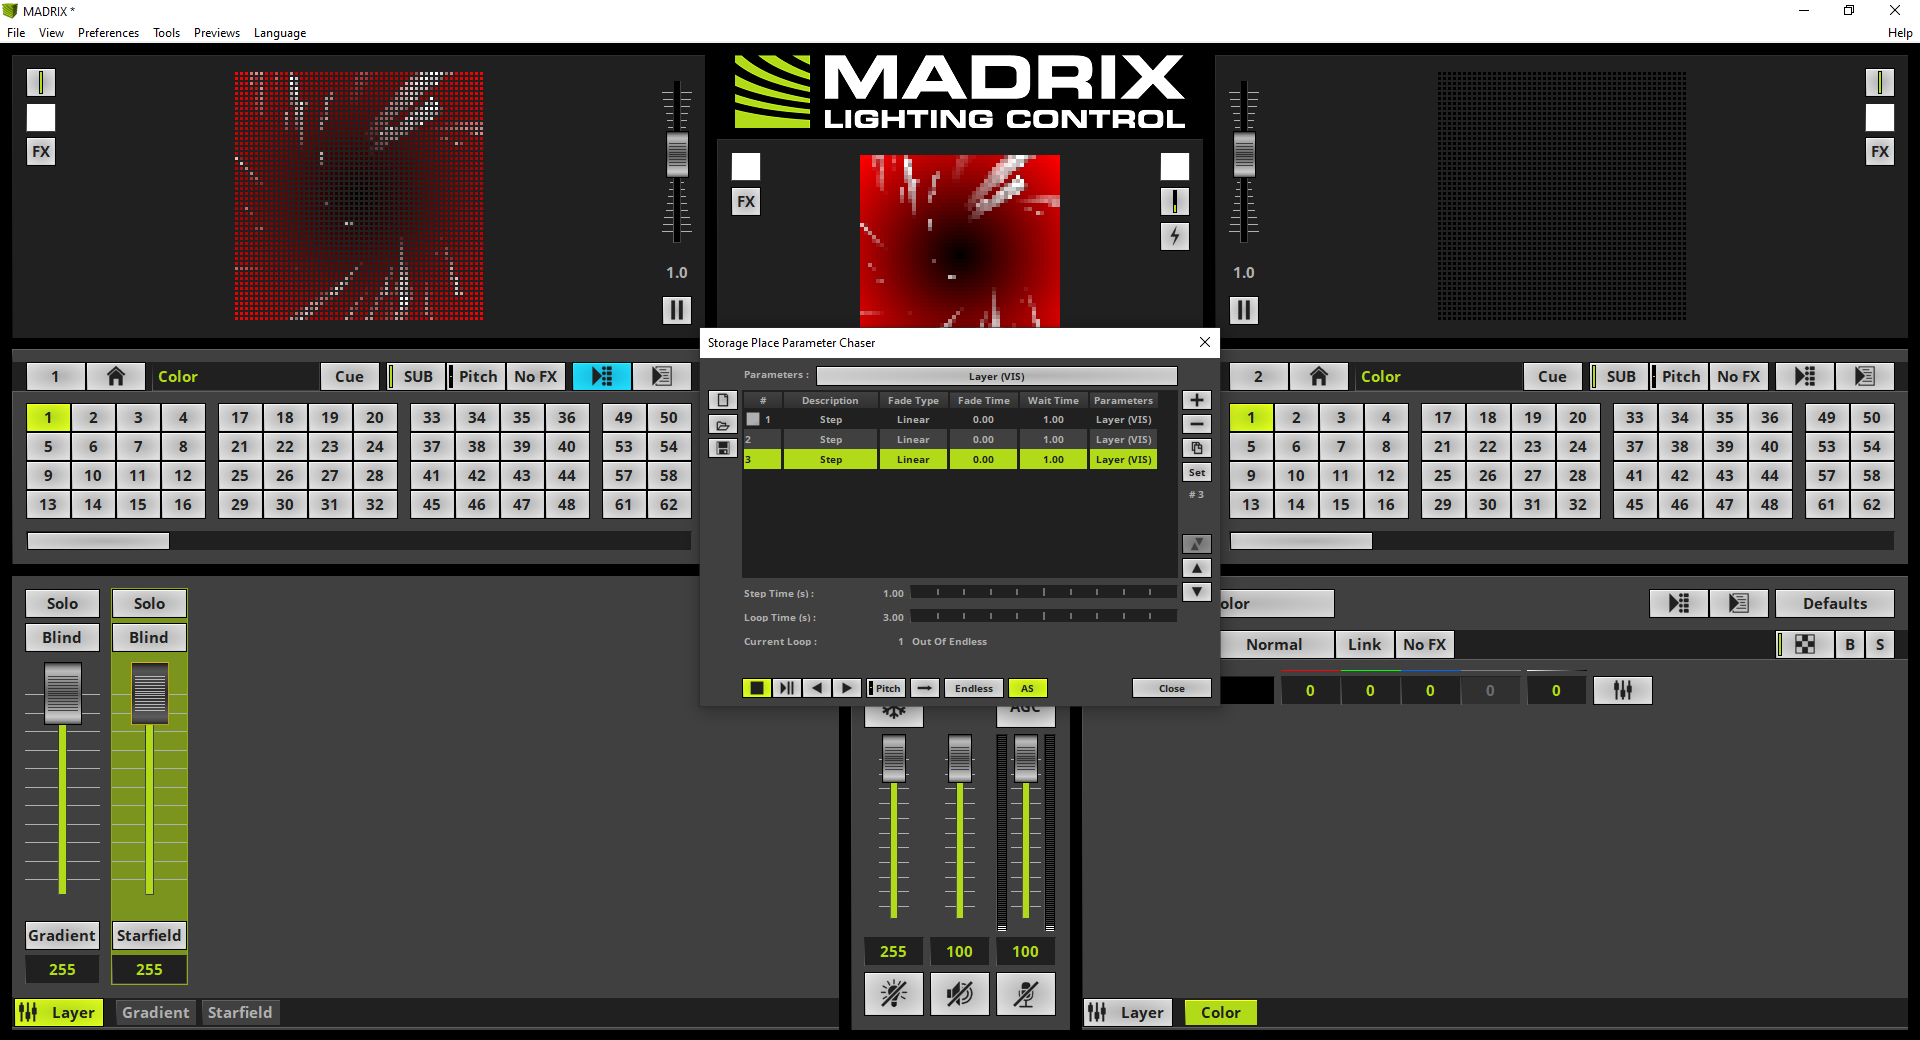
In our task it is required to create a kind of Fade In effect with different fade times per layer. To create such a visual result we will use the Storage Place Parameter Chaser. To open the Storage Place Parameter Chaser we perform a right click at the Storage Place Parameter Chaser button at the Storage section and select Edit.
|
8. |
An empty Storage Place Parameter Chaser opens.
|
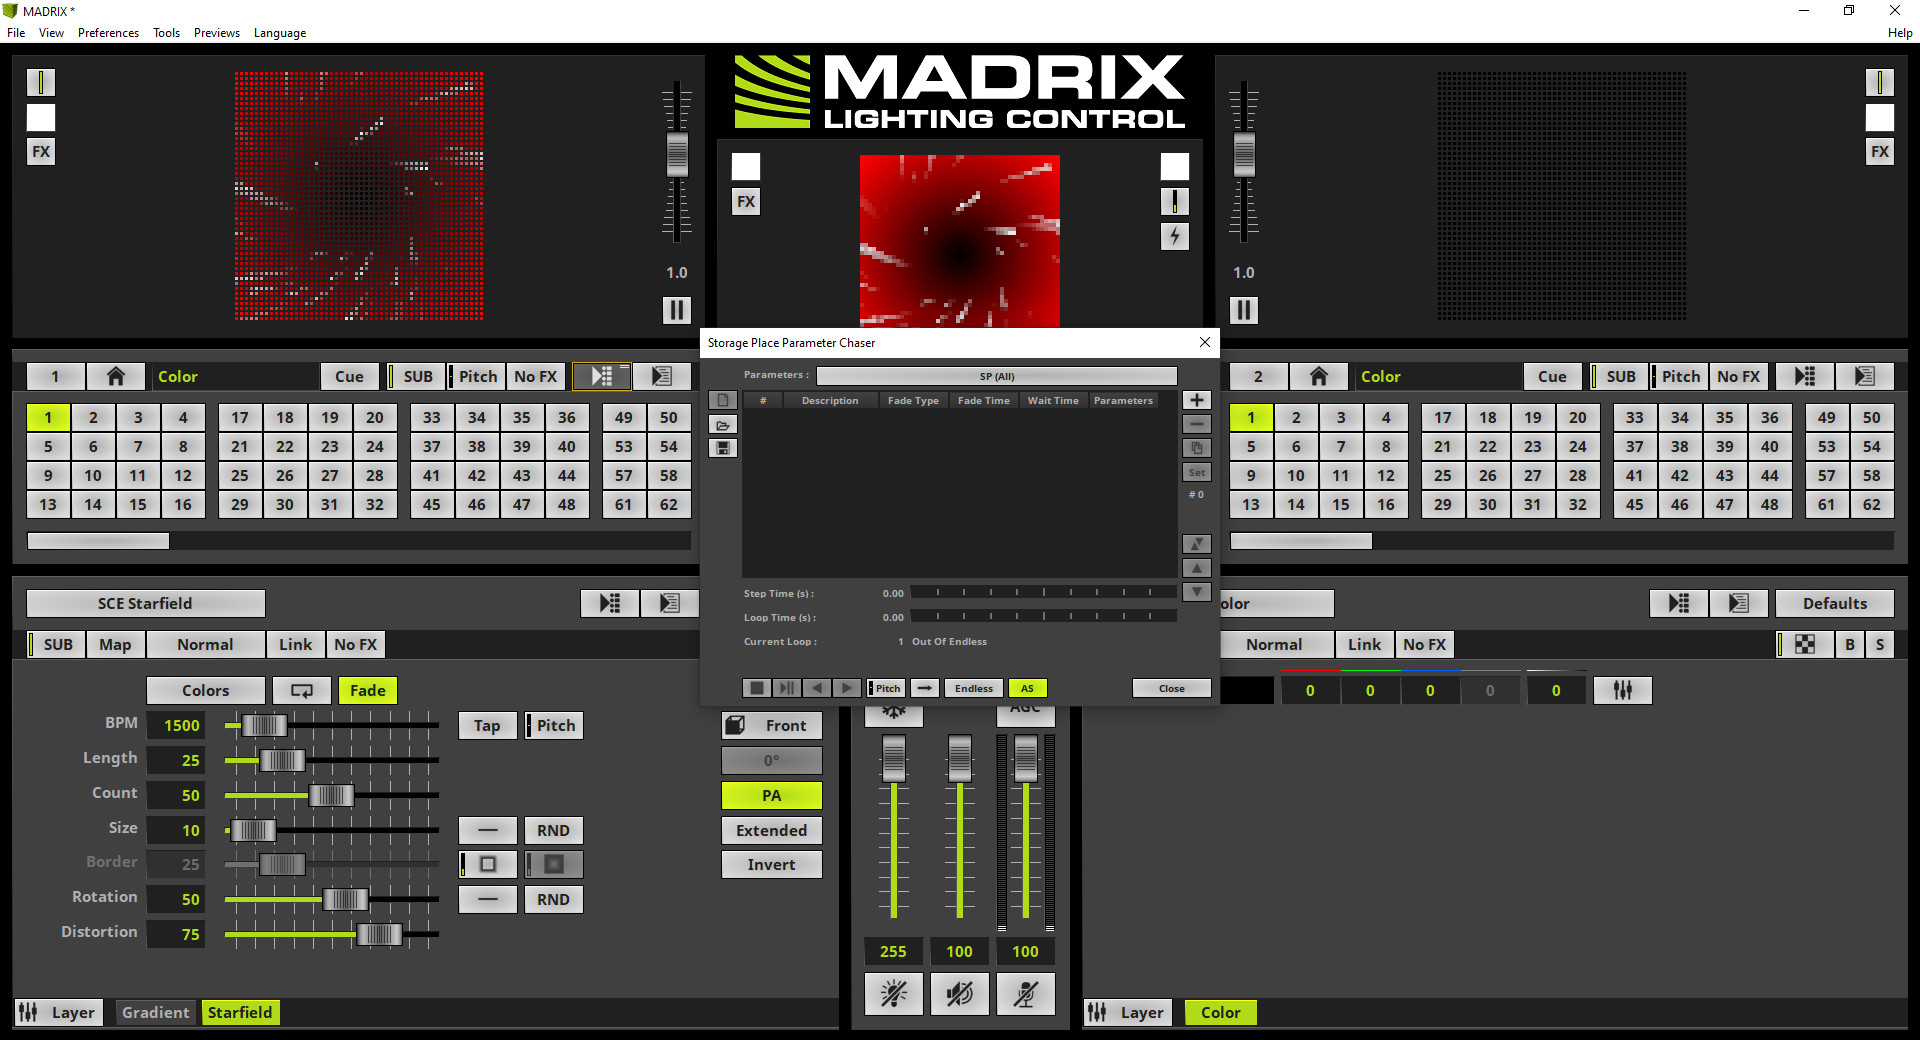
9. |
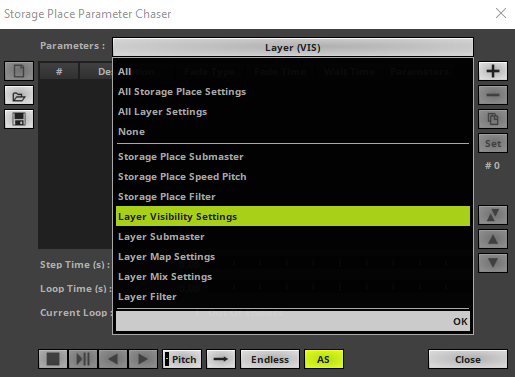
In this tutorial we only want to add changes of the visibility settings in the Storage Place Parameter Chaser. Therefor we click the Parameter selection button and enable only Layer Visibility Settings. All other parameters should be disabled. After changing the parameter we click OK.
|
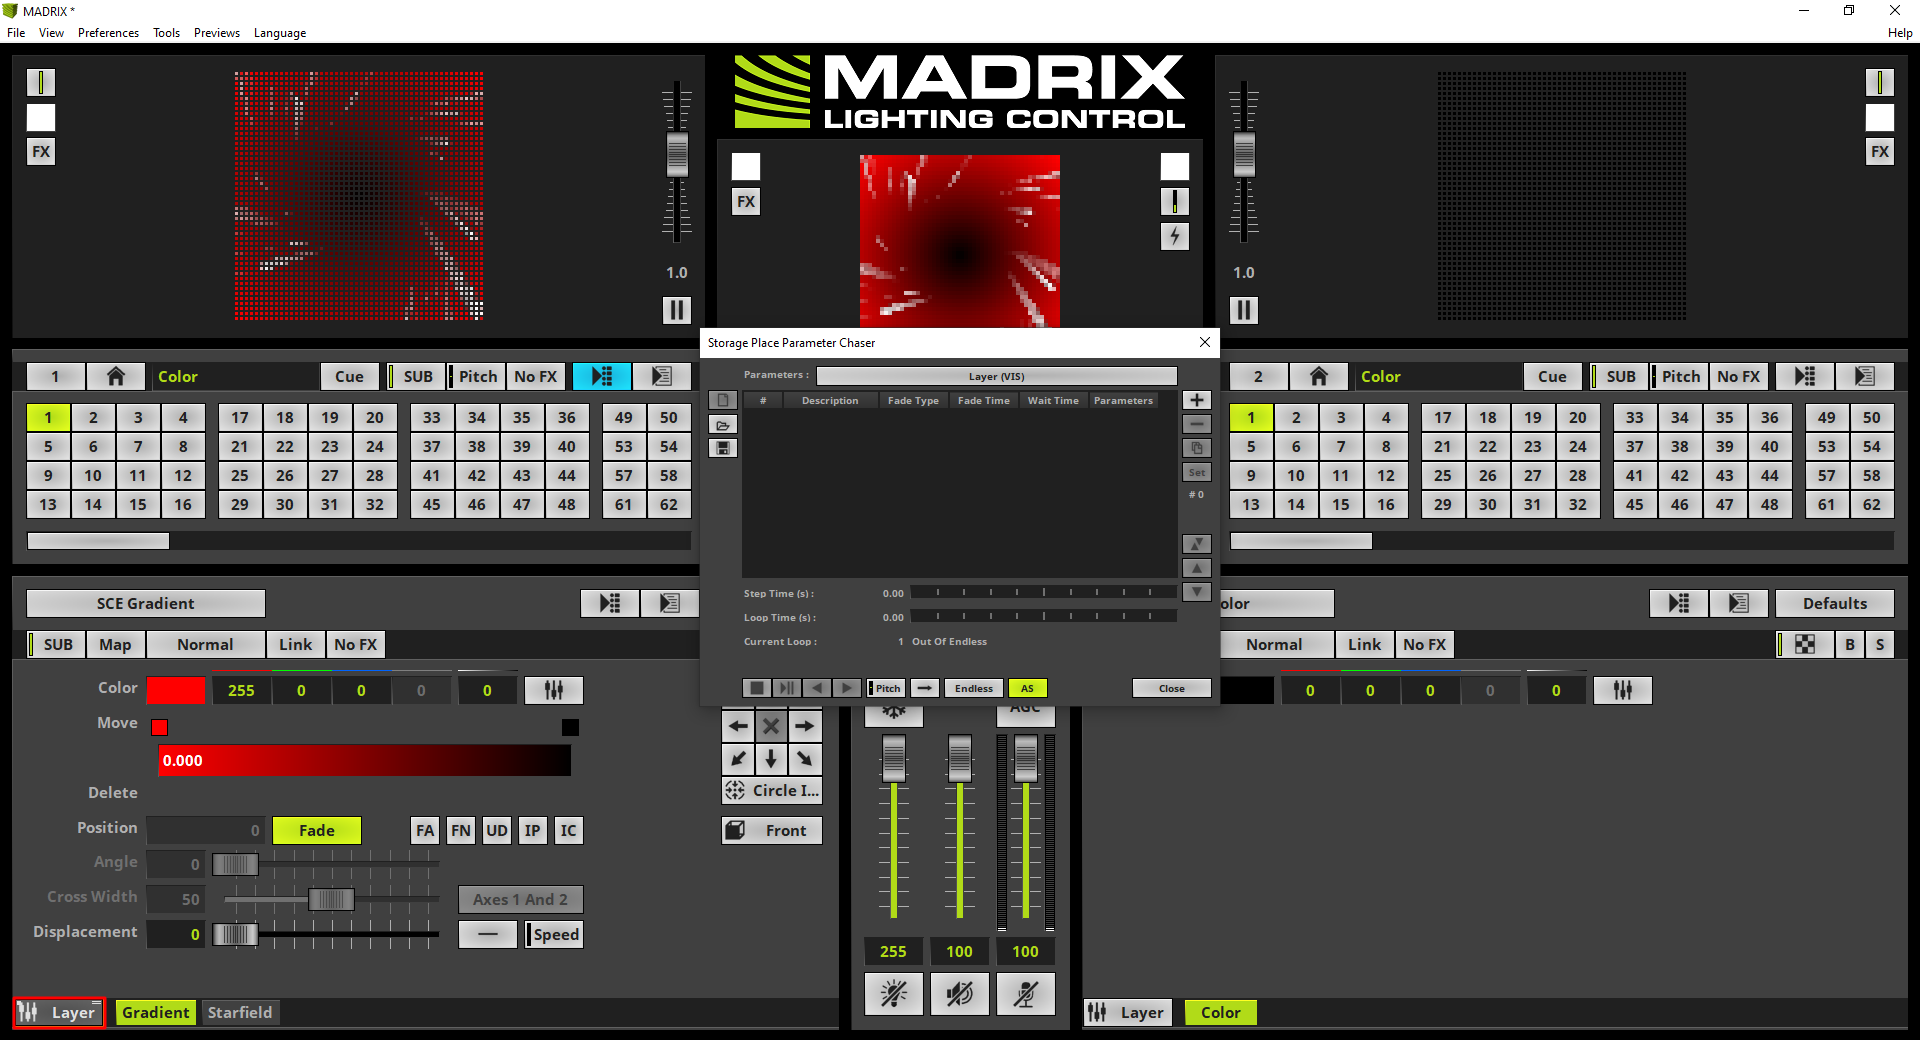
10. |
Before we start to add steps to the Storage Place Parameter Chaser we want to change the MADRIX effect parameter view to Layer view via a click at the Layer button on the bottom left corner of the Effect Section.
|
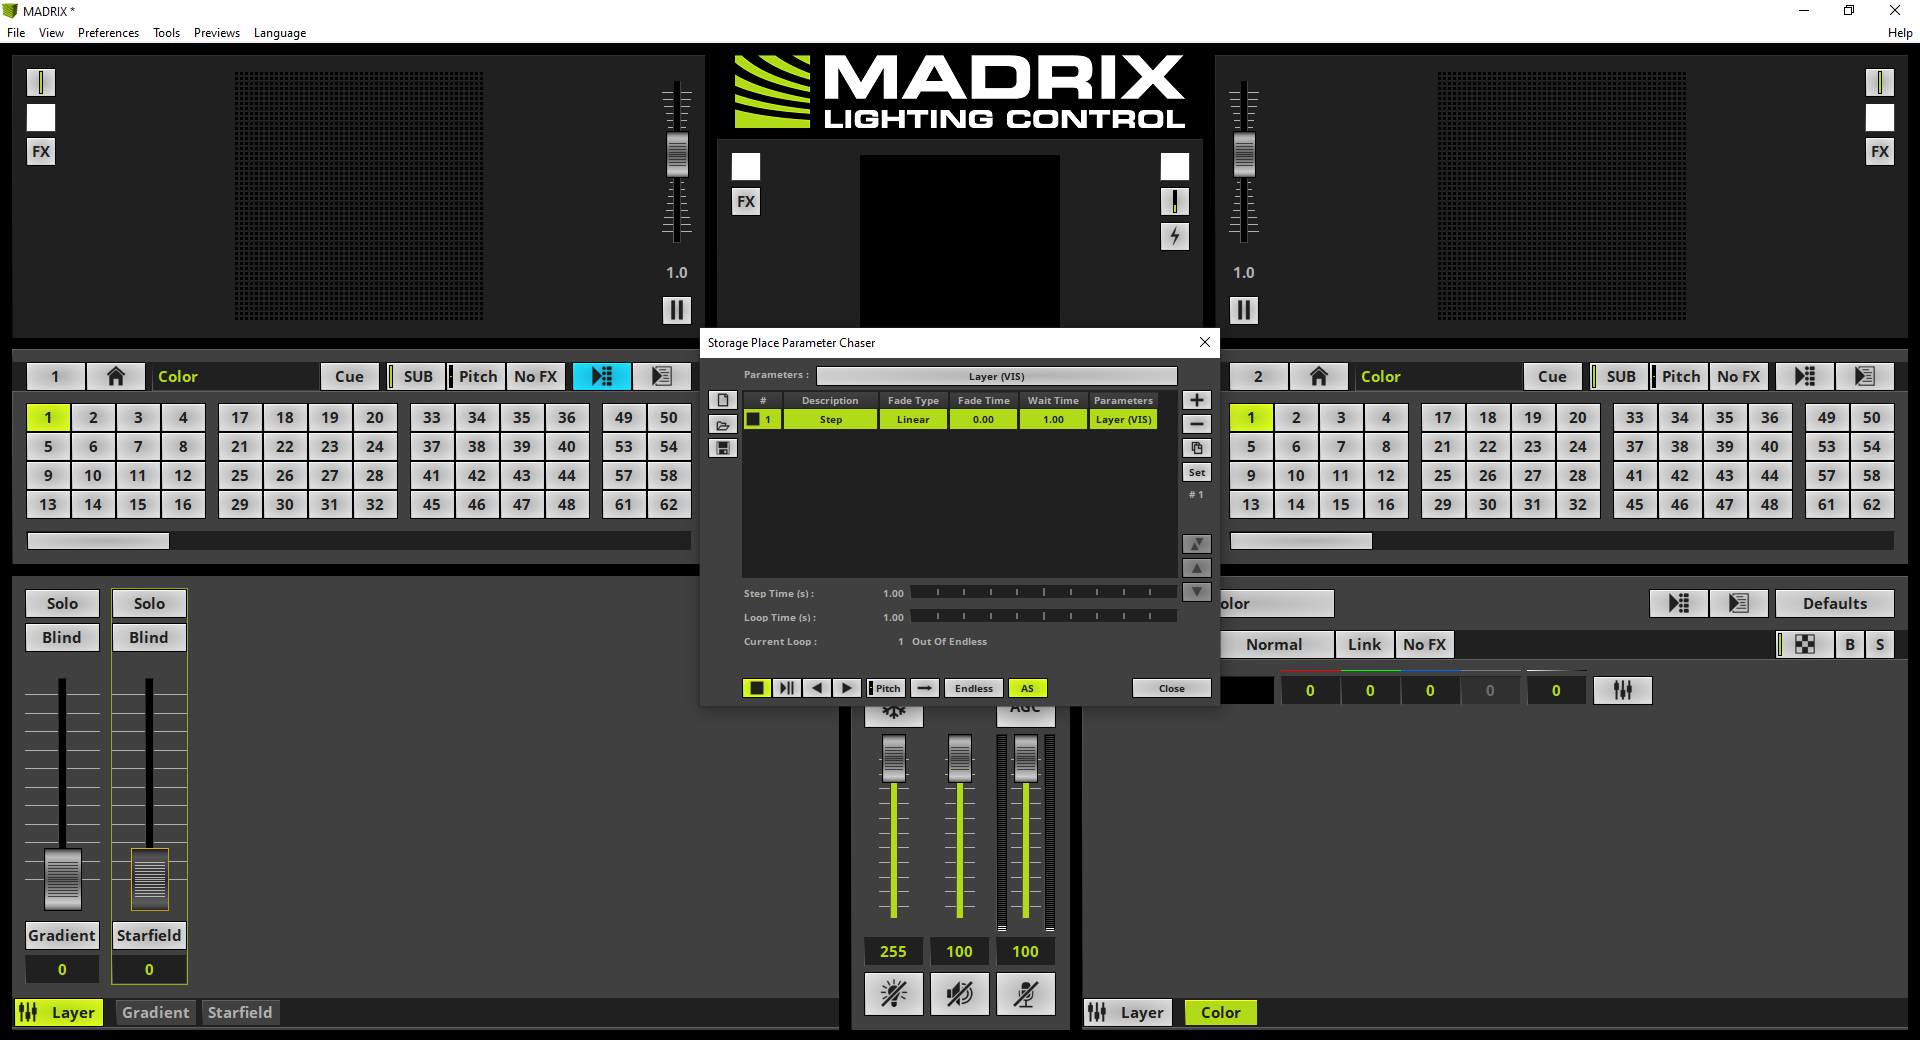
11. |
In the Layer view we will find the direct access to the Opacity sliders per Effect Layer. For the first chaser step we want to set the values for both Effect Layers to 0 to create the required blackout. Now we click the + button at the Storage Place Parameter Chaser to add the first step.
We will set the timing for Wait Time and Fade Time in Step 14 after all steps of the Storage Place Parameter Chaser have been added.
|
12. |
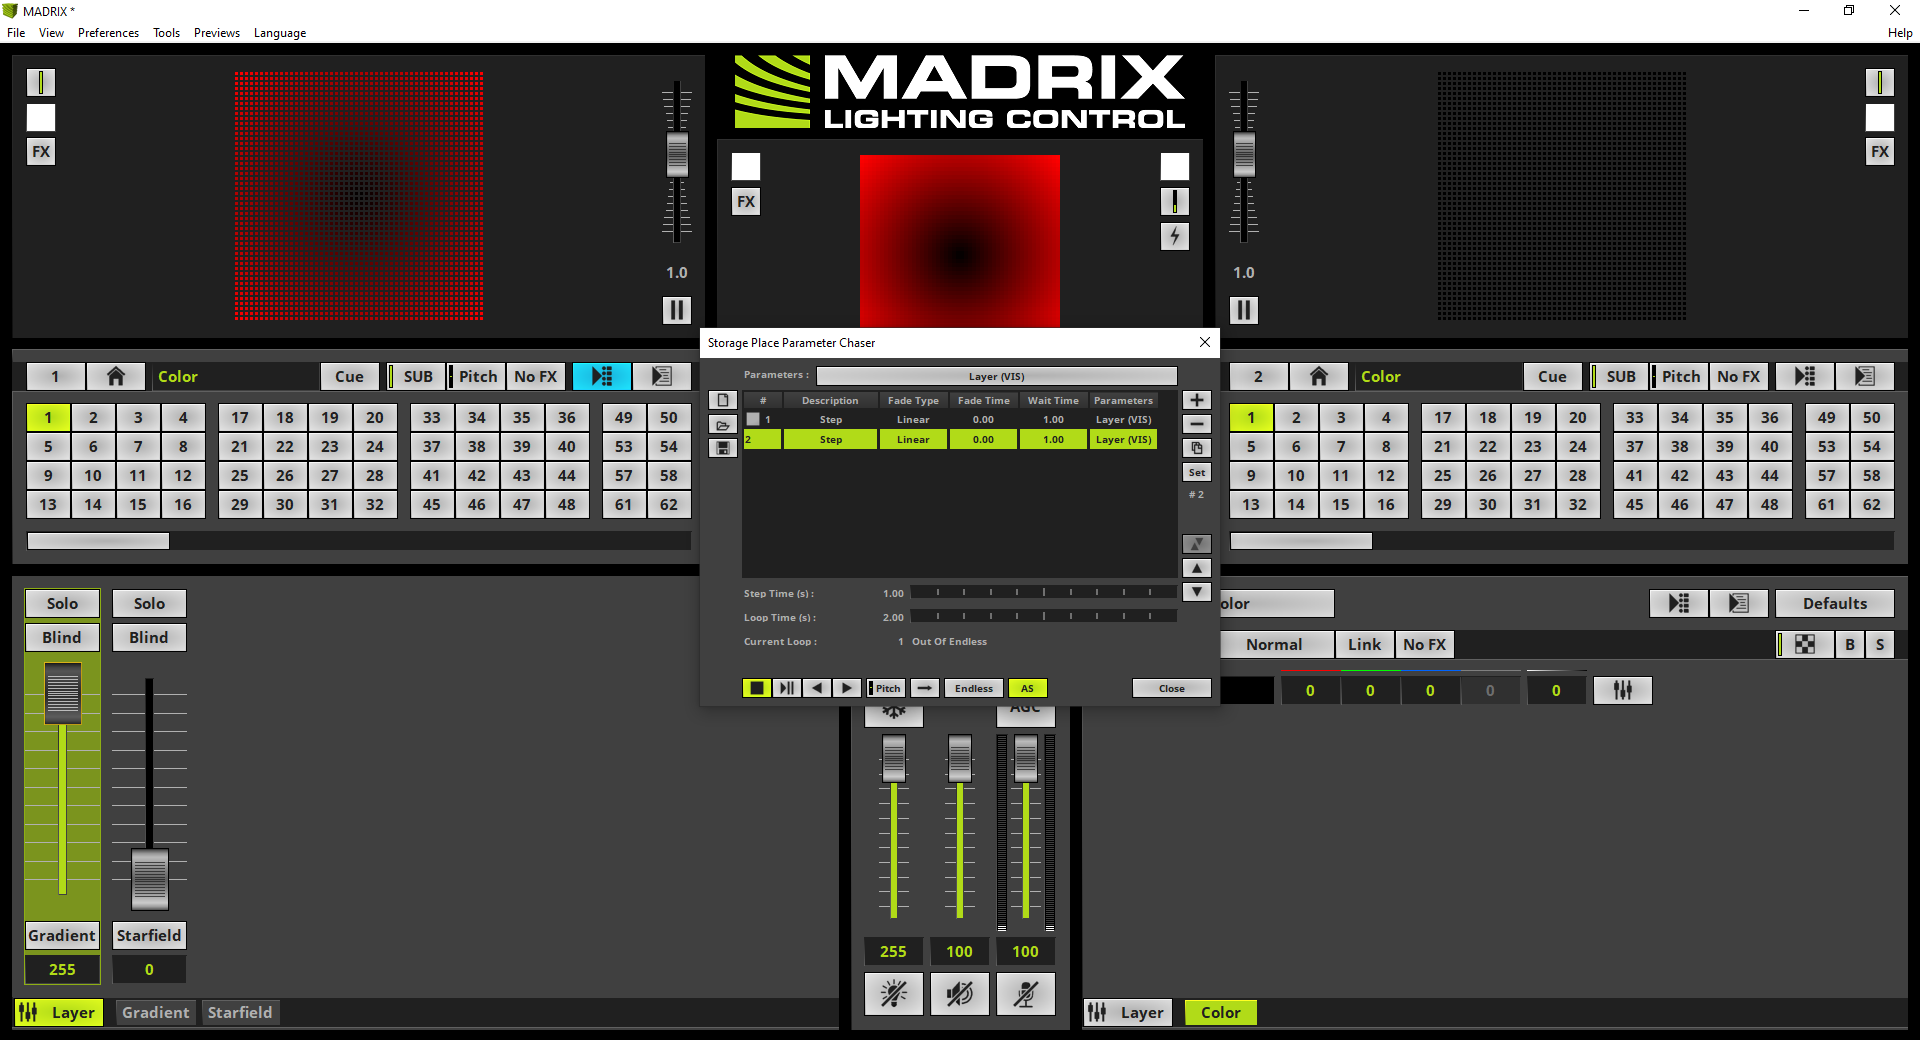
According to our task the SCE Gradient Effect Layer should be faded as first. So we set the Opacity of the Gradient Effect Layer to 255 and click the + button at the Storage Place Parameter Chaser again.
|
13. |
In this step we change the Opacity of the Starfield Effect Layer also to 255 and click the + button at the Storage Place Parameter Chaser.
|
14. |
All required steps are added to the Storage Place Parameter Chaser. But we have to change the timing according to our task. In the task it is required to have a blackout for 0.5 seconds. As we can remember the first step is responsible for this kind of black out in this chaser. So we perform a double click at the column Wait Time of the first entry and set the value to 0.5 with the help of the keyboard.
The Gradient Effect Layer should be faded in 2 seconds after the black out. So we perform a double click at the Fade Time column of step 2 and change the value to 2. To accept the value we can press [Enter].
When we have again a look at our task, the SCE Starfield Effect Layer should be enabled after another 3 seconds with a fade time of 3 seconds. To delay the fade in of the SCE Starfield Effect Layer in this chaser we have to increase the Wait Time of the chaser step before. That means we have to perform a double click at the Wait Time column of the second step and set the value to 3. Furthermore we have to perform a double click at the Fade Time column of the third chaser step and change the value also to 3.
|
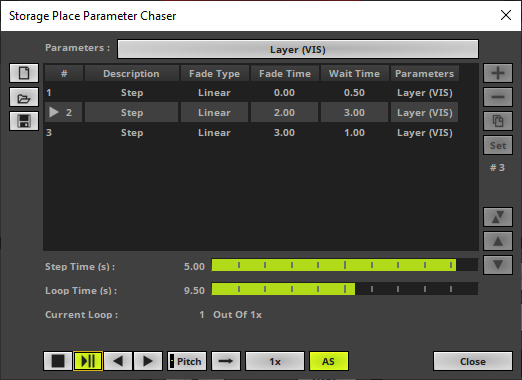
15. |
To run the Storage Place Parameter Chaser only once at activating the desired Storage Place we have to change the Loop Count to 1.and the Automatic start (AS) option should be enabled.
|
16. |
When we now start the Storage Place Parameter Chaser for a test, we can figure out the chaser will be played only for one loop and the Effect Layers are faded according to our task.
|


Congratulations! You have successfully learned how to work with a Storage Place Parameter Chaser in MADRIX 5.