|
This tutorial shows you how you can control a second monitor or projector in full screen mode with MADRIX.
Date: 09/2014
MADRIX Version: 3.3 (Created with)
Note: For this tutorial it is necessary to have a graphics card with a minimum of two outputs. Please connect two output devices to your PC (such as one monitor and one projector).
1.
|
We want to create a new DVI Patch with 200 pixels horizontally and 150 pixels vertically.
Start MADRIX and go to Preferences > Matrix Generator or press the F2 key. The Matrix Generator window will be opened. Now change the settings to:
| ▪ | Fixture: !generic DVI 1x1 RGB |
| ▪ | Count: Set X to 200, Y to 150, and Z to 1 |
| ▪ | Merge Fixtures: Enable this option. |

Click OK
|
2.
|
Now, go to Previews > External Preview 1 > Full Screen and click it.
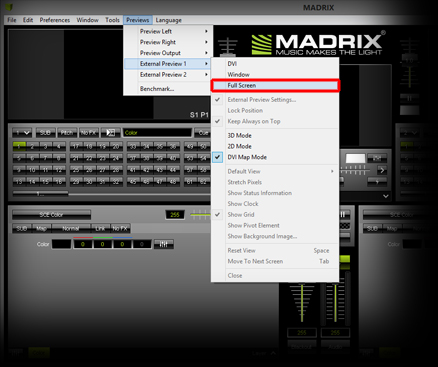
The DVI Preview Window will be opened in Full Screen Mode.
|
3.
|
It is possible that the full screen window overlies the MADRIX user interface. Press the Tab (Tabulator) key on your keyboard and the full screen window will switch to the second output device.
|
4.
|
Go again to Previews > External Preview 1. Now you can change several options.
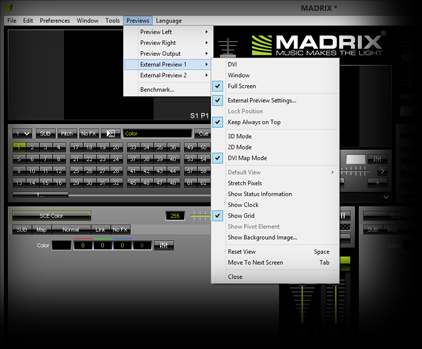
| ▪ | External Preview Settings...: If you click on it, the External Preview Settings window will be opened. In most cases, you do not need to change any value. For more information, see this tutorial »MADRIX DVI Output For Screen-Capture Software |
| ▪ | Keep Always On Top: Enable this option and no other windows will be able to overlay this window even if you change to another program. |
| ▪ | 3D Mode: You can change the view to a 3D view, but for video projectors you should use a 2D view. |
| ▪ | 2D Mode: If 3D Mode is enabled, you can change it the 2D view. |
| ▪ | DVI Map Mode: In Full Screen mode you usually do not need to activate this option. More information is provided in another tutorial »How To Use DVI Map Mode |
| ▪ | Stretch Pixels: If this option is enabled, the pixels will be stretched to full screen (in this example there are 200x150 pixels). Please note there will not be added any new pixels. The pixels will only be taller. The following images show the result |
|
Stretch Pixels disabled
|
|
Stretch Pixels enabled
|
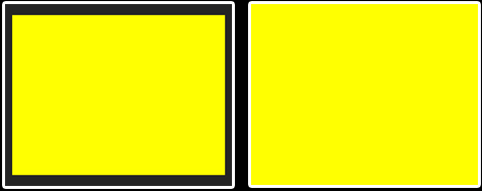
The white borders in the picture represent the size of the display.
|
| ▪ | Show Status Information: If you enable this option, you should see some information at the top of the window, like the pixel resolution. |
| ▪ | Show Clock: If you activate this option, the current time will be displayed on top of the full screen window. |
| ▪ | Show Grid: If you enable this option, you can see a thin frame for each pixel. |
|
Grid disabled
|
|
Grid enabled
|

|
| ▪ | Show Background Image...: There is the possibility to load a background image into the output window. You can see the loaded image if the Stretch Pixels option is disabled. |
| ▪ | Reset View: If you zoomed in and changed the position of the matrix in the preview, you can reset the preview to default with this option. |
| ▪ | Move To Next Screen: You can send the preview to the next screen, such as the second graphic card output. |
|
Congratulations! You have arranged a second output window in Full Screen Mode.
|