Overview
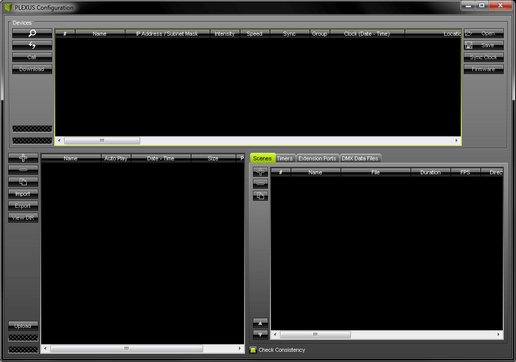
Certain settings of your device can be managed using the PLEXUS Configuration window.
To call up the PLEXUS Configuration window, please go to the menu 'Tools' > 'PLEXUS Configuration ' (or 'Ctrl+Alt+P').
It is highly recommended to maximize the size of the PLEXUS Configuration window.

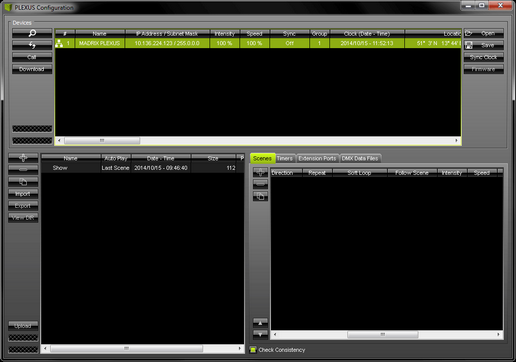
The lower section of the PLEXUS Configuration window consists of two parts for the Stand-Alone Mode. However, the upper section of the PLEXUS Configuration window is labeled 'Devices'. This upper section can be used to manage your PLEXUS devices.
Further Settings To Manage
Buttons
![]() Scans the USB ports of your computer and the network (Ethernet) for connected PLEXUS devices. If devices are found, they will be shown in the list.
Scans the USB ports of your computer and the network (Ethernet) for connected PLEXUS devices. If devices are found, they will be shown in the list.
![]() This symbol shows that the device is connected via USB.
This symbol shows that the device is connected via USB.
![]() This symbol shows that the device is connected via network (Ethernet).
This symbol shows that the device is connected via network (Ethernet).
![]() Re-scans already connected devices and brings the information in the list up to date.
Re-scans already connected devices and brings the information in the list up to date.
![]() Launches remote access to your device (network connection required). For more information, see Remote Control.
Launches remote access to your device (network connection required). For more information, see Remote Control.
![]() Downloads a saved PLEXUS Configuration directly from a connected PLEXUS to your harddisk. You can use this feature to create backups, for example.
Downloads a saved PLEXUS Configuration directly from a connected PLEXUS to your harddisk. You can use this feature to create backups, for example.
![]() Imports the MADRIX PLEXUS Device Settings from an external file (*.mpds). Use this option to easily restore all device settings (as described in the table below).
Imports the MADRIX PLEXUS Device Settings from an external file (*.mpds). Use this option to easily restore all device settings (as described in the table below).
![]() Exports the MADRIX PLEXUS Device Settings to an external file (*.mpds). Use this option to easily store all device settings (as described in the table below).
Exports the MADRIX PLEXUS Device Settings to an external file (*.mpds). Use this option to easily store all device settings (as described in the table below).
![]() Synchronizes the internal clock of the PLEXUS with the clock of your computer. The computer clock will define the time and date that is used. First, select your PLEXUS devices in the list. Then, click 'Sync Clock.
Synchronizes the internal clock of the PLEXUS with the clock of your computer. The computer clock will define the time and date that is used. First, select your PLEXUS devices in the list. Then, click 'Sync Clock.
![]() Upgrades the firmware of your MADRIX PLEXUS (USB connection required). For further instructions, see MADRIX PLEXUS (Firmware).
Upgrades the firmware of your MADRIX PLEXUS (USB connection required). For further instructions, see MADRIX PLEXUS (Firmware).
In addition, please edit the following columns according to your requirements.
Each column represents a certain setting of the device, which can often be adjusted in the various menus on the device itself.
For more information about each PLEXUS menu, please see chapter LCD Graphics Display (PLEXUS Menus).
(Perform a double-click to change their values. Use Enter to apply your changes. Use Escape to cancel.)
'Name' |
defines the name (label) of the device. |
'IP Address / Subnet Mask' |
defines the network settings regarding IP address, Subnet mask, and standard gateway for the device. |
'Intensity' |
defines the main brightness of the output your device in percent. Applicable values are: 0 - 100%. The default value is 100%. |
'Speed' |
defines the tempo of the output in percent. Applicable values are: 1 - 1000%. The default value is 100%. |
'Sync' |
defines if your interfaces, who are in the same Group, use the implemented Master-Slave Synchronization. |
'Group' |
assigns your device to a certain group. In this way you may set up several different Master-Slave clusters (in the same network). Make sure that Master or Slave devices that should communicate with each other are assigned to the same group! |
'Clock |
defines the time and date of the device. |
'Location' |
defines the geographical location of the device, incl. the time zone. This information is required to calculate the corresponding sunrise and sunset times. |
'SD Card' |
cannot be edited. The 'used space'/'total available space' of your SD card is shown. The values are displayed in GB. |
'Remote Control' |
defines the source for remote control. You can choose to receive remote commands via USB, via Art-Net, or to turn remote control off (Disabled). |
'Remote Universe / Port' |
defines for Art-Net which universe or for DMX which XLR port is used to receive the remote commands. |
'Remote Start Channel' |
defines a DMX start channel, which specifies the range of DMX channels used for the set of remote functions. 20 DMX channels are used by the remote functions. The default value is 1. |
'Remote Thru' |
defines if DMX-Thru is enabled (DMX -> Art-Net), when Remote Control is activated over DMX. Incoming DMX data would then additionally be sent through to Art-Net. |
'Timers' |
defines if Timers are activated or deactivated for the device. |
'Extension Ports' |
defines if the Extension Port and its Ports are activated or deactivated for the device. |
'Art-Net -> DMX 1' |
defines which Art-Net universe is assigned to the first XLR port for output (DMX 1). |
'Art-Net -> DMX 2' |
defines which Art-Net universe is assigned to the second XLR port for output (DMX 2). |
'DMX 1 -> |
is used for Art-Net output from stand-alone playback. It defines on which Art-Net universe the SD card data for port DMX 1 is sent. In this way, it routes the data from DMX 1 to the specified Art-Net universe. |
'DMX 2 -> |
is used for Art-Net output from stand-alone playback. It defines on which Art-Net universe the SD card data for port DMX 2 is sent. In this way, it routes the data from DMX 2 to the specified Art-Net universe. |
'Serial Number' |
cannot be edited. It shows the serial number of the device. |
'Firmware' |
cannot be edited. It shows the current firmware version of the device. |
'Brightness' |
defines how bright the display is, when it is used. Applicable values are: 10 - 100%. The default value is 100%. |
'Brightness Dimmed' |
defines how bright the display is, when it gets dimmed. Applicable values are: 0 - 100%. The default value is 10%. |
'Dim After' |
defines after how much time the display will be dimmed. The default value is 30s. |
'Contrast' |
defines the contrast of the display and how well it can be read. Applicable values are: 0 - 100%. The default value is 50%. |
'Invert' |
defines if the colors of the display are inverted from white text and black background ('No') to black text and white background ('Yes'). |
'Rotation' |
defines if the display of the device is rotated or not. Choose between '0°' (no rotation) and '180°' (rotated display). |
'Language' |
defines the language of the PLEXUS menus. Choose from 'English', 'Deutsch' (German), or Español (Spanish). |
'Intensity Group 1 - 8' |
defines the brightness for each Intensity Group. Applicable values are: 0 - 100%. The default value is 100%. |
'Full Frames DMX 1' |
defines if the device should always send full frames for the first XLR output. |
'Full Frames DMX 2' |
defines if the device should always send full frames for the second XLR output. |
'Full Frames Art-Net 1' |
defines if the device should always send full frames for Art-Net and the first Art-Net universe. |
'Full Frames Art-Net 2' |
defines if the device should always send full frames for Art-Net and the second Art-Net universe. |
'MAC Address' |
cannot be edited. It shows the MAC address of the device. |
Introduction
You may simply connect multiple devices at the same time to control larger LED installations using multiple DMX universes.
In addition, a Master interface can be set up to synchronize the setup across all DMX universes. This feature is called Master-Slave Synchronization. So-called Slave interfaces will receive the commands from the Master interface.
Usage
First, Master-Slave-Synchronization allows Scenes to be triggered simultaneously (at the same time) on several, different devices.
In this way, your LED installation will show the same effects (or one overlapping effect), although it is controlled by 2 or more interfaces!
Second, time stamps will be sent between interfaces to ensure time synchronicity.
Configuration
Please note that the synchronization works only when all corresponding devices are connected and set up in one and the same network (Ethernet). This includes physical connection (cabling) as well as settings in MADRIX, the PLEXUS devices, and network settings of the operating system.
Please make sure that all synchronized PLEXUS devices use the same firmware version!
Master-Slave Synchronization can be configured on the device, but mainly in the PLEXUS Configuration window, as described next.
PLEXUS Configuration Window
Sync
To call up the PLEXUS Configuration window, please go to the menu 'Tools' > 'PLEXUS Configuration ' (or 'Ctrl+Alt+P').
Select your device in the list. Change the settings for every required device, one at a time.

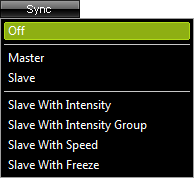
Now perform a double-click on the column 'Sync' to change the settings.
(Use a left mouse click to apply your changes. Use Escape to cancel.)
Choose your settings according to the following table:

'Off' |
will deactivate any synchronization for the device. |
'Master' |
will set the interface to work as central clock and the main interface in the group (Master interface). |
'Slave' |
will set the interface as Slave interface to synchronize with the 'Master'. |
'Slave With Intensity' |
will become available when Slave is selected above. Activate/check this entry and the interface will synchronize with the 'Master' and also accept any Intensity changes from the Master. If the function is disabled/unchecked, the device can function with its own Intensity settings. |
'Slave With Intensity Group' |
will become available when Slave is selected above. Activate/check this entry and the interface will synchronize with the 'Master' and also accept any Intensity Group options from the Master. If the function is disabled/unchecked, the device can function with its own Intensity Group settings. |
'Slave With Speed' |
will become available when Slave is selected above. Activate/check this entry and the interface will synchronize with the 'Master' and also accept any Speed changes from the Master. If the function is disabled/unchecked, the device can function with its own Speed settings. |
'Slave With Freeze' |
will become available when Slave is selected above. Activate/check this entry and the interface will synchronize with the 'Master' and also accept any Freeze options from the Master. If the function is disabled/unchecked, the device can function with its own Freeze settings. |
More Information
| • | You don't need to configure Timers for your Slave devices, when the Master-/Slave-Synchronization should be used. Only the Master interface needs to have Timers configured (if you wish to use Timers). The Master will automatically communicate the Timer(s) to the Slave device(s). You can configure Timers in the PLEXUS Configuration window. |
| • | When using Master-/Slave-Synchronization that means you are going to use more than 1 PLEXUS interface. Please make sure to record (Step 4) Recording) and convert effects (Step 5) Converting Files) that are set up correctly for all of your devices (regarding size of your Patch/virtual LED matrix and DMX Universe output, for example). |
| • | Intensity Group is a feature that can be used in combination with Remote Control. |
When setting up the Sync mode, it is important to pay attention to the Group settings as well. Please continue with the next chapter Group.
Group
Call up the PLEXUS Configuration window again. Go to the menu 'Tools' > 'PLEXUS Configuration ' (or 'Ctrl+Alt+P').
Select your device in the list. Change the settings for every required device, each at a time.
Please configure the column 'Group'!
The setting assigns your device to a certain group. In this way, you may set up several different Master-Slave clusters (in the same network). It allows you to create several, independent groups.
Make sure that Master or Slave devices which should communicate with each other are assigned to the same group!
PLEXUS Device Settings
Sync
Instead of using the PLEXUS Configuartion window, you may check the settings on the device itself.
Navigate to the PLEXUS menu 'Network' > 'Sync'.

This menu shows the current settings regarding Master-Slave Synchronization of your current PLEXUS Configuration.
You can check the Sync Type (Master, Slave, Off) and Sync Group (1 -256).
Also, check if Intensity (Enabled, Disabled), Intensity Group (Enabled, Disabled), Speed (Enabled, Disabled) and Freeze (Enabled, Disabled) should be synchronized for Slave devices.