This topic includes:
MADRIX 5 uses so-called Storage Places [storage bins] to store and organize your lighting visuals.
▪Storage Places are part of a Storage.
[Because of this, a Storage offers options that affect a single Storage Place or all of its included Storage Places.]
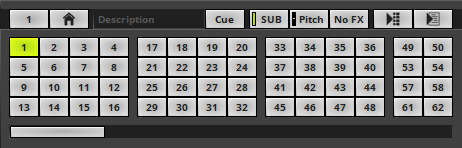
▪The screenshot below shows the complete Storage Deck A including the numbered Storage Places [Storage Place 1 to 62 can be seen by default]. Learn more »Storages
▪A single Storage contains 256 Storage Places. And MADRIX 5 offers up to 256 Storages.
▪In total, you have therefore access to 256 x 256 Storage Places.
▪Storage Places allow you to access, manage, and organize your different lighting visuals.
▪In order to use MADRIX Effects and light effects, you need to set them up first.
Learn more »Effect Areas [Deck A / Deck B]
|
▪Shows an empty Storage Place with its default configuration. |
|
▪Shows a preselected Storage Place, which is not active yet. |
|
▪Shows the currently selected Storage Place. This Storage Place is active on the selected Storage. |
|
▪Shows that this Storage Place contains visuals configured by you. The Storage Place is occupied and not empty. |
|
▪Shows a Storage Place that is currently selected on the other side. You can only select a Storage Place once on either side. This Storage Place is shown already on the left or the right side and cannot be accessed. |
|
▪You can increase the size of a Storage Place as shown on the user interface [Learn more »Storages]. When the size is large enough, MADRIX 5 will include a small Thumbnail preview of the MADRIX Effect that is stored in the Storage Place. Learn more below. |
|
▪You can decrease the size of a Storage Place as shown on the user interface [Learn more »Storages]. When the size is too small, MADRIX 5 will only show small icons. |
|
▪Shows a Thumbnail. Hover with your mouse over a single Storage Place in order to see a small preview of the MADRIX Effect that is stored in the Storage Place. The Thumbnail can be generated automatically or manually. Learn more below |
|
▪The scroll bar at the bottom is used for scrolling through the panel. |
|
▪Is part of the scroll bar and shows the location of occupied Storage Places. |
|
▪Is part of the scroll bar and shows the location of the currently selected Storage Place. |


Using The Mouse
▪Left Mouse Click - Click with your left mouse button directly on a single Storage Place to select and activate it. MADRIX 5 will automatically fade to the new Storage Place according to the Fade Time and Fade Type of the crossfader.
▪Left Mouse Double-Click - Perform a double-click with your left mouse button directly on a single Storage Place to select and activate it immediately without using the Fade Time and Fade Type of the crossfader.
▪Right Mouse Click - Calls up the context menu as explained below.
▪Left Mouse Click And Hold And Swipe/Drag - Click with your left mouse button in the general direction of the Storage Place panel, continue to hold, and move your mouse in order to swipe and drag the entire panel. This allows you to navigate through the Storage Place panel. [You can also use the scroll bar at the bottom.]
▪Scroll Wheel - Click in the the general direction of the Storage Place panel to focus it. Then, use the scroll wheel of your mouse to scroll through the panel.
▪ Click with your left mouse on this scroll bar to scroll through the Storage Place panel.
Automatic Fade
▪MADRIX 5 automatically applies an automatic fade according to the Fade Time and Fade Type of the Crossfader when you are switching from one Storage Place to another Storage Place within one, single Storage.
▪Example: S1 P34 is currently selected. Now, select S1 P22 and MADRIX 5 will automatically do a crossfade for you [incl. Fade Time and Fade Type].
▪[Perform a Left Mouse Double-Click to not use the automatic fade. This will activate the next Storage Place without a crossfade.]
Drag And Drop [Copy/Cut/Paste]
Copy And Paste
▪Left Mouse Click And 2 Sec. Hold - You can perform a Copy and Paste with the mouse.
Use a left mouse click on a Storage Place and continue to hold for 2 seconds. A small + appears. Continue to hold and move your mouse to another Storage Place. Release the mouse button to paste a copy onto the new Storage Place.
Use the keyboard button Ctrl in addition to remove the wait time to immediately perform the drag and drop.
Cut And Paste
▪Left Mouse Click And 2 Sec. Hold + Shift - You can perform a Cut and Paste with the mouse.
Use a left mouse click on a Storage Place and continue to hold for 2 seconds. Press Shift in addition. A small rectangle appears. Continue to hold the buttons and keys and move your mouse to another Storage Place. Release the mouse button to move the previously selected Storage Place to the new position.
Use the keyboard button Shift in addition to remove the wait time to immediately perform the drag and drop.
Drag And Drop
▪File Drag And Drop - You can select a MADRIX 5 Storage Place file [of the file type *.mspz or *.mspx] in Windows and drag it to a Storage Place of your choice in MADRIX 5 in order to load it in MADRIX 5.
Keyboard Shortcuts
▪Arrow Keys - Use the 4 arrow keys on your computer keyboard to navigate and in order to preselect a specific Storage Place.
▪Spacebar/Enter - Press the Spacebar or Enter key on your keyboard to actively select a preselected Storage Place.
▪Page Up/Page Down - Press the Page Up and Page Down keys to scroll through the Storage Place panel back and forth.
▪Home/End - Press the Home key to instantly display the first Storage Place [P1]. Press the End key to instantly display the last Storage Place [P256].
▪Ctrl+F - Press F to instantly jump back to your currently selected Storage Place and to bring it into focus.
There are several options available for each Storage Place via a context menu.
▪Right Mouse Click on a Storage Place to call up the context menu.
▪A small window will be shown.

You can use the following options:
▪Cue - Adds the currently selected Storage Place to the current Cue List.
▪Open... - Loads a previously saved MADRIX 5 Storage Place file [of the file type *.mspz or *.mspx]. A new window opens for you to select the file on your harddisk.
▪Save... - Saves the current Storage Place configuration to an external file [of the file type *.mspz or *.mspx]. A new window opens for you to select a location on your harddisk. Simply enter a name and click Save
- The default MADRIX Effect, SCE Color with the color Black, cannot be saved unless you change the the Storage Place Description. Learn more »Storages
▪Copy - Copies the current Storage Place configuration into the clipboard as a duplicate.
▪Cut - Copies the current Storage Place configuration into the clipboard and applies a Clear
▪Paste - Inserts a copy of a Storage Place from the clipboard into the currently focused Storage Place.
▪Thumbnail - Defines how MADRIX 5 manages the Thumbnail of the currently selected Storage Place. Learn more below
▪Clear - Removes the current Storage Place configuration and restores the default, blank Storage Place.
Hover with your mouse over a single Storage Place in order to see a small preview of the MADRIX Effect that is stored in the Storage Place.
Thumbnails are shown in 256 x 256 pixel resolution.

When using the context menu of a Storage Place, you can set up how MADRIX 5 manages the Thumbnail of each individual Storage Place. First, make sure that the currently selected Storage Place is also the active Storage Place of this Storage.
▪Right Mouse Click on a Storage Place to call up the context menu.
▪A small window will be shown.
▪Navigate to Thumbnail
▪Automatic - Is activated by default. MADRIX 5 will automatically generate a new Thumbnail each time you leave this Storage Place and switch to another Storage Place. That means the Thumbnail preview will always be up to date and show the last visual status.
▪Generate - Allows you to manually generate a new Thumbnail at this moment. Automatic will then be deactivated as a result.
Once a manual Thumbnail has been generated, MADRIX 5 will use this Thumbnail until you manually generate a new Thumbnail or activate Automatic again.
▪Open... - Allows you to load a custom image and have it shown as Thumbnail for this Storage Place.
The original aspect ratio of an image will be kept, but the longer edge will be limited to 256 pixels.
Supported image formats include
- Bitmap [of the file type *.bmp]
- GIF [of the file type *.gif]
- JPG [of the file types *.jpg, *.jpeg, *.jpe, *.jfif]
- PNG [of the file type *.png]
- TIFF [of the file types *.tif, *.tiff]
Once an image has been loaded, MADRIX 5 will use it as the Thumbnail until you load a new image or activate Automatic again.
You can also define how thumbnails look. Learn more »User Interface
Import
Learn more »File Types
File Menu
▪Go to the menu File > Import > Storage Place > Storage Place Deck A / Deck B...
▪You can import previously saved MADRIX 5 Storage Place file [of the file type *.mspz or *.mspx] onto the currently selected Storage Place on the left or on the right side. A new window opens for you to select the file on your harddisk. [This is the same functionality as Open... from the context menu.]
Drag And Drop
▪File Drag And Drop - You can select a MADRIX 5 Storage Place file [of the file type *.mspz or *.mspx] in Windows and drag it to a Storage Place of your choice in MADRIX 5 in order to load it in MADRIX 5.
Export
File Menu
▪Go to the menu File > Export > Storage Place > Storage Place Deck A / Deck B...
You can export the currently selected Storage Place to an external file [of the file type *.mspz or *.mspx]. A new window opens for you to select a location on your harddisk. Simply enter a name. [This is the same functionality as Save... from the context menu.]
▪Go to the menu File > Export > Storage Place > All...
You can export all currently occupied Storage Place to individual, external files [of the file type *.mspz or *.mspx]. A new window opens for you to select a location on your harddisk. Simply enter one name and MADRIX 5 will automatically add the Storage Place number to the file as well.
▪Make sure to save your MADRIX 5 Setup file after configuring your MADRIX Effects [and working with Storage Places].
▪When switching to a different Storage, MADRIX 5 will not automatically select a new Storage Place for you. When switching to another Storage, you need to actively select a different Storage Place if that is what you want.
| MADRIX 5.7. |
| [Ctrl & +/-] = Zoom In/Out | [Ctrl & 0] = 100% |
|
Previous Next
|
|
Enable Automatic Translation | Activer La Traduction Automatique | 启用自动翻译 |