This topic includes:
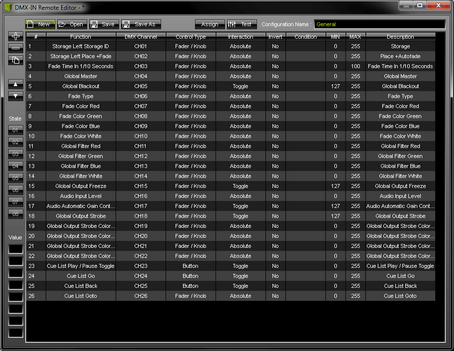
Any DMX input signal can be used to control MADRIX remotely. While you can use preconfigured DMX protocols, you can also set up such a configuration according to your needs with the help of the DMX-IN Remote Editor. This topic describes how to use the DMX-IN Remote Editor.
| ▪ | Make sure to configure your DMX device first. [For example, DMX devices can be consoles, DMX desks, fader boards, other DMX interfaces, etc.] |
| ▪ | Set up DMX Input. |
| ▪ | Learn more »DMX-IN / Art-Net Remote / sACN Input |
| ▪ | Go to Preferences > Device Manager... > DMX Input |
| ▪ |
| ▪ | A new window will open. |
| ▪ | If you are creating a new DMX protocol, the list will be empty. |
| ▪ | If you are modifying an existing DMX protocol map, the list will already contain all preconfigured settings. |

|
Add - Adds a new item to the list. |
|
Duplicate/Copy - Copies and duplicates the currently selected list item. The new item will be added to the list right after the selected item. You can change its settings afterwards. |
|
Navigation - Allows you to select the next or previous list item. |
|
New - Creates a new configuration while deleting all previous list items with your permission. |
|
Open - Loads a previously saved DMX Remote Configuration file into the DMX-In Remote Editor from an external file [of the file type *.mdrx]. |
|
Save - Saves the current DMX Remote Configuration to an external file [of the file type *.mdrx]. |
|
Assign - Allows you to assign a control of your DMX controller to a function in MADRIX. |
|
Test - Allows you to test single list items and their functionality on the MADRIX user interface, while having the DMX-IN Remote Editor still opened. - Test is also useful for testing modifiers. Learn more Modifiers |
|
Configuration Name - Allows you to type in an individual description for your DMX Remote Configuration. |
Ctrl + A |
Selects all items in the list. |
Ctrl + E [hold] |
Activates Assign, while holding this shortcut. |
Ctrl + N |
Creates a new configuration. |
Ctrl + O |
Opens a configuration. |
Ctrl + S |
Saves a configuration. |
Ctrl + T [hold] |
Activates Test, while holding this shortcut. |
Del |
Removes selected items from the list. |
Arrow Up |
Navigates upwards in the list. |
Arrow Down |
Navigates downwards in the list. |
Double-click on an item |
Calls up the context menu for the column. |
Double-click on a head row of the list |
Sorts the list alphabetically according to the column [ascending or descending]. |
Overview
| ▪ | Each list item represents 1 DMX remote functionality using 1 DMX control [i.e., button, fader, etc.]. |
| ▪ | Configure each list item as required. |
| ▪ | Configure each column of an list item. |
| ▪ | Add or remove list items to add or remove the functionality you require. |
Function |
|
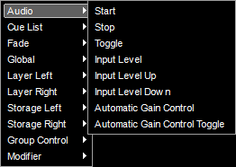
1] Create a new item with + 2] Select the general topic [e.g., Audio] 3] Select the exact function you wish to configure [e.g., Volume] |
||||||
DMX Channel |
|
A] Click Assign, select a list item and use a control on your DMX controller. In most cases, MADRIX will automatically recognize the DMX Channel, Control Type, and Interaction. B] Or first select a list item and perform a double-click with your mouse on the column DMX Channel. Second, enter the correct DMX channel [e.g., CH01 for channel 01]. |
||||||
Control Type |
|
A] Click Assign, select a list item and use a control on your DMX controller. In most cases, MADRIX will automatically recognize the DMX Channel, Control Type, and Interaction. B] Or first select a list item and perform a double-click with your mouse on the column Control Type. Second, select the type of the control of your DMX controller [e.g., Button].
|
||||||
Interaction |
|
A] Click Assign, select a list item and use a control on your DMX controller. In most cases, MADRIX will automatically recognize the DMX Channel, Control Type, and Interaction. B] Or first select a list item and perform a double-click with your mouse on the column Interaction. Second, select the mode [e.g., Toggle]. Toggle - Defines that the Control Type only has two states [On or Off]. Is usually used for Button. Absolute - Defines that the Control Type uses all available values [e.g., 0 to 255]. Is usually used for Fader / Knob. |
||||||
Invert |
|
1] Select a list item and perform a double-click with your mouse on the column Invert. 2] The item will change between No and Yes |
||||||
|
1] Select a list item and perform a double-click with your mouse on the column Cond. 2] Select the condition [e.g., None]. Learn more Modifiers |
|||||||
MIN, MAX, |
|
|
Overview
The DMX-IN Remote Editor allows you to create advanced DMX configurations.
| ▪ | Modifiers allow you to set certain conditions. |
| ▪ | In general, these are the steps to follow: 1] Create a new item with + or select a list item and perform a double-click with your mouse on the column Function 2] Select Modifier 3] Select a State or Value 4] Create a new list item and configure its Function or use an existing list item 5] Assign the condition to this function. Learn more Condition |
State
| ▪ | State - Creates a requirement/condition that is required before the function will work. |
| ▪ | You can define up to 8 States. |
| ▪ | Valid values are Yes [Value = 1] or No [Value = 0]. |
| ▪ | Example: - List item 1 defines a button as a Modifier, State 1 to be toggled. When pressed, State 1 is active [On, Yes]. When not pressed, State 1 is not active [Off, No] . - List item 2 is a function to control the Master [Global Master]. A Condition was set up for this functionality. If MADRIX receives value 1 [Yes] from State 1, the function can be used. - Because of the Condition, the Master Fader can only be used when the button is pressed at the same time: |
![]()
- If no condition is assigned, the fader can be moved and the Master Fader of MADRIX will always respond accordingly:
![]()
- When Test is activated, MADRIX shows the status of a State in the MIDI Remote Editor. A green button indicates status Yes, a gray button indicates status No.
![]()
Value
| ▪ | Value - Allows to add several functions to one or more controls of the MIDI controller by combining it with other available controls. |
| ▪ | You can define up to 8 Values. |
| ▪ | Valid values range from 0 to 255. |
| ▪ | Example: - Your DMX controller may only have 2 faders. - But you would want to control the Master, the Speed Master Left, and the Speed Master Right with these two faders. - In this example, we have configured the first fader to activate three different configurations for the second fader. - If fader 1 is set to 0, the second fader will act as the Master. - If fader 1 is set to 127, the second fader will act as Speed Master Left. - If fader 1 is set to 255, the second fader will act as Speed Master Right. - Depending on how the first fader is set up, the modifier value changes from 0 to 255. MADRIX checks this value and allows the fader to control the corresponding function on the MADRIX user interface. |
| ▪ | Note: Always assign the correct values to modifier and function. |

| ▪ | When Test is activated, MADRIX shows the status of a Value in the DMX-IN Remote Editor. |
![]()
Example 1
| ▪ | You wish to use single buttons of your DMX controller for each Storage Place. |
| ▪ | Use + to create a new function. |
| ▪ | Select Storage Left > Place +Fade |
| ▪ | Use Assign to match your button to this function. Disable Assign again when done. |
| ▪ | Set MAX to 0 in order to trigger Storage Left S1 P1 [Storage 1 Place 1]. |
| ▪ | Repeat the steps and set up MAX for each Storage Place you wish to control. - MAX will always have a value that is -1 compared to the actual Storage Place index number [e.g., set MAX to 6 in order to control S1 P7] |
| ▪ | Use Storage Right > Place +Fade and repeat the steps accordingly to control the Storage Places on the right side. |


