This topic includes:
▪DMX-OUT Via Ethernet Network [Art-Net]
▪3] Fixture Patching In MADRIX 5
▪5] Adding Devices Automatically
▪7] Configuration Of DMX Output
▪9] Optimized Frames Or Full Frames
▪Additional Art-Net Device Settings
DMX-OUT Via Ethernet Network [Art-Net]
You can connect the LUNA via Ethernet network to the network card of your computer that runs the MADRIX 5 Software. Data is sent to the LUNA via network [Ethernet] and distributed to the XLR output ports [DMX 1 - 4/8/16].
▪Connect your LED controllers or fixtures to the XLR ports of MADRIX LUNA [DMX 1 - 4/8/16].
▪Connect MADRIX LUNA to power.
[Please see safety instructions in the MADRIX LUNA Technical Manual & Quick Start Guide!]
▪Connect MADRIX LUNA to your computer using network cabling.
▪It is highly recommended to only use Gigabit Ethernet network components [network card, switches, etc.].
▪Set up the corresponding settings in the »Configuration Using A Web Browser
Art-Net is a network-based protocol. MADRIX 5 will use the network card of your computer to send data.
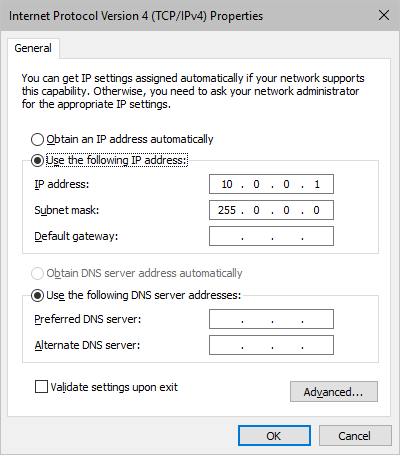
▪It is required to set up the correct network settings in Windows, first.
▪You must use these IP address and Subnet mask settings. Otherwise, Art-Net might not work!
▪The IP addresses of your computer and your MADRIX LUNA devices need to be different.
▪Set up an individual IP address in the following IP address range:
- 2.0.0.1 ... 2.255.255.254 or
- 10.0.0.1 ... 10.255.255.254
▪Set up the corresponding Subnet mask
- 255.0.0.0
[Via factory default settings, MADRIX LUNA devices will have an IP address in the 10.x.x.x network range, such as 10.206.224.100, for example].
[Please note: Your devices and the sender, such as the PC that runs MADRIX 5, need to have the same subnet mask!]
▪Restart MADRIX 5, if you have changed the network settings in Windows while MADRIX 5 was running.
▪Example for PCs that are running MADRIX 5:
3] Fixture Patching In MADRIX 5
▪Start MADRIX 5.
▪Configure the virtual LED matrix using the Matrix Generator or Patch Editor.
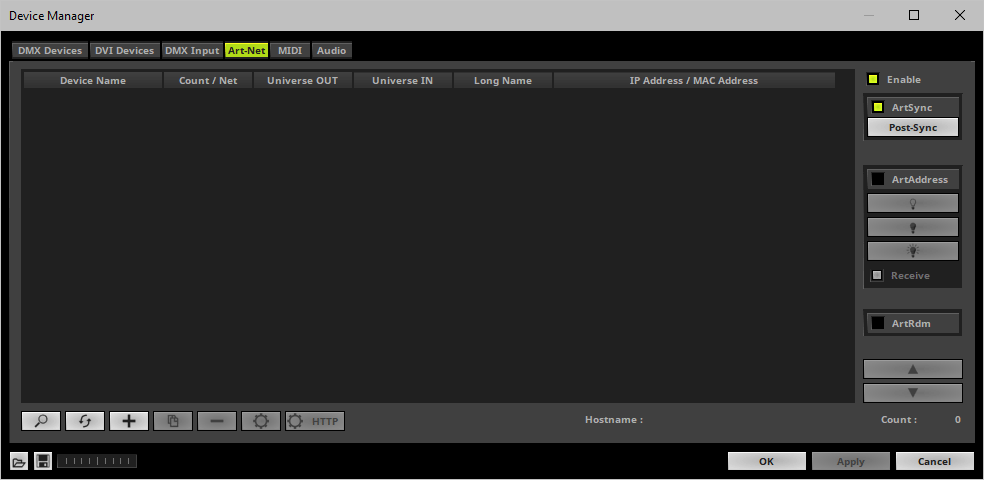
▪Go to the menu Preferences > Device Manager... > Art-Net
[Keyboard shortcut: F4 > Art-Net]
▪Activate the checkbox Enable [in the upper, right corner].
5] Adding Devices Automatically
MADRIX 5 can automatically add your MADRIX LUNA devices.
▪Click 
[MADRIX 5 will automatically search the network for connected MADRIX LUNA devices. Devices that are found will appear in the list. A number of entries will be created in the list for each LUNA device.]
[The Art-Net standards only supports a maximum of 4 output ports per device. Since LUNA 8 features 8 output ports plus 1 input port, 3 list items are created in MADRIX 5, for example. Two entries will be shown for LUNA 4. Five entries will be shown for LUNA 16.]
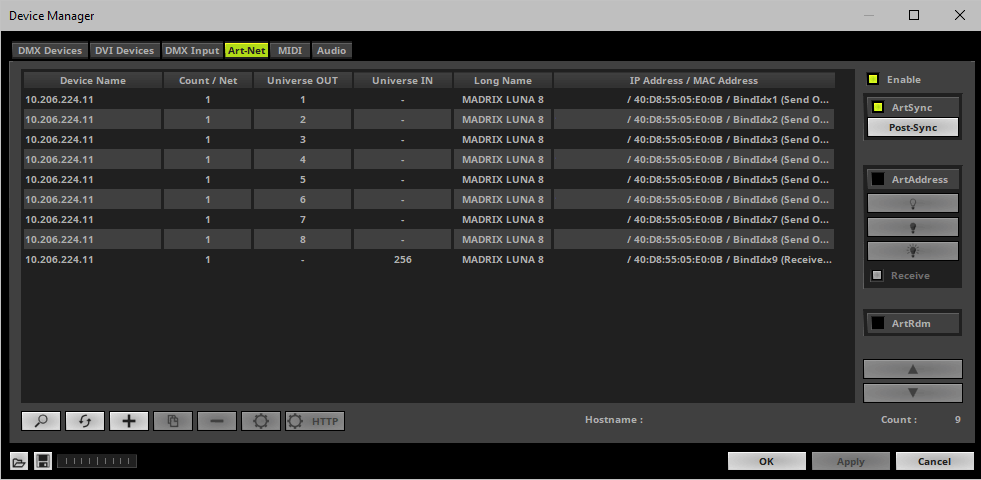
Each of your MADRIX LUNA devices and its ports need to be activated. By default, they are still deactivated. 4 ports will be shown for LUNA 4 [plus an additional IN port], 8 ports will be shown for LUNA 8 [plus an additional IN port], and 16 ports will be shown for LUNA 16 [plus an additional IN port].
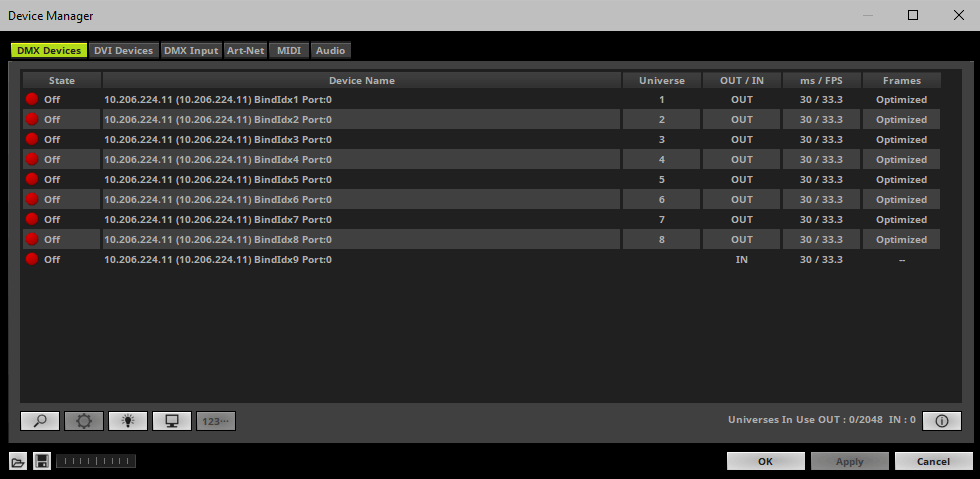
▪Go to the menu Preferences > Device Manager... > DMX Devices
[Keyboard shortcut: F4]
▪Select your devices and their ports in the list.
▪Right Mouse Click on the column State to set from Off to On [indicated by green light].
▪OUT and IN are set by default for the corresponding ports and universes.
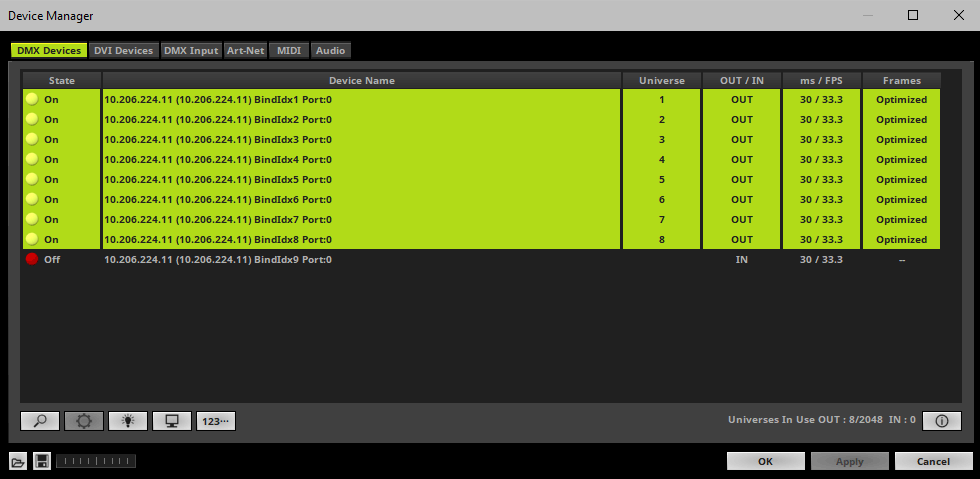
▪[In the screenshot above, one LUNA 8 is connected. If more devices are connected, please use the different IP addresses of different devices and device details [i] to identify them in the Device Manager.]
7] Configuration Of DMX Output
▪Make sure that your devices are still selected under Preferences > Device Manager... > DMX Devices
▪When using your device as an output device, set up Universe
- Right Mouse Click or Left Mouse Double-Click on the column Universe and enter the required number.
▪This setting assigns a specific DMX universe [of the Patch] to the device or the port of the device.
▪Make sure to assign the correct universe according to your requirements.
Learn more »Glossary
▪By default, DMX universe 1 - 4/8/16 are assigned to the ports DMX 1 - 4/8/16 when using one MADRIX LUNA:
LUNA Output Port |
Name under Device Manager... > DMX Devices |
DMX 1 |
BindIdx1 Port:0 |
DMX 2 |
BindIdx1 Port:1 |
DMX 3 |
BindIdx1 Port:2 |
DMX 4 |
BindIdx1 Port:3 |
DMX 5 |
BindIdx2 Port:0 |
DMX 6 |
BindIdx2 Port:1 |
DMX 7 |
BindIdx2 Port:2 |
DMX 8 |
BindIdx2 Port:3 |
DMX 9 |
BindIdx3 Port:0 |
DMX 10 |
BindIdx3 Port:1 |
DMX 11 |
BindIdx3 Port:2 |
DMX 12 |
BindIdx3 Port:3 |
DMX 13 |
BindIdx4 Port:0 |
DMX 14 |
BindIdx4 Port:1 |
DMX 15 |
BindIdx4 Port:2 |
DMX 16 |
BindIdx4 Port:3 |
▪Make sure that your device is still selected under Preferences > Device Manager... > DMX Devices
▪Set up the frame time for your device.
- Right Mouse Click or Left Mouse Double-Click on the column ms / FPS and enter the required number.
- The frame time [in milliseconds; ms] affects the frame rate. The frame rate specifies how fast data is sent to the device or received from it [in Frames Per Second; FPS].
- Increase the frame time in order to decrease the frame rate [e.g., 40 ms = 25 FPS].
- Decrease the frame time in order to increase the frame rate [e.g., 20 ms = 50 FPS].
- The default value is 30 ms / 33.3 FPS.
- The minimum value is 1000 ms / 1 FPS.
- The maximum value is 5 ms / 200 FPS.
Please note: If you want to output high frame rates, make sure to set Main Mixing FPS in the Options to the same value in order to render the same frame rate [It is set to 50 FPS by default. Otherwise, frames will be duplicated].
Please note: If you want to input high frame rates, make sure to set DMX Controller Input FPS in the Options to the same value in order to process the same frame rate [It is set to 50 FPS by default. Otherwise, frames will be duplicated].
- Some LED fixtures might have problems with a low frame time / high frame rate. Then, it is recommended to increase the frame time / decrease the frame rate.
▪[When using Art-Net, the Frame Time [ms] can be individually set for each port. But it cannot be set individually for each port, when Sync Mode is activated. Learn more below.]
9] Optimized Frames Or Full Frames
▪Make sure that your device is still selected under Preferences > Device Manager... > DMX Devices
▪Choose how to send data.
- Right Mouse Click or Left Mouse Double-Click on the column Frames to choose between Optimized and Full
- Per DMX512 standard, MADRIX 5 only sends the number of DMX channels that is configured [optimized frames]. For example, if you are using 312 DMX channels on a DMX universe, only 312 DMX channels will be sent with every single frame on this universe.
- Activate Full Frames if devices should always send full frames on a particular universe, instead of optimized frames. Sending full frames means that always the full 512 DMX channels of a DMX universe will be sent with every frame [even when you are using less than 512 channels on the universe].
- Activating Full Frames is recommended if problems with the data output of your devices occur.
▪In addition, you can activate Full Frames for the device and each MADRIX LUNA output port separately.
MADRIX LUNA can use the special sync mode of Art-Net.
▪Large LED projects require dependable data distribution. The MADRIX 5 Software and LUNA hardware allow you to synchronize data output for all 4/8/16 DMX ports and even across multiple LUNA devices to get an optimal image on the LEDs.
▪When Art-Net sync mode is activated, MADRIX 5 and MADRIX LUNA will automatically handle the synchronization of data.
Art-Net Sync Mode is highly recommended for MADRIX LUNA!
|
ArtSync - Allows you to activate or deactivate the usage of synchronization commands/packages for Art-Net. In addition, you can choose between Post-Sync [default] and Pre-Sync. By default, the sync data is sent after the main DMX/Art-Net data. Pre-Sync would send it before the main DMX/Art-Net data. ▪Before activating sync, make sure that all activated Art-Net devices are available in your network! Else, the frame rate of Art-Net might drop. If you are not sure, do not enable any sync mode. ▪Disable ArtSync if you wish to HTP merge from two sources! ArtSync would then interfere with the merge and create unwanted results. |
Additional Art-Net Device Settings
It is very important to set up the correct settings for your devices!
Broadcast Mode Or Unicast Mode
MADRIX 5 can send Art-Net data in 2 ways to your Art-Net devices:
▪Broadcast Mode - Means that every packet sent from a single transmitter will be received by all recipients in the network. MADRIX 5 will send data to all devices in the network.
- Advantage: The same data [e.g., DMX universe 1 and 2] can be made available for different points of your setup.
- Disadvantage: A potentially huge number of data packages will be sent over the network. This can reduce the overall network performance and cause data issues or instability.
▪Unicast Mode - Means that the specific data will only be sent to the specified recipient.
- Advantage: Data traffic is reduced immensely, which means that a larger number of Art-Net devices can be used in one network. Reduced network traffic increases the performance and stability.
- Disadvantage: The network settings of all devices need to be 100% correct.
Unicast Mode is recommended in general.
▪Go to the menu Preferences > Device Manager... > Art-Net
[Keyboard shortcut: F4 > Art-Net]
▪Select your device in the list.
▪Click 
▪A new window will open.
▪A] Choose Send Unicast Mode to activate Unicast Mode:
- Make sure to enter the correct IP Address of your device that should receive the Art-Net data. When MADRIX LUNA has been automatically found by MADRIX 5, the IP address will be pre-configured for you.
- MADRIX 5 will send the corresponding data only to this device.
▪B] Choose Send Broadcast Mode to activate Broadcast Mode:
- Make sure to select the correct Network card of your computer that should send the Art-Net data. When MADRIX LUNA has been automatically found by MADRIX 5, the correct network will be pre-configured for you.
- MADRIX 5 will send data to the whole Art-Net network.
▪Click Apply
Status Indicators [ArtAddress]

In order to use these features, Enable ArtAddress first.
▪Regarding sending ArtAddress commands to nodes, make sure that your nodes fully support this Art-Net feature.
You will also get notified by a message box. Confirm the message with OK or abort via Cancel.
▪MADRIX LUNA, MADRIX NEBULA, MADRIX PLEXUS, MADRIX STELLA, MADRIX ORION, and MADRIX AURA support ArtAddress.
▪MADRIX 5 itself can receive ArtAddress commands.
|
Mute Status Indicators - Switches off and disables all built-in status indicators of a device over Art-Net [ArtAddress > AcLedMute]. |
|
Operate Status Indicators Normally - Allows the built-in status indicators of a device to operate normally again, after having them switched off [ArtAddress > AcLedNormal]. |
|
Highlight Device - Activates the highlight mode [ArtAddress > AcLedLocate]. Select one or more interfaces and click the button. The corresponding status indicators of the selected interfaces will flash for a better identification or tests. This makes it easier to see them on site/stage. It considerably speeds up the procedure of programming or testing the selected interfaces. |
|
In addition to sending out commands to nodes, MADRIX 5 itself can receive ArtAddress commands. Receive - Activates that MADRIX 5 is able to receive ArtAddress commands. It is enabled by default. ▪AcLedMute and AcLedNormal will disable the identification of MADRIX 5. ▪AcLedLocate will enable the identification of MADRIX 5. You can further customize ArtAddress properties under menu Preferences > Options... > General |


| MADRIX LUNA User Manual 2.05. |
| [Ctrl & +/-] = Zoom In/Out | [Ctrl & 0] = 100% |
|
Previous Next
|
|
Enable Automatic Translation | Activer La Traduction Automatique | 启用自动翻译 |