This topic includes:
▪Importing Several Fixture Lists
Depending on your lighting design, you may wish to control very complex LED layouts. You may also have already created your design in a separate software tool.
The widely used CSV file format can be imported into the Patch Editor of the MADRIX 5 Software. It will quickly generate complex patch layouts based on data of third-party software, such as visualizers, consoles, CAD software, other lighting design tools, or even manually.
CSV is an acronym and stands for comma-separated values. This is a very general file format that makes it easy to record, save, and exchange structured data.
It is widely available in other software tools for data import and export. This also means that data which is not yet available in this format can usually be converted into CSV or can even be created manually/semi-automatically.
The CSV Fixture List Import is a feature that is part of the MADRIX 5 Patch Editor. Learn more »Patch Editor
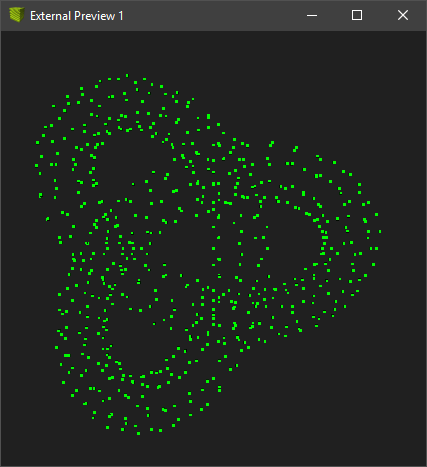
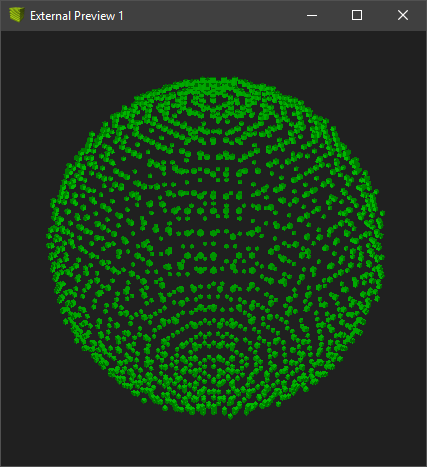
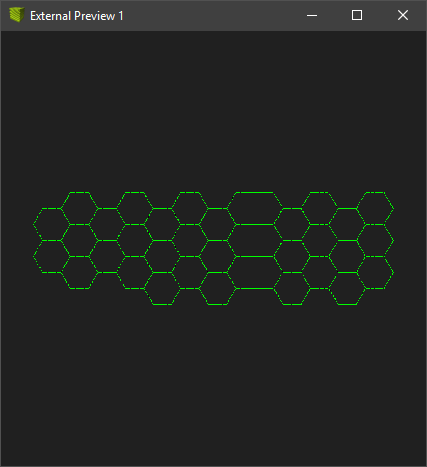
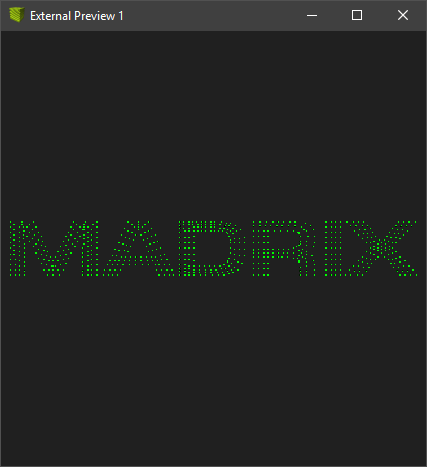
The CSV Fixture List Import makes it possible to very quickly create complex layouts, such as the following examples.
|
|
|
|
CSV files are usually text files with tabularly structured data. Since CSV is a very general file format, the data can be structured in many different ways.
The MADRIX 5 Software is extremely flexible and has a variety of options during the import process in order to be able to process as many different CSV files as possible.
The MADRIX 5 Software expects a file in the following format:
▪Files in UTF-8 encoded format are supported. [In order to not misinterpret special characters.]
- A Unicode Byte Order Mark [BOM] can be included but will be skipped automatically.
▪Files in UTF-16 encoded format with BOM [Little Endian/LE or Big Endian/BE] are supported.
▪CRLF, LF, and CR line endings are supported.
▪Each line will be interpreted as data set, except for the following rules:
- Any line can be used as header line [optional].
- Empty lines or invalid lines can be included but will be skipped automatically.
▪Each data set includes data fields that are separated
▪Each data field, except the last data field of a line, ends with a single, special characters, i.e. field separators.
▪Text that should be processed can be included in a pair of special characters, i.e. text delimiters.
▪If text delimiters are used, only whitespace [spaces, tabulators] is allowed outside of those delimiters, which then is automatically ignored.
▪If text delimiters are used, no additional text can be outside of those delimiters.
▪Should field separators and text delimiters be interpreted as valid data, they need to be included within text delimiters themselves.
▪Field separators and text delimiters should be the same for all data sets throughout the whole file.
▪All data sets should have the same amount of data fields. Otherwise they will be filled up with empty data fields automatically.
▪MADRIX 5 works pixel-based [2D] / voxel-based [3D].
To import a list of fixtures into the Patch Editor, follow these steps:
0] Export your lighting design as CSV file.
1] Open the Patch Editor.
2] Start the CSV import process.
3] Define CSV Import Settings.
4] Define Fixture List Import Settings and end the CSV import process.
5] Set up the final Patch.
0] Export Your CSV File
▪Export your fixture list in the CSV file format from your visualizer, console, CAD software, other lighting design tool, or create it manually.
[Alternatively, export your data from your software tool in the native file format that is possible and then convert it to CSV with the help of a spreadsheet program, for example.]
1] Open The Patch Editor
▪Go to the menu Preferences > Patch Editor...
[Keyboard shortcut: F3]
▪A new window will open.
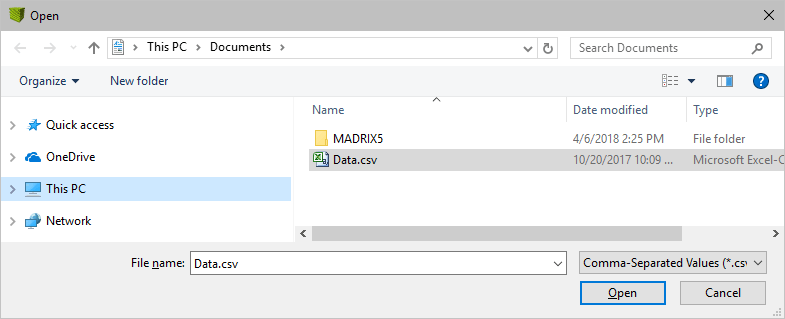
2] Start The CSV Import Process
▪In the Patch Editor, go to File > Import Fixture List...
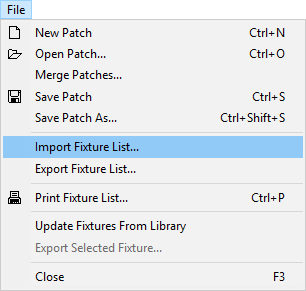
▪A new window will open. Select your CSV file in the File dialog and confirm with Open
2] Define CSV Import Settings
The main import process has two separate steps. This is the first step.
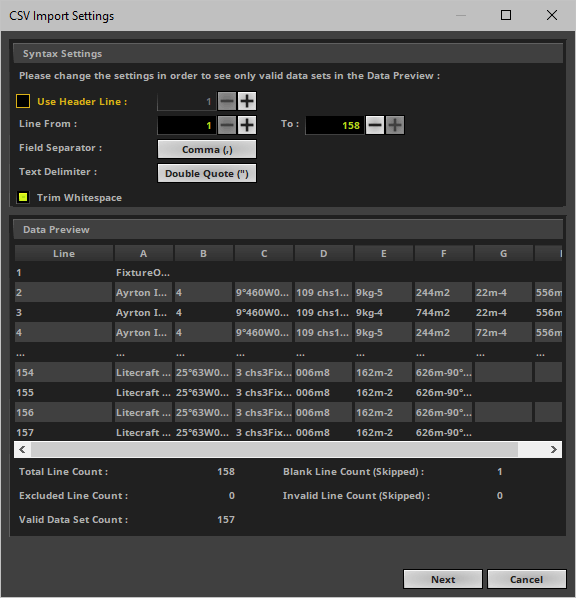
Syntax Settings
Set up the Syntax Settings according to all of the parameters below. Double-check by using the Data Preview.
Use the Data Preview to see how the data will be processed. If not configured correctly, your data will not be imported in a way that makes sense. The data should be structured and previewed in a useful way. For example, fixture names should be identifiable as such and fixture positions should be only sensible numbers instead of text. [Please see the next screenshot below.]
▪Use Header Line - Defines if the CSV file has a descriptive first line that provides a definite name for each data set and column. Activate this option if there is a header line. Set up the line number where this header line is located. The default value is 1.
[Otherwise the text provided in this line would be seen as usable data and errors would occur during the import process. If activated, the header line will be automatically excluded from the data sets.]
▪Line From To - Defines all the lines that the MADRIX 5 Software imports as data sets. Therefore, you can define a range of line numbers in order to include or exclude specific lines. The default values range from 1 to the maximum line number that can be found in the file.
[If a header line is used, it will be excluded automatically.]
▪Field Separator - Defines how data sets are separated within the CSV file. Data can be structured using specific characters. The default value is Comma.
- None - There is no character used to separate the data fields.
- Space - A single space [ ] separates the data fields.
- Tabulator - Uses a tabulator [ tab ] for the separation.
- Comma - A comma [ , ] separates the data fields.
- Semicolon - A semicolon [ ; ] separates the data fields.
- Period - A period [ . ] separates the data fields.
- Colon - A colon [ : ] separates the data fields.
- Underscore - An underscore [ _ ] separates the data fields.
- Hyphen - A hyphen [ - ] separates the data fields.
- Pipe - A pipe [ | ] separates the data fields.
- Custom Character... - Allows you to define the field separator individually if it cannot be selected via the options above. Define the custom character by entering it via the keyboard and confirm with OK
▪Text Delimiter - Allows you to define how text is marked in the data fields.
- None - There is no character to mark text.
- Single Quote - A single quote ['] marks text.
- Double Quote - A double quote ["] marks text.
- Custom Character... - Allows you to define the field separator individually if it cannot be selected via the options above. Define the custom character by entering it via the keyboard and confirm with OK
▪Trim Whitespace - Defines if the software should automatically remove spaces, tabulators, and other whitespace characters that might be unnecessarily included in the data fields. Data sets, which are already clean or cleaned up in this way, are required in order to be able to process them without issues.
Data Preview
The Data Preview shows a preview of how the software will process the data sets that are included in the CSV file.
▪Since you might want to import a very high number of data sets, only the first four lines are shown as well as the last four lines.
▪By default, the line numbers are shown in addition to the various columns [A to Z].
▪If Use Header Line is activated, the descriptions provided by the header line will be automatically used as column titles.
▪If Line From To is customized to exclude certain lines, the data preview will reflect that.
▪Total Line Count - Shows the overall number of lines that is found in the CSV file.
▪Excluded Line Count - Shows how many lines are not included in the import process according to the Syntax Settings [such as the header line, for example].
▪Valid Data Set Count - Shows how many data sets will be imported according to the Syntax Settings.
▪Blank Line Count (Skipped) - Shows how many blank lines are skipped in the process [lines that do not contain any valid data sets].
▪Invalid Line Count (Skipped) - Shows how many lines are seen as invalid and are therefore skipped and not included in the process [lines that contain invalid data sets].
▪Follow the advice of the error messages if they appear at the bottom.
If you know that your CSV file should not have any blank or invalid lines, or that it should have more valid data sets, you should double-check your software data export and the final CSV file. [A text editor or spreadsheet program might also help to manually make any required adjustments in that case.]
▪The following screenshot is a sample how such Data Preview could look like:
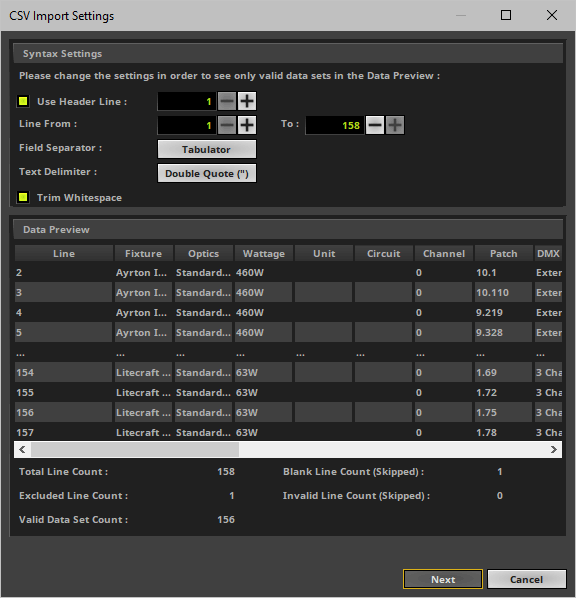
If your Data Preview shows sensible and useful data, continue with a click on Next
4] Define Fixture List Import Settings
The main import process has two separate steps. This is the second step.
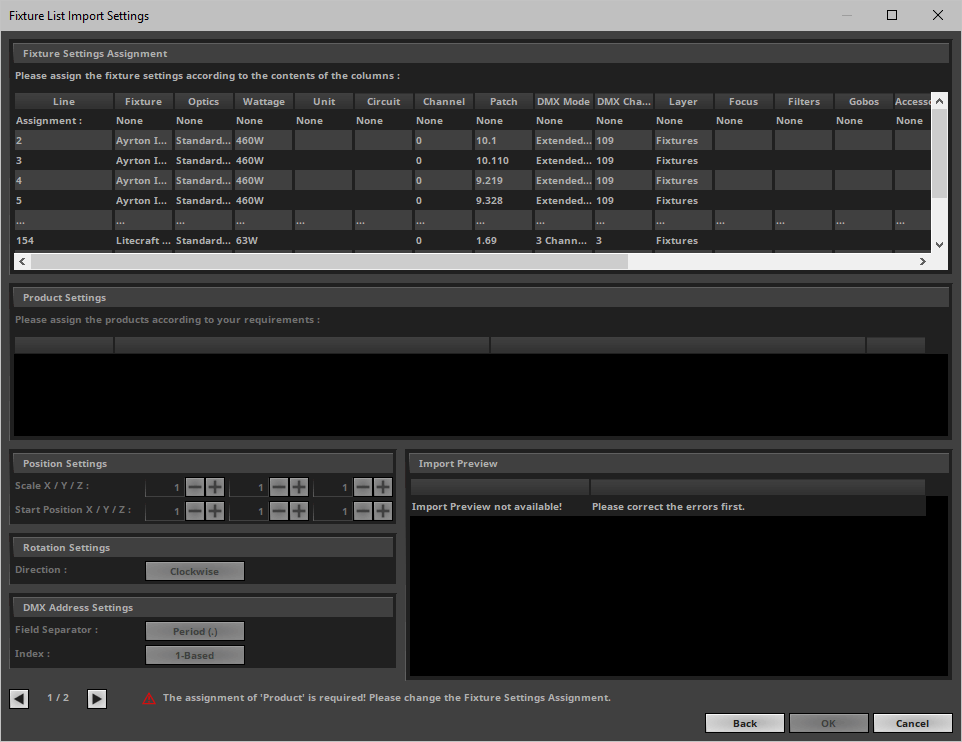
Fixture Settings Assignment
Now, assign your imported data sets to the corresponding settings in the MADRIX 5 Software.
▪Left Mouse Double-Click - Perform a double-click with your left mouse button on the corresponding column in the line Assignment: and change None to one the following fixture settings.
[If you defined a header line in the first step, the columns are now appropriately named according to the CSV contents. This helps assigning the fixture settings in this step. Otherwise, the columns are named A to Z.]
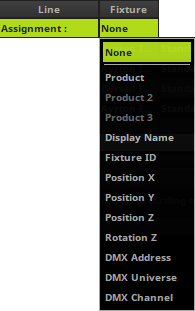
You can assign the following fixture settings:
▪Product - Assigns this column to a fixture/product. According to all the different products that are found, you can assign fixture profiles below by using Product Settings
▪Product 2 - Is available if the complete product name is split into several parts/data fields.
▪Product 3 - Is available if the complete product name is split into several parts/data fields.
▪Display Name - Assigns this column to the [short] name for fixtures used in the Fixture Editor and ultimately in the Patch Editor.
▪Fixture ID - Assigns this column to the Fixture ID that is used in the Patch Editor as a unique identifier for each fixture.
▪Position X - Assigns this column to the horizontal position of fixtures. It is assumed that fixture are included in the CSV data with their middle position.
▪Position Y - Assigns this column to the vertical position of fixtures. It is assumed that fixture are included in the CSV data with their middle position.
▪Position Z - Assigns this column to the depth position of the fixture. It is assumed that fixture are included in the CSV data with their middle position. [For a 2D patch, this value is 1 and will even be assigned automatically if this column is not assigned.]
▪Rotation Z - Assigns this column to the rotation of the fixture around the Z-axis.
▪DMX Address - Assigns this column to both, the DMX universe and the DMX channel. This means that the column needs to include the data for both of those fixture settings. [If assigned, DMX Universe as well as DMX Channel are not available separately anymore.]
▪DMX Universe - Assigns this column to the DMX universe of fixtures. [If assigned, DMX Address is not available anymore.]
▪DMX Channel - Assigns this column to the DMX start channel of fixtures. [If assigned, DMX Address is not available anymore.]
▪You need to assign at least Product
▪Aside from Product, all other settings are optional. The more settings you can assign, the more data can be used in the MADRIX 5 Software.
▪Each fixture setting can only be assigned once.
▪It is not necessary to assign fixture settings to all columns/data fields that are found in the file.
▪If you do not assign all of the fixture settings above, those will be ignored and default values will be generated automatically for the corresponding settings for each fixture.
▪If Position X is not assigned, all fixtures will be placed at position X = 1, which is the left border of the Patch.
▪If Position Y is not assigned, all fixtures will be placed at position Y = 1, which is the top border of the Patch.
▪If Position Z is not assigned, all fixtures will be placed at position Z = 1, which is the front border of the Patch.
▪If Rotation Z is not assigned, they will be placed in the original rotation according to the MADRIX 5 Fixture Library.
▪If DMX Address, DMX Universe, or DMX Channel are not assigned, fixtures will be addressed automatically in ascending order.
▪If only DMX Universe is assigned, the DMX channel will be set to 1.
▪If only DMX Channel is assigned, the DMX universe will be set to 1.
▪If Display Name is not assigned, fixtures will be named based on a combination of the fixture profile and the fixture ID.
▪It is assumed that the fixture IDs provided in the CSV file are decimal numbers and unique. If Fixture ID is not assigned, fixtures will be numbered in ascending order automatically.
▪The following screenshot is a sample how such Fixture Settings Assignment could look like, including making use of a header line:

Product Settings
▪Becomes only available when a Product has been assigned in the Fixture Settings Assignment
▪When Product has been assigned in the Fixture Settings Assignment, you need to further specify the correct product and fixture profile from the MADRIX 5 Fixture Library.
▪You need to assign the correct fixture profile to the products found in the data sets.
▪Each different product that was found in the data sets will be listed separately.
▪You can individually assign a fixture profile to each product that was found.
▪At least one product needs to be assigned.
▪You do not have to assign a product to all of the Source Products. Unassigned products will be ignored automatically.
▪Count - Shows the number of fixtures of this type included in the CSV file.
▪Source Products - Shows the products found in the CSV file.
▪Assigned Products - Shows the fixture profiles of MADRIX 5 assigned to the source products.
▪Rotation - Shows the chosen rotation of assigned products.
▪Size - Shows the the size of the fixture in X x Y x Z [in px].

▪Left Mouse Double-Click - Perform a double-click with your left mouse button on the column Assigned Products > None
▪A new window will open.
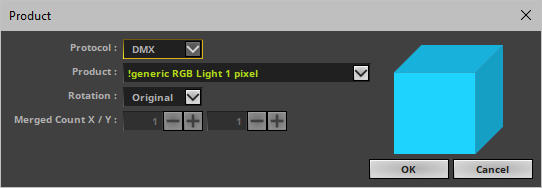
▪Protocol - Choose the general fixture protocol.
- DMX - Makes all DMX-based fixture profiles available as Product
- DVI - Makes all DVI-based fixture profiles available as Product
▪Product - Choose the corresponding fixture profile from the MADRIX 5 Fixture Library.
[This is the product selection known from the Matrix Generator and Patch Editor.]
▪Rotation - Choose the corresponding fixture rotation. The fixture preview to the right will help you assess the correct rotation.
▪Merged Count X / Y - Is only available for Protocol DVI. Allows you to merge the chosen DVI product into a larger DVI fixture. Choose the number of fixtures in X and Y accordingly.
Position Settings
The CSV import process proves extremely useful when you can assign the fixture settings Position X, Position Y, and Position Z. Depending on your imported data sets, you may want to adjust the settings further regarding the position of fixtures.
▪Becomes only available when Position X, Position Y, and/or Position Z have been assigned respectively in the Fixture Settings Assignment
▪Note: When importing fixtures that are larger than 1 pixel/voxel, these position settings/coordinates will be used as the center of the fixture. This affects the Scale and Start Position accordingly.
▪It is assumed that the fixture positions provided in the CSV file represent the center of the fixture.
▪Scale X / Y / Z - Changes the total dimensions in X, Y, and Z by proportionally increasing or decreasing the horizontal, vertical, and depth aspects with the help of a multiplicative factor. Note: The overall Matrix Size of the Patch affects the performance!
- Entering negative values, such as -1, will invert [i.e. mirror] the position of imported fixtures along the corresponding axis [X, Y, or Z]. It does, however, not flip the orientation of fixtures.
[By default, the distances are applied according to the scale and in the units of the CSV data. These might fundamentally differ from the MADRIX 5 Software: E.g. meters or pixel pitch compared to pixels in MADRIX 5.]
▪Start Position X / Y / Z - Defines an offset for the position of fixtures instead of always starting at 1 / 1 / 1.
[By default, the software automatically crops/removes any empty spaces the data sets might produce regarding the start position. This means that the start position of the first fixture is set to 1 / 1 / 1 in order to reduce the Matrix Size. If you need to set your fixtures to a certain area, use this setting to enter the appropriate offset.]
Rotation Settings
The rotation of fixtures in the CSV data sets might be different to the rotation of the corresponding fixture profiles of the MADRIX 5 Fixture Library.
▪Becomes only available when Rotation Z has been assigned in the Fixture Settings Assignment
▪It is assumed that the fixture rotations provided in the CSV file are provided in degrees.
▪Free angles can be included but will be rounded up to the next available quarter rotation [0°, 90°, 180°, 270°].
▪Direction - Allows you to define the general direction of the rotation.
- Clockwise - Defines the rotation according to the direction of the clock.
- Counterclockwise - Defines the rotation as the opposite of the normal clock rotation.
▪Offset - Allows you to add [in case of clockwise rotation] or subtract [in case of counterclockwise rotation] from the rotation value set in the data sets.
- Original - Leaves the rotation as defined in the data sets.
- 90° - Offsets the rotation value by 90 degrees.
- 180° - Offsets the rotation value by 180 degrees.
- 270° - Offsets the rotation value by 270 degrees.
DMX Address Settings
The DMX addresses of the CSV data sets might be managed differently than the settings of the MADRIX 5 Software.
▪Becomes only available when DMX Address, DMX Universe, and/or DMX Channel have been assigned respectively in the Fixture Settings Assignment
▪It is assumed that the DMX addresses provided in the CSV file are provided as decimal numbers.
▪Field Separator - Is only available when DMX Address has been assigned in the Fixture Settings Assignment. Defines the way DMX universe and DMX channel are combined as a single DMX address.
- Space - A single space [ ] separates universe and channel.
- Tabulator - Uses a tabulator [ tab ] for the separation.
- Comma - A comma [ , ] separates universe and channel.
- Semicolon - A semicolon [ ; ] separates universe and channel.
- Period - A period [ . ] separates universe and channel.
- Colon - A colon [ : ] separates universe and channel.
- Underscore - An underscore [ _ ] separates universe and channel.
- Hyphen - A hyphen [ - ] separates universe and channel.
- Pipe - A pipe [ | ] separates universe and channel.
- Custom Character... - Allows you to define the field separator individually if it cannot be selected via the options above. Define the custom character by entering it via the keyboard and confirm with OK
▪Index - Defines how the DMX addressing starts in the CSV data sets regarding DMX universe as well as DMX channel.
- 0-Based - DMX addressing starts with value 0 and ranges from 0 to 255.
- 1-Based - DMX addressing starts with value 1 and ranged from 1 to 256.
Import Preview
While configuring all options in the Fixture List Import Settings dialog, the Import Preview shows a preview of the overall properties that will be set after the import process has been finished.
▪DMX Fixture Count - Shows the total number of DMX fixtures that will be imported.
▪DVI Fixture Count - Shows the total number of DVI fixtures that will be imported.
▪Fixture IDs - Shows the range of unique identifiers that will be imported [or generated automatically by the software if not assigned in the Fixture Settings Assignment].
▪Map Area X - Shows the range of positions where which fixtures will be patched and located in X as well as the total size of that area in brackets.
▪Map Area Y - Shows the range of positions where which fixtures will be patched and located in X as well as the total size of that area in brackets.
▪Map Area Z - Shows the range of positions where which fixtures will be patched and located in X as well as the total size of that area in brackets.
▪DMX Universes - Shows the range of DMX universes that will be imported [or generated automatically by the software if not assigned in the Fixture Settings Assignment].
▪DMX Channels - Shows the range of DMX channels that will be imported [or generated automatically by the software if not assigned in the Fixture Settings Assignment].
Message And Errors
The software will show various messages and errors below the Import Preview to guide you through the process.
▪Red Exclamation Mark - Shows errors that you will have to fix. Otherwise, the import process cannot be finalized.
▪Gray Exclamation Mark - Shows messages that hold valuable information for you. Please decide to adjust the settings accordingly or choose to leave the settings as they are and regard this message only as information.
End The CSV Data Import
Since the Fixture List Import Settings dialog is the second step of the main import process, the main import process will end after this step.
Double-check and confirm all of your settings via the Import Preview before ending the process!
▪OK - Imports the configured data into the Patch Editor.
5] Set Up The Final Patch
After the import process, the final Patch is not yet finished since just now you have imported a large list of fixtures, but not created a Patch for the MADRIX 5 Software yet.
▪Double-check all imported fixtures. Repeat the CSV Fixture List Import process and modify your data or import settings if you are not satisfied with the result, or do any required changes manually in the Patch Editor [»Patch Editor].
▪After you have set up and configured all of your fixtures, it is important to define the Matrix Settings.
▪Click Matrix Settings
[menu Edit > Matrix Settings...]
▪A new window will open.
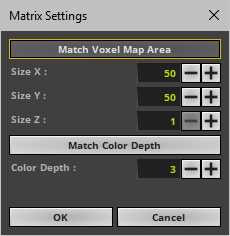
The virtual LED matrix represents your LED fixtures. Therefore, it is the area on which the MADRIX Effects are rendered and displayed, and ultimately sent to your output. MADRIX 5 needs to know in pixels/voxels how large your LED project is in total.
Set up the Matrix Settings manually or use the semi-automatic options: according to all of these parameters:
▪Match Voxel Map Area - Automatically defines the total size of the virtual LED matrix in X, Y, and Z according to the placed fixtures.
▪Match Color Depth - Automatically defines the number of color channels your LED fixtures use according to the placed fixtures.
▪Confirm with OK
▪Close the Patch Editor when you have finished the configuration.
Importing Several Fixture Lists
If you wish to import several, different CSV files, i.e. several fixture lists, follow these steps:
▪Import the first CSV file/fixture list.
▪Save the Patch as a separate file via Patch Editor > File > Save Patch As...
▪Import the second CSV file/fixture list.
▪Save the second Patch as a separate file via Patch Editor > File > Save Patch As...
▪Repeat the process for all the different fixture lists.
▪In the Patch Editor, use File > Merge Patches... in order to combine all separately saved Patch files.
Learn more »Merging Patches
If you are encountering problems, please work through the following checklist:
▪The assignment of 'Product' is required! Please change the Fixture Settings Assignment.
If you see this message, you need to assign the fixture setting Product in the section Fixture Settings Assignment.
▪The assignment of one or more products is required. Please change the settings.
If you see this message, you need to assign the correct fixture profile to the products found in the data sets in the section Product Settings.
▪If you want to undo a Fixture Settings Assignment or assign a setting to a different column, set the incorrect column to None again and assign the fixture settings to the correct column instead.
▪If you are not satisfied with the results, please double-check:
- Your software data export from your third-party software, such as visualizers, consoles, CAD software, other lighting design tools, or other software for data export.
- The CSV file
- The CSV Import Settings [step one of the main import process]
- The Fixture List Import Settings [step two of the main import process]
▪Or modify the data sets manually [a text editor or spreadsheet program might help in this case]
▪Check any messages or errors of the CSV Import Settings [step one of the main import process] or Fixture List Import Settings [step two of the main import process] and act accordingly by fixing the error and evaluating if the settings a message refers to need to be modified or can remain unchanged.
▪Instead of assigned all fixture settings that are provided in the CSV file, you may choose not to assign certain settings and let the MADRIX 5 Software use or generate default values instead.
| MADRIX 5.7. |
| [Ctrl & +/-] = Zoom In/Out | [Ctrl & 0] = 100% |
|
Previous Next
|
|
Enable Automatic Translation | Activer La Traduction Automatique | 启用自动翻译 |