This topic includes:

The Fade Area, including the important Crossfader, is positioned in the middle of the MADRIX user interface; between both Effect Pipelines [Learn more »Work Areas [Left/Right]]. This section of the user interface serves different purposes, as explained below.
|
Fade Type - Is part of the Crossfader. It specifies how the fade will look like. Perform a right mouse click to reset to the default value [XF]. Learn more Fade Types |
||||||
|
Color-Fade Color - Is part of the Crossfader. It specifies the color used only for the Color-Fade. Perform a right mouse click to reset to the default value [Black]. Learn more Crossfader |
||||||
|
Color Filter - Applies an additive color filter to the Main Output. Perform a right mouse click to reset to the default value [White]. Learn more Color Filter |
||||||
|
Filter - Applies special filters to quickly change your visuals. Learn more »Filters [FX] |
||||||
|
Crossfader - Determines which Effect Pipeline is send to the output, i.e. visuals from which side. Perform a right mouse click to reset to the default value [50%]. Learn more Crossfader |
||||||
|
Fade To Left - Is part of the Crossfader. It triggers an automatic fade to the left and applies the currently set Fade Time and Fade Type. Skip To Left - Is part of the Crossfader. Perform a double-click in order to immediately skip to the left [without applying a Fade Time or Fade Type]. Learn more Crossfader |
||||||
|
Fade Time - Is part of the Crossfader. It specifies the duration of the fade, when an automatic fade is triggered. [To change the time, select the value via left double-click first. Then, enter a value using the keyboard, use the mouse wheel, or use a left mouse click and hold while dragging the mouse up or down.] Learn more Crossfader |
||||||
|
Automatic Fade - Is part of the Crossfader. It triggers an automatic fade and applies the currently set the Fade Time and Fade Type from left to right or right to left. Learn more Crossfader |
||||||
|
Strobe - Activates a strobe on top of the Main Output. Perform a right mouse click to choose the color. Learn more Strobe |
||||||
|
Main Output Macro - Controls the Main Output Macro Editor. Learn more Main Output Macro |
||||||
|
View - Changes the view of the MADRIX user interface. The following views are available:
|
Overview
The Crossfader specifies which effect [from Effect Pipeline Left or Effect Pipeline Right] is displayed on Preview Output. As such, the Crossfader specifies the source of the final output. The Preview Output will show you the results and the final output towards your LEDs.
| ▪ | Set the Crossfader to the far left to show only the effect of Effect Pipeline Left [Preview Left/Storage Left]. |
| ▪ | Set the crossfader to the far right to show only the effect of Effect Pipeline Right [Preview Right/Storage Right] |
| ▪ | Any position in between is also possible to mix both effects. |
Automatic Fades
| ▪ | FADE - Starts an automatic fade. - The fader will automatically fade to the other side according to the Fade Time and the Fade Type. - If the fader is positioned on the right side, it will automatically move to the left side. If the fader starts on the left side, it will move to the right side. |
| ▪ | Fade Time - Defines the duration of the automatic fade. - Set the time using seconds and tenths of seconds. - To change the time, select the value via left double-click first. Then, enter a value using the keyboard, use the mouse wheel, or use a left mouse click and hold while dragging the mouse up or down. - Example: Enter '2.5' for a fade duration of 2.5 seconds. |
| ▪ | Fade To Left / Fade To Middle / Fade To Right - Click on the arrow buttons to fade to a specific position: left, middle, right. |
Manual Fades
| ▪ | Left Mouse Click And Hold And Drag - Click with your left mouse button on the Crossfader, continue to hold, and move your mouse in order to change its position. You can fade manually in this way. |
| ▪ | Left Mouse Click - Click with your left mouse button directly on the Crossfader panel to instantly change the position to the mouse location. |
| ▪ | Left Mouse Double-Click - Perform a double-click with your left mouse button directly on the Crossfader panel to reset the Crossfader to 50%, i.e. to the exact middle position between Left and Right. |
| ▪ | Right Mouse Click - Perform a right click with your mouse on the Crossfader to reset the Crossfader to 50%, i.e. to the exact middle position between Left and Right. |
| ▪ | Skip To Left / Skip To Middle / Skip To Right - Perform a double-click on the arrow buttons to instantly skip to a specific position: left, middle, right. |
Examples
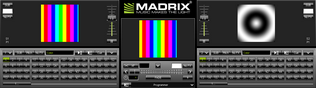
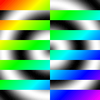
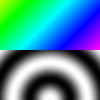
Crossfader To The Left |
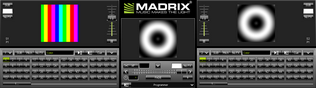
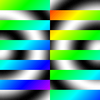
Crossfader To The Right |
|
|
Fade Types
All fades [manual and automatic] are of a certain type. By changing the Fade Type, you can change how a fade will look like.
Learn more Fade Types
Introduction
The Crossfader creates a fade between Effect Pipeline Left and Effect Pipeline Right. You can specifically control the visual result of the fade:
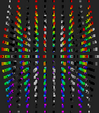
| ▪ | You can choose from different types of fades using the drop-down list as shown below. |
| ▪ | The fade types will influence how Effect Left is mixed with Effect Right during the fade or vice versa. |

The following table describes how the different fade types work.
For these examples, let us assume that Effect Left is currently playing and that you would want Effect Right to be displayed next. So we will fade from Preview Left to Preview Right.
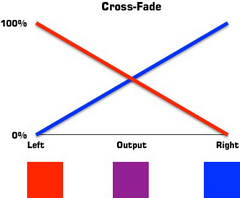
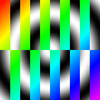
Cross-Fade |
A Cross-fade starts by dimming Effect Left linearly from 100% to 0% during the fade time. But at the same time, Effect Right starts to fade in until it is fully shown at the end of the fade. As a result an interpolation of the colors of Left and Right will be used during the fade. At the beginning of the whole fade procedure, Effect Left stands at 100%, while Effect Right is not displayed [0%]. Halfway through, both effects are dimmed to 50%, as you can see in the picture. Neither Effect Left nor Effect Right are displayed with 100%. That is why the cross-fade appears to be darker. At the end of the fading procedure, Effect Left stands at 0%, while Effect Right is shown with 100%. |
|
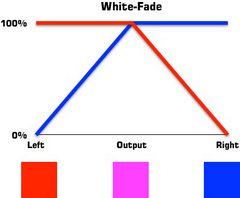
White-Fade |
A White-fade is the opposite of a black-fade. It starts with Effect Left being shown at 100% for the first half of the fade time. At the same time, Effect Right fades in during the first half until it is also shown with 100%. Afterwards, Effect Right remains at 100% for the rest of the fade procedure, while Effect Left is dimmed from 100% to 0%. Halfway through, both effects are shown with 100%. Because of that, a white-fade does not necessarily display a white color in middle position. Instead, this fade type uses addition of all color values. For example, if your are using a SCE Color in pure red on Effect Left [255, 0, 0] and SCE Color in turquoise/cyan on Effect Right [0, 255, 255], the result will indeed be a pure white halfway trough as it adds up to 255, 255, 255. But using a SCE Color in pure red on Effect Left [255, 0, 0] and SCE Color in pure green [0, 255, 0], this results in pure yellow in the middle of the fade procedure [255, 255, 0], for example. |
|
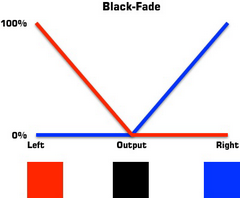
Black-Fade |
A Black-fade starts with dimming Effect Left from 100% to 0% for the first half of the fade time. Effect B remains at 0% during this time. Then, halfway through the fade procedure, Effect Right starts to increase until 100% shown. Effect A was already at 0% and remains at this level for the rest of the fade. Since both effects are shown with 0% in the middle of the fade, this always results in a black output, and therefore the name. |
|
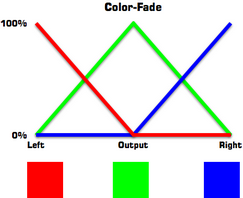
Color-Fade |
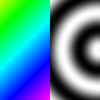
Essentially, a Color-Fade in MADRIX does imitate a black-fade [see above]. Effect Left is dimmed to 0% first and afterwards Effect Right increases linearly from 0% to 100%. But on top of that, a color is added. While Effect Left is reduced in intensity, the color C gains intensity. In the middle of the fade Effect Left and Effect Right stand at 0%, but color C stands at 100%. When Effect Right reaches 100%, color C is reduced to 0% again. In the middle position you will not see Effect Left or Right, but only the color you picked. The Fader Box button or the Color Picker enable you to choose the color for the color-fade. |
|
Horizontal Wipe |
Wipes one side over another horizontally [from the right or left side]. The currently active effect stays and will be shown in the background until the new effect fully covers the output. |
|
Vertical Wipe |
Wipes one side over another vertically [from above or below]. The currently active effect stays and will be shown in the background until the new effect fully covers the output. |
|
Depth Wipe |
Wipes one side over another vertically [from back or front]. The currently active effect stays and will be shown in the background until the new effect fully covers the output. |
|
Horizontal Cross Wipe |
Wipes one side over another horizontally [from the right and the left side] and splits the new effect at the same time during the fade. The currently active effect will be shown in the background until the new effect fully covers the output. |
|
Vertical |
Wipes one side over another vertically [from the top and the bottom side] and splits the new effect at the same time during the fade. The currently active effect will be shown in the background until the new effect fully covers the output. |
|
Depth |
Wipes one side over another vertically [from the back and the front] and splits the new effect at the same time during the fade. The currently active effect will be shown in the background until the new effect fully covers the output. |
|
Horizontal Slide |
Pushes the old effect out of the frame horizontally [from the left to the right and vice versa]. The currently running effect will move accordingly to the side until it vanishes. |
|
Horizontal Slide |
Pushes the old effect out of the frame vertically [from the top to the bottom and vice versa]. The currently running effect will move accordingly to the top or bottom until it vanishes. |
|
Depth Slide |
Pushes the old effect out of the frame vertically [from the back to the front and vice versa]. The currently running effect will move accordingly to the top or bottom until it vanishes. |
|
Horizontal Cross Slide |
Pushes the old effect out of the frame horizontally [from the left to the right and vice versa] and splits both effects at the same time during the fade. The currently running effect will move accordingly until it vanishes. |
|
Vertical |
Pushes the old effect out of the frame vertically [from the top to the bottom and vice versa] and splits both effects at the same time during the fade. The currently running effect will move accordingly until it vanishes. |
|
Depth |
Pushes the old effect out of the frame vertically [from the back to the front and vice versa] and splits both effects at the same time during the fade. The currently running effect will move accordingly until it vanishes. |
|


![]() Color Filter - Filters the colors of the Main Output.
Color Filter - Filters the colors of the Main Output.
| ▪ | Simply select the color using the Color Picker or the Color Fader Box in the upper right corner of the Fade Area to activate the Color Filter. |
| ▪ | White is the default color and means that no filter is active. |
| ▪ | The Color Filter works in multiply mode [additive mode]. - That means that the colors of the effects are multiplied with the colors of the filter [Effect x Color Filter]. - Both, effect and filter, are represented through RGB or RGBW mode [RGB(W) x RGB(W)]. - Moreover, every single color of the effect will be multiplied with the corresponding color of the filter [R x R, G x G, B x B, W x W]. You will see the relation in the following table. - Please note that below calculations are examples to show how it works. - In MADRIX, color values might be converted to always ensure a maximum color value of 255. [E.g., without the conversion 255 x 255 would not result in 255]. |
Effect |
x |
Color Filter |
The colors of the effects are multiplied with the colors of the filter. |
|
results in |
||||
RGB(W) |
x |
RGB(W) |
Effect and filter are represented through RGB or RGBW mode. |
|
results in |
||||
R G B |
x x x x |
R G B |
Every single color of the effect will be multiplied with the corresponding color of the filter. |
|
Example 1 in RGB Mode |
||||
SCE Color |
x |
Color Filter |
= |
Result |
Yellow
255 255 0 |
x x x |
Green
0 255 0 |
= = = |
Green
0 255 [after conversion] 0 |
Example 2 in RGB Mode |
||||
SCE Color |
x |
Color Filter |
= |
Result |
Red
255 0 0 |
x x x |
Green
0 255 0 |
= = = |
Black
0 0 0 |
Example 3 in RGB Mode |
||||
SCE Color |
x |
Color Filter |
= |
Result |
Turquoise
0 255 255 |
x x x |
Pink
255 0 255 |
= = = |
Blue
0 0 255 [after conversion] |
This strobe applies directly to the Main Output.
| ▪ | Left Mouse Click and Hold - Activates the strobe. Continue to hold as long as the strobe should be active [Flash button]. - Simply release the mouse button to deactivate the strobe again. |
| ▪ | Right Mouse Click and Hold - Allows you to choose the color of the strobe. - Simply hover over the new color with your mouse and release the mouse button to select the color.  |
| ▪ | The speed [i.e. the frequency] of the strobe can be set up in the Options. |
| ▪ | How the strobe works can be set up in the Options. Learn more »Performance |
The Main Output Macro is 1 of 4 locations to apply a Macro. A Macro is a Script written to further influence the functionality of the effect or output. A Macro is not necessary, but can add further functionality to your project.
The Main Output Macro is a Macro that affects the entire main output.
Learn more »Macros And Scripts