This topic includes:
SCE Image allows you to load and display one or several images, pictures, logos, etc. on your LEDs. And you can add certain animations to them.
[In MADRIX 2, SCE Image was named SCE Bitmap.]
|
|
 Default Settings |
 Customized Example |
| ▪ | Various buttons and controls have universal functions. They are available for each MADRIX Effect / Layer. Learn more »Effect Areas [Left/Right] Learn more »Layers |
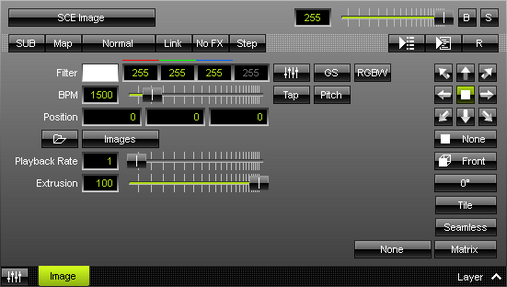
This MADRIX Effect uses the following, individual controls:
| ▪ | Filter - Applies a multiplicative color filter to the image. The default value is White. - GS - Activates grayscale mode to show the input only in gray shades. The Filter is independent of this mode. - RGBW - Converts the input into RGBW. This is useful when using RGBW fixtures to convert from the standard RGB color values of the input. If the option is disabled when using RGBW fixtures, the input will appear darker since the White channel is not used. The W color channel of the Filter only works if RGBW is activated. Learn more »Using Colors And Intensity |
| ▪ | BPM - Defines the speed [when using a direction/movement]. The default value is 1500. Valid values range from 0 to 9999. Learn more »Using BPM Control |
| ▪ | Position - Defines the position of the image in X, Y, and Z [in %]. The default values are 0, 0, 0. Valid values range from -1000 to 1000. |
| ▪ | Playback Rate - Defines the speed of the Image Table and how fast images are changed. Valid values range from 0 to 50. - The default value is 1, which means that the Duration of the Image Table for each image is used. A rate of 2 doubles the speed and cuts the Duration in half, for example. |
| ▪ | Extrusion - Adds depth to the input; i.e. duplicates the input image [in % of the virtual LED matrix]. This is mainly relevant for 3D. The default value is 100. Valid values range from 0.01 to 100. |
|
Open - Allows you to load an image into MADRIX. Select the file on your computer or another source. Continue with Image Import Settings |
|
Open Image Table - Opens the Image Table, a window to organize multiple images. Learn more Image Table |
|
Filtering - Defines how input is processed and displayed. Mainly affects the visual outcome when the input is scaled up or down [e.g., when choosing a different mode for Stretching / Aspect Ratio]. Choose from 2 different modes. The default setting is None. |
|
Direction - Allows you to choose the direction. This includes all directions for 2D and 3D mode. The default value is None. Learn more »Using Directions |
|
Look-At Type - Allows you to choose from which side you want to look at the effect. This is mainly relevant for 3D. The default value is Front. Learn more »Using Directions |
|
Rotation - Rotates the image [0°, 90°, 180°, 270°]. The default value is 0. |
|
Tile - Tiles and duplicates the input and thereby generating patterns. |
|
Seamless - Activates or deactivates a continuous stream of the input image. MADRIX will automatically display the input image again to create a continuous display. |
|
Stretching / Aspect Ratio - Defines the aspect ratio of the image. The default value is Matrix. None - Disables stretching. Matrix - Stretches to the current aspect ratio of the virtual LED matrix. Original - Stretches to the original aspect ratio of the source. 4:3 - Applies a 4:3 aspect ratio. 16:9 - Applies a 16:9 aspect ratio. |

Restoring The Default Settings
|
Restore Default Layer Settings - Restores the default settings of the Layer. |
SCE Image supports the following file types:
| ▪ | BMP [of the file type *.bmp] |
| ▪ | GIF and Animated GIF [of the file type *.gif] |
| ▪ | JPG [of the file type *.jpg] |
| ▪ | PNG [of the file type *.png] |
| ▪ | TIFF [of the file type *.tif or *.tiff] |
| ▪ | MADRIX Image Table [of the file type *.mitz] |
| ▪ | MADRIX Image Table Uncompressed [of the file type *.mitx] |
Overview
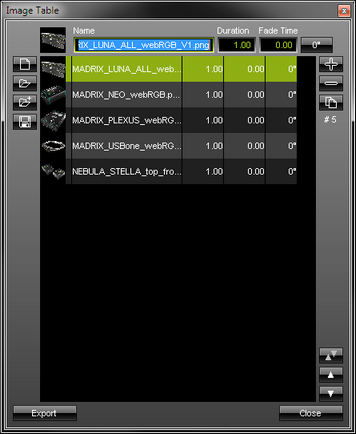
SCE Image allows you to load one image or multiple images at a time. Use the Image Table to manage multiple images as described below.
| ▪ | Left Mouse Click - Selects an image in the Image Table. |
| ▪ | Double-Click Left Mouse Button - Immediately chooses and activates the selected image and displays it on the LEDs. In this way, you can define which image to show next. MADRIX will automatically continue in the list then, beginning with this image. |
| ▪ | Ctrl + Left Mouse Click - Allows you to select several images in the Image Table at different positions. |
| ▪ | Shift + Left Mouse Click - Allows you to select several images by selecting 1] the first image, 2] the last image, 3] and all images in-between will be selected automatically. |
| ▪ | Automatic Loop - When the last image of the Image List is shown, MADRIX will automatically loop back to the first image and start from the beginning again. |
|
Preview - Displays a small preview of the loaded or currently selected image. |
||
Name |
|
||
Duration |
|
||
Fade Time |
|
||
|
Rotation - Rotates the image [0°, 90°, 180°, 270°]. The default value is 0°. |
||
|
New - Immediately removes all items from the list. |
||
|
Open - Loads a previously saved MADRIX Image Table from an external file [of the file type *.mitz or *.mitx]. |
||
|
Open And Attach - Loads a previously saved MADRIX Image Table from an external file [of the file type *.mitz or *.mitx] and adds the new images to the images that are already loaded. |
||
|
Save - Saves the Image Table to an external file [of the file type *.mitz or *.mitx]. |
||
|
Add Images - Adds and appends one or several images to the Image Table. Choose the files from your harddisk or another storage location. Continue with Image Import Setings |
||
|
Remove Images - Removes one or several images from the Image Table. First, select the images in the list. |
||
|
Duplicate Images - Copies the currently selected images and adds them as new items to the Image Table. |
||
#5 |
|
||
|
Swap Position - Swaps the position of images in the Image Table when several images are selected first. |
||
|
Position Up - Changes the order, and positions currently selected images one step higher up in the list. |
||
|
Position Down - Changes the order, and positions currently selected images one step lower down in the list. |
||
|
Export - Exports the currently selected image or images from the Image Table as an external image file [of the file type *.bmp]. |
||
|
Close - Closes the Image Table window. |
Context Menu
| ▪ | Right Mouse Click - You can call up the context menu by performing a right mouse click on Images |
| ▪ | A small window will be shown. |

You can quickly perform the following actions:
| ▪ | Edit... - Opens the Image Table [in the same way you can open the window by clicking on Images with the left mouse button]. |
| ▪ | Open... - Loads images or a previously saved Image Table from an external file [of the file type *.mitz or *.mitx]. A new window opens for you to select the file on your harddisk. |
| ▪ | Copy - Copies the current images into the clipboard as a duplicate. |
| ▪ | Paste - Applies all images from the clipboard to the currently focused Image Table [Images]. |
| ▪ | Clear - Removes all images from the Image Table. |
Drag And Drop [Copy And Paste]
| ▪ | Left Mouse Click And Hold - You can perform a Copy and Paste with the mouse. Click with the left mouse button on the Images button and hold for 3 seconds. A small + appears. Now, continue to hold and drag the mouse to another image control [of a different layer] and release the mouse to instantly apply the images. |
| ▪ | File Drag And Drop - You can select a MADRIX Image Table file [of the file type *.mitz or *.mitx] in Windows and drag it to a color control of your choice in MADRIX in order to load it in MADRIX. |
After opening an image or loading it into the Image Table, please use the following options to finally import your images into MADRIX. [When importing an image, a copy will be created and used within MADRIX. Your original content will not be changed.]
Optimize Size

| ▪ | Optimize Size - When activated, MADRIX automatically optimizes the file size of images loaded into MADRIX. If the image has a larger pixel resolution than your virtual LED matrix in MADRIX, the software automatically reduces the pixel resolution of the image to fit the virtual LED matrix. Thereby the file size is reduced, which in turn reduces the required space in the local memory of your computer [RAM]. This increases performance and stability of the software and computer. It is recommended to activate Optimize. Learn more Important Notes |
| ▪ | Confirm with OK, restore the default settings via Defaults, or abort the process using Cancel |
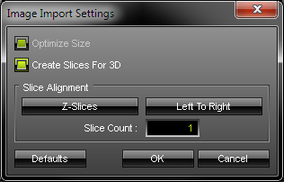
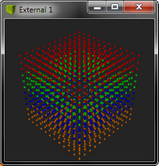
| ▪ | Create Slices For 3D - Is a way to bring 2D content to 3D LED matrices by slicing the image into different parts and applying each slice to X-levels, Y-levels, or Z-levels as required. [You will get the most benefit out of this feature when using images that are made up of different parts and are especially created for this area of application.] Example: Your virtual LED matrix is 10 x 8 x 4. Now, you have prepared an image and want to display it not only on the first Z-level or use Extrude, but on all 4 Z-levels. Then, you would let MADRIX create 4 slices. |
| ▪ | Slice Type - Defines the 3D orientation of how slices are applied to your LED matrix. - X-Slices - Uses slices to fill the LED matrix; always starting from left to right. - Y-Slices - Uses slices to fill the LED matrix; always starting from top to bottom. - Z-Slices - Uses slices to fill the LED matrix; always starting from front to back. |
| ▪ | Slice Order - Defines how your source image is processed. - Left To Right - MADRIX slices the image starting left. [The first, left slice will then be applied to the left for X-Slices, to the top for Y-Slices, and to the front for Z-Slices.] - Right To Left - MADRIX slices the image starting right. [The first, right slice will then be applied to the left for X-Slices, to the top for Y-Slices, and to the front for Z-Slices.] - Top To Bottom - MADRIX slices the image starting top. [The first, top slice will then be applied to the left for X-Slices, to the top for Y-Slices, and to the front for Z-Slices.] - Bottom To Top - MADRIX slices the image starting bottom. [The first, bottom slice will then be applied to the left for X-Slices, to the top for Y-Slices, and to the front for Z-Slices.] |
| ▪ | Slice Count - Defines in how many slices an image is divided. A value of 1 means that no slices are created and that the image is used as one. [A value of 4, for example, will create 4 slices that each make up 25% of the source image.] |
| ▪ | The settings with the highest performance are Z-Slices and Top To Bottom |
| ▪ | Confirm with OK, restore the default settings via Defaults, or abort the process using Cancel |
Original 2D Image |
Image Import Settings |
MADRIX 3D Output |
|
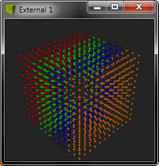
Z-Slices - Left To Right |
|
|
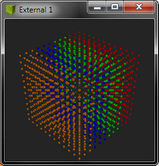
Y-Slices - Left To Right |
|
|
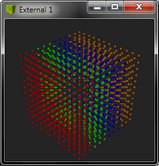
X-Slices - Left To Right |
|
|
Z-Slices - Right To Left |
|
|
Z-Slices - Top To Bottom |
|
|
Z-Slices - Bottom To Top |
|


| ▪ | Please do use pictures with a pixel resolution according to the size of your LED matrix! |
| ▪ | It is not useful to use a resolution of 3000x2000 pixels if your LED matrix has a size of 192x128, for example. Please resize your pictures before using them in MADRIX. Please do also use 72 DPI. Both means will improve performance considerably. At the same time, you will avoid that the RAM of your computer will overload. |
| ▪ | Optimize Size - When activated, MADRIX automatically optimizes the file size of images loaded into MADRIX. If the image has a larger pixel resolution than your virtual LED matrix in MADRIX, the software automatically reduces the pixel resolution of the image to fit the virtual LED matrix. Thereby the file size is reduced, which in turn reduces the required space in the local memory of your computer [RAM]. This increases performance and stability of the software and computer. |