Introduction
The X-NET 8 fully supports the Art-Net protocol. It can be configured to output anything between 1 and 8 DMX universes.
How Do I Configure The X-NET 8 Using Art-Net?
1) You have to set up your computer's IP address to 2.0.0.1 and the subnet mask to 255.0.0.0.
2) X-NET 8 Back Panel View:
Set up the IP address of your X-NET 8 from 2.39.2.1 to 2.39.2.255 using the SW1, SW2, and SW3 switches.
Back Panel Switches:
SW1: x100
SW2: x10
SW3: x1
Set up an IP address other than your computer's network card.
Examples:
2.39.2.10: you have to set the SW1 to 0, SW2 to 1, and SW3 to 0
2.39.2.127: you have to set the SW1 to 1, SW2 to 2, and SW3 to 7
2.39.2.231: you have to set the SW1 to 2, SW2 to 3, and SW3 to 1
...
Each X-NET 8 must have its own, unique IP address.
Example:
1st X-NET 8 ... 2.39.2.1
2nd X-NET 8 ... 2.39.2.2
3rd X-NET 8 ... 2.39.2.3
...
3) X-NET 8 Front Panel View:
To activate Art-Net, set the two dip-switches on the front side of the X-NET 8 to the OFF position (upper position). As a result, you will disable the CL100M protocol and enable the Art-Net protocol at the same time.
Please also adjust the two rotary dip switches Art-Net Sub-Net and Art-Net Universe. With the help of these two HEX rotary dip switches you define the start (first) universe for each X-NET 8.
Example for the Front Panel HEX rotary dip switches Sub-Net and Universe:
Universe 0 ... Sub-Net value 0 , Universe value 0
Universe 8 ... Sub-Net value 0 , Universe value 8
Universe 16 ... Sub-Net value 1 , Universe value 0
Universe 24 ... Sub-Net value 1 , Universe value 8
Universe 32 ... Sub-Net value 2 , Universe value 0
Universe 40 ... Sub-Net value 2 , Universe value 8
...
Universe 122 ... Sub-Net to value 7 , Universe to value A
...
Universe 255 ... Sub-Net to value F , Universe to value F
4) You must restart your X-NET 8 if you make changes on the front or back panel switches!
Broadcast Or Direct IP Mode?
Using the Art-Net protocol in broadcast mode means that every packet sent from a single (MADRIX) transmitter will be received by all recipients in the network. This can be a very useful feature, e.g. if you wish universes 1 and 2 to be available on several points of the set-up. The disadvantage is that through broadcasting a potentially huge number of packages will be sent over the network.
To reduce network traffic, we suggest usin Direct IP mode.
Please note: In the following example we will configure a X-NET 8 with ports 1–8 to use DMX universes 1–8 in broadcast mode.
How Do I Configure MADRIX?
In order to configure MADRIX, please go to the MADRIX menu "Preferences -> Device Manager". Activate the "Art-Net" tab and enable Art-Net.

Now press the "New" button to add new Art-Net device(s).

Please select the number of devices you wish to create. And please enter the number of ports of each device.
Select "Use Direct IP Mode For the Devices" if you wish to use Direct IP mode. For more information see the chapter Art-Net.
Select "Device Sends Full Frames" if you wish to always send a single frame including all 512 DMX channels. If this option is disabled, MADRIX will automatically send optimized frames that reduce network traffic. If problems occur with your Art-Net node, please enable this option and send full frames.
Select a device and press "Edit" to configure this Art-Net device.

Here you can set up your Art-Net device. First, please click on "Port Count" and select the Port Count to be "4 0x4".
Up to this point we have used the broadcast option.
Please note: You can also use Direct IP mode by activating the switch "Send Direct". In that case you will have to type in the IP address of your X-NET 8.
Accordingly, you will see your newly created Art-Net 0001 (Art-Net 0002, ...) device listed with 4 ports. Repeat this step and create a new Art-Net device by clicking the "New" button.

If you did repeat the step, you will now see two Art-Net devices (Art-Net 0001 and Art-Net 0002) in the list. You can modify these Art-Net devices by selecting the Art-Net device first and then clicking the "Edit" button.

As shown above, we have changed the "Short Name" from Art-Net 0001 to X-Net 8 #1A in this example.
Select the next Art-Net device and click edit.
For the second 4 ports of your first X-Net 8 select also port count 4 0x4 and set up the universe port out to 4 0x04, 5 0x05, 6 0x06, 7 0x07.

This modification is repeated for the Art-Net 0002 device changing the "Short name" from Art-Net 0002 to X-Net 8 #1B. Close this dialog with OK.

Now you will see the two Art-Net devices, X-Net 8 #1A and X-Net 8 #1B, in the list.
X-Net 8 #1A with the first 4 DMX universes and
X-Net 8 #1B with the next 4 DMX universes.

In the next step open the tab called "DMX Devices". Here, you have to enable each Art-Net device by activating the "Enable" switch. You will also have to assign the DMX universe for each port.
In this example we have used all 8 ports of the X-NET 8 and activated them for output.
First X-Net 8:
X-NET 8 #1A Port:0 is the DMX universe 1
X-NET 8 #1A Port:1 is the DMX universe 2
...
...
X-NET 8 #1B Port:3 is the last DMX universe 8.
If you have more than one X-NET 8, configure the subsequent X-NET 8 devices in the same way.


In this example you can see a correct Art-Net configuration for two X-NET 8 sending in broadcast mode.

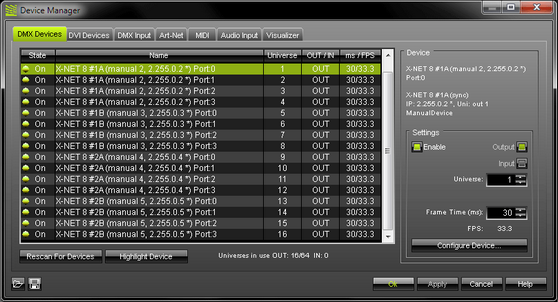

X-NET 8 #1A Port:0 is the DMX universe 1
X-NET 8 #1A Port:1 is the DMX universe 2
X-NET 8 #1A Port:2 is the DMX universe 3
X-NET 8 #1A Port:3 is the DMX universe 4
X-NET 8 #1B Port:0 is the DMX universe 5
X-NET 8 #1B Port:1 is the DMX universe 6
X-NET 8 #1B Port:2 is the DMX universe 7
X-NET 8 #1B Port:3 is the DMX universe 8
Important Notes
For more information please consult the chapter Art-Net.
The "Auto Find" option of MADRIX may find only one node with 4 universes (with older X-NET 8 firmwares). If this is the case, please add your X-NET 8 devices manually by using the "New" button.
Please always "Enable" all Art-Net ports when using the X-NET 8. Please enable all ports in MADRIX even if you do not need all ports in your LED installation. Otherwise problems might occur caused by the firmware of the X-NET 8. Please do not disable any ports in MADRIX.
Please remember to configure your light matrix in the Matrix Generator or Patch.
Please make sure to save your MADRIX Setup after the configuration process.