|
This tutorial shows you how you can use the MADRIX Fixture Editor.
Date: 09/2014
MADRIX Version: 3.3 (Created with)
1.
|
Start the Fixture Editor. You can find it at Start > All Programs > MADRIX 3 > Fixture Editor.
The MADRIX Fixture Editor will be opened and it will be empty at first.

|
2.
|
Go to File > Open Library
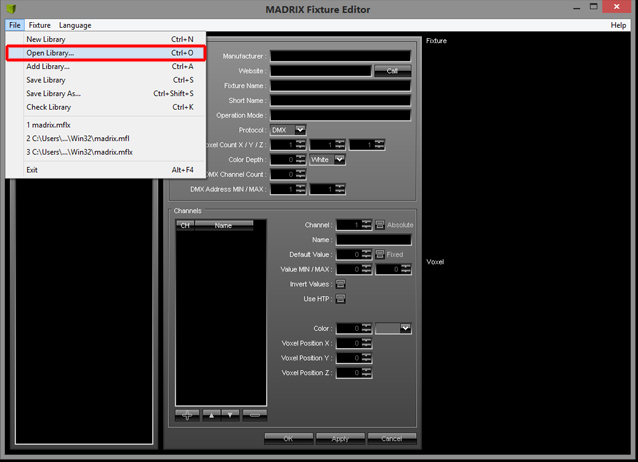
Select the madrix.mflx and click Open
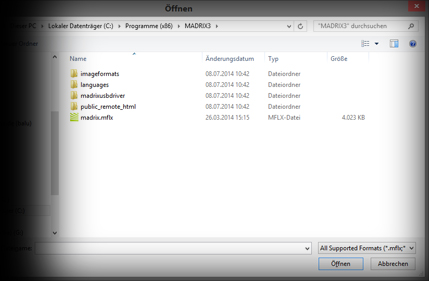
Note: The default Fixture Library for MADRIX is the madrix.mflx.
|
3.
|
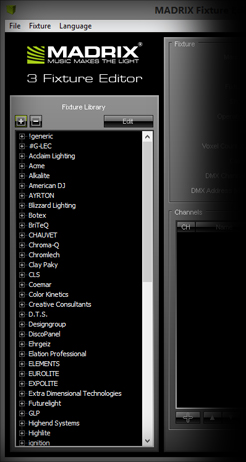
You can see the list of available fixtures included in this .mflx file.
|
4.
|
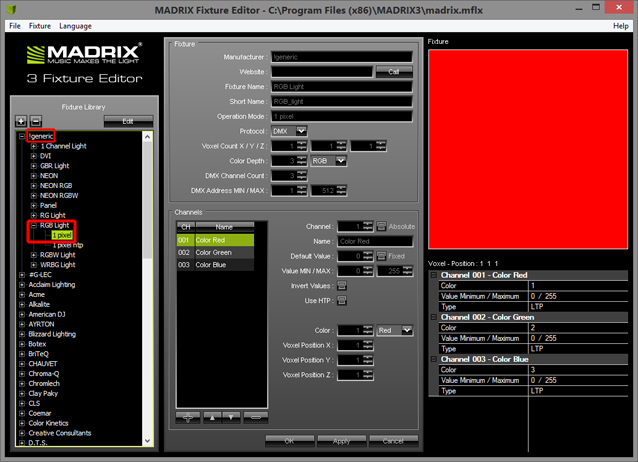
We now want to copy an existing fixture configuration and change the settings to create our own custom profile.
In this example, we will change the fixture profile !generic RGB Light 1 Pixel
Therefore, go to !generic > RGB Light > 1 Pixel in the list of fixtures on the left side. Select the fixture.
Now, you can see its properties.
|
5.
|
In step 5, we want to copy the selected fixture. Go to Fixture > Copy Fixture
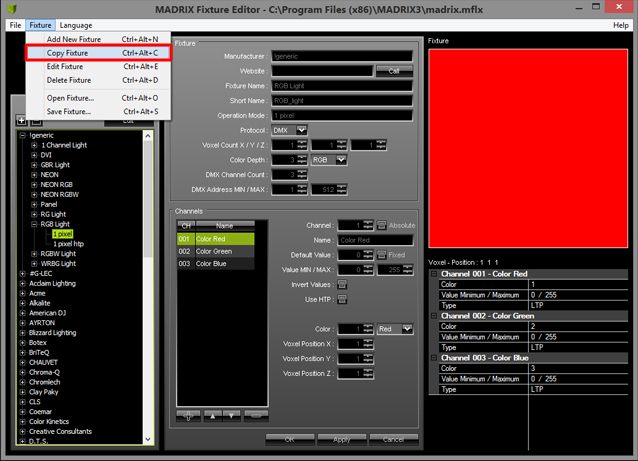
You can see that the properties of the fixture will be highlighted in green. That means you can change the properties.
Note: The same effect occurs if you click Edit Fixture. But in that case, you will override the original properties.

|
6.
|
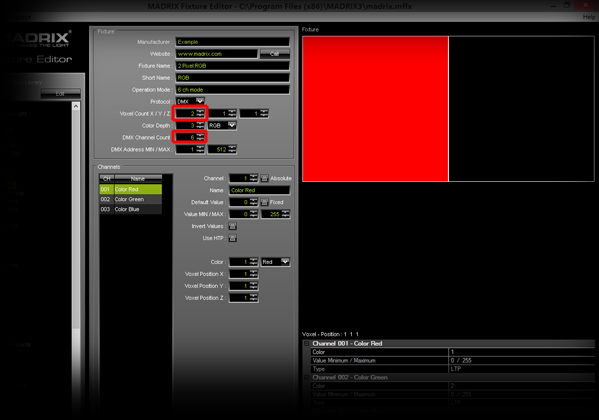
We will now have to change the properties to create our new fixture. The new fixture has somewhat similar properties. We will change the name and add another pixel, so that the fixture has two pixels side by side.
To create a new fixture, we have to change the following entries:
| ▪ | Manufacturer: This is also the name under which you can find the profile in the section Fixture Library to the left. In this tutorial we will call it Example |
| ▪ | Homepage: You can add the manufacturer's homepage. In this way, you could call up the DMX Chart again some time in the future, for instance. |
| ▪ | Fixture Name: This is also the name where you can find the correct profile under the Manufacturer branch in the section Fixture Library. In this example, we will call it 2 Pixel RGB |
| ▪ | Short Name: You will see this name later in the Patch of MADRIX. In this example, it is called RGB |
| ▪ | Operation Mode: It is possible to create different profiles for one fixture. For instance, the new fixture has a mode with 3 DMX channels, with 6 DMX channels, and 7 DMX channels. You can implement the different modes using the same Manufacturer, Fixture Name, and Short Name. Only the Protocol Name must be different. In this example, it is called 6 ch Mode |
| ▪ | Protocol: Here you can choose between DMX or DVI. We want to create a DMX fixture. |
| ▪ | Voxel Count X/Y/Z: These make up the size of the fixture. In this example, we are only changing the X-amount to 2, because we want to have two pixels next to each other. If you changed the Voxel Amount, you can see the new fixture size in the section Fixture Preview on the right side. |
| ▪ | Color Depth: You can change it if you use a non-RGB fixture. For example, that could be an RGBW fixture or a single-color fixture. In this example, leave it at 3, RGB |
| ▪ | DMX Channel Count: Here you can set the required DMX channels for the fixture. In this example, we need to set up a value of 6 |
|
7.
|
We will add the missing color channels in this step.
Therefore, select Color Blue in the section Channel and click Add at the bottom of the section. The Fixture Editor will automatically set the correct, new color at the right position.
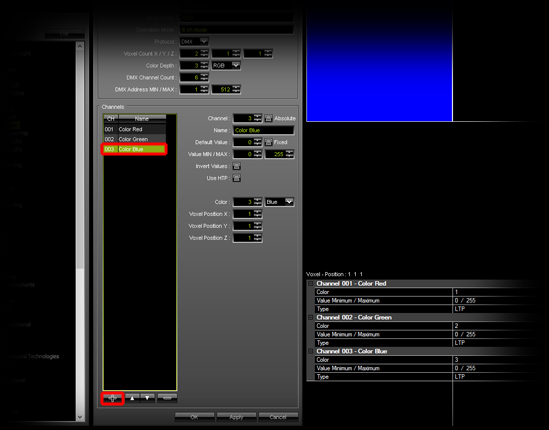
Repeat this step until the channel list contains a total of 6 entries.
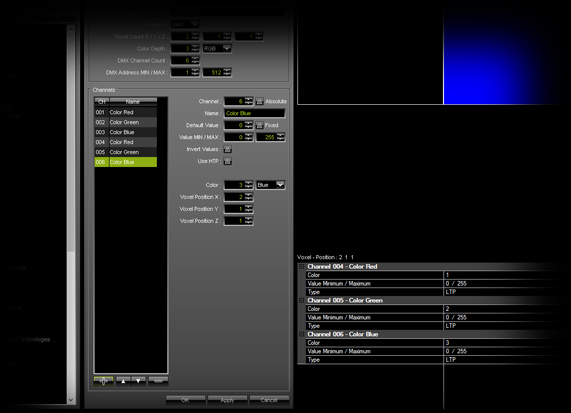
Click OK
|
8.
|
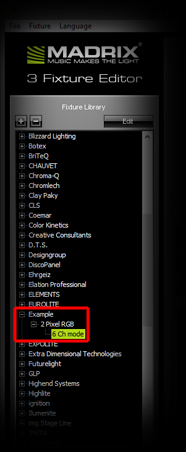
Now, you can find a new branch in the Fixture Library section. It is called, Example and has a fixture called 2 Pixel RGB with the 6 ch Mode
|
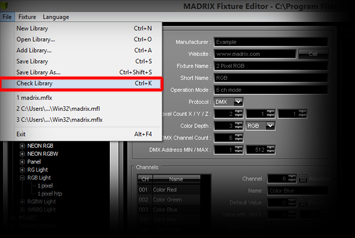
9.
|
You can check your new fixtures in the library. Go to File > Check Library
|
10.
|
Save the .mflx file you just changed.
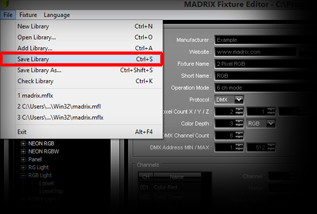
Note: You have to restart MADRIX if you want to see the changes of the Fixture Library in MADRIX.
|
Congratulations! You have created a new Fixture with the MADRIX Fixture Editor.
|