Introduction
The Art-Net protocol is a widely known standard to transfer DMX512 over Ethernet (network).
Usage
This chapter describes how Art-Net can be used to connect your PC that runs the MADRIX software to the MADRIX PLEXUS via network cables to output DMX data. DMX data is then sent to the device over Ethernet/network.
(Your LED fixtures, LED controllers, or LED drivers would be connected to the XLR ports of the PLEXUS device.)
Using MADRIX
Please make sure to install the MADRIX software first.
For more information about the installation process, see the MADRIX PLEXUS Quick Start Guide or the MADRIX Help And Manual.
Connecting MADRIX PLEXUS To Your PC
Now, please connect the MADRIX to your computer using the network connection. Your device can be powered via the USB port or by using the external power supply.
Network Settings
Please make sure that the network settings of your operating system and the settings of your PLEXUS device are correct!
To configure the IP address, subnet mask, and standard gateway of your device, go to the PLEXUS menu 'Network' > 'IP Address'. Or use the PLEXUS Configuration window in MADRIX.
In Windows, please navigate to the corresponding item to change the network settings of your operating system.
In general, these settings are recommended:
Device and network card:
· |
2.0.0.1 ... 2.255.255.254 or |
· |
10.0.0.1 ... 10.255.255.254 |
Subnet mask:
· |
255.0.0.0 |
It is recommended to use this address area.
Please note: Recently, the 2.X network range has been made public. That is why MADRIX PLEXUS will have an IP address in the 10.X address range when shipped.
Settings Of The Device

Navigate to the menu 'Network' > 'Art-Net'.
In this menu, the current settings regarding Art-Net, a network protocol for DMX-over-Ethernet, are shown. More specifically, this menu contains the universe settings. Technically speaking Art-Net universes range from 0 to 255, but they are displayed on the PLEXUS and in MADRIX from 1 to 256.
'Art-Net -> DMX 1' sets which received Art-Net universe is sent to the first XLR port for DMX output (DMX 1).
'Art-Net -> DMX 2' sets which received Art-Net universe is sent to the second XLR port for DMX output (DMX 2).
'DMX 1 -> Art-Net' is used for Art-Net output from stand-alone playback. It defines on which Art-Net universe the SD card data for port DMX 1 is sent. In this way, it routes the data from DMX 1 to the specified Art-Net universe.
'DMX 2 -> Art-Net' is used for Art-Net output from stand-alone playback. It defines on which Art-Net universe the SD card data for port DMX 2 is sent. In this way, it routes the data from DMX 2 to the specified Art-Net universe.
Please change the Universe according to your requirements or deactivate the option by choosing 'Off'.
'Art-Net -> DMX 1' and 'Art-Net -> DMX 2' specify if incoming Art-Net data is routed to the corresponding XLR port (DMX 1 or DMX 2) and which Art-Net universe should function as source for each port. These settings should be activated if you want to connect your MADRIX PC to your PLEXUS device using network cables. In Live Mode, you would then send data over the network to the PLEXUS and the PLEXUS outputs the data to each XLR port, where your LED fixtures, LED controllers, or LED drivers would be connected.
'DMX 1 -> Art-Net' and 'DMX 2 -> Art-Net' specify if the corresponding XLR port is used and if those incoming values should be broadcasted to the Art-Net network and to which Art-Net universe it should be sent. This means, the PLEXUS runs a Stand-Alone show and the data is sent over network (via Art-Net) directly to the LED fixtures or you could convert the data to DMX again using a signal converter. Data will be sent over Art-Net to the configured Art-Net universe via Broadcast according to the configured IP address and Subnet mask of the device.
This could also be data from "Test Sending" (see below).
You may change the settings in this menu, on the device (How To Edit Values).
You can also configure the settings in the PLEXUS Configuration window in MADRIX. For more information, see Managing Devices Further.
For more information about Art-Net output, see the chapter Art-Net (Output).
Configuring Your Virtual LED Matrix In MADRIX
You will need to configure your virtual LED matrix according to your LED installation.
Start the MADRIX software now if not yet done.
In MADRIX, navigate to the menu 'Preferences' > 'Matrix Generator...' or 'Preferences' > 'Patch Editor...' for this task. For more information, please read the MADRIX Help And Manual.
Configuring Art-Net In MADRIX
In MADRIX, please navigate to the menu 'Preferences' > 'Device Manager...' > tab 'Art-Net'.
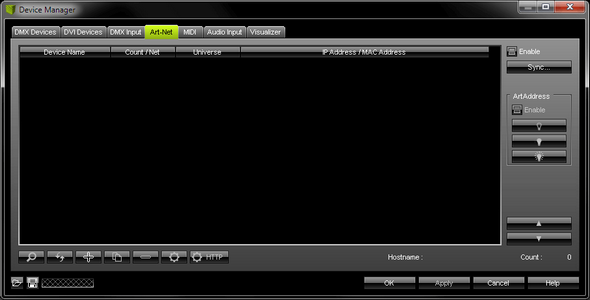
![]() Activate 'Enable' in the upper right corner. The checkbox will light up green, when activated.
Activate 'Enable' in the upper right corner. The checkbox will light up green, when activated.
![]() Click this button to let MADRIX automatically find your device.
Click this button to let MADRIX automatically find your device.
Your device will be shown in the list.
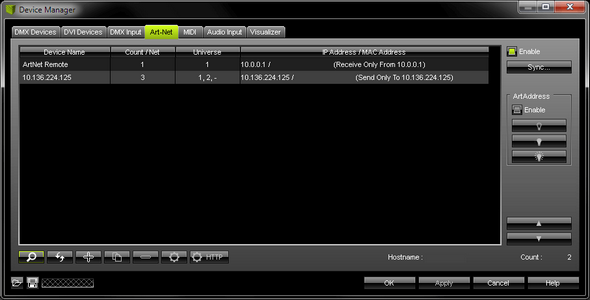
(The entry 'ArtNet Remote' will be created automatically when activating Art-Net and can be ignored at this stage.)
Art-Net is now activated. But you will still need to configure DMX output, as described below.
Configuring DMX Output In MADRIX
Activating Your Device
In MADRIX, navigate to 'Preferences' > 'Device Manager...' (or press 'F4'). Open the first tab 'DMX Devices'.
This window shows your connected devices. Two list entries will be created for your PLEXUS device and Art-Net, one entry for each DMX port. At this stage, both ports are deactivated.
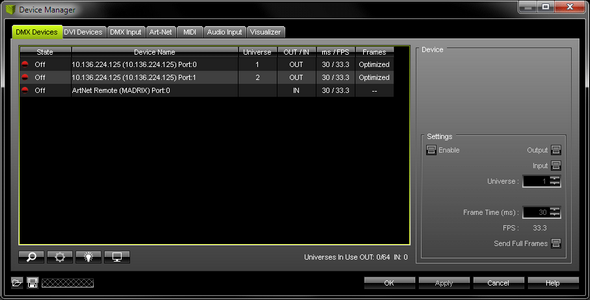
Please activate 'Enable' for every DMX port now. To do so, select a list entry and activate 'Enable'. Click 'Apply' afterwards.
Please activate the option 'Enable' for both ports, if required!
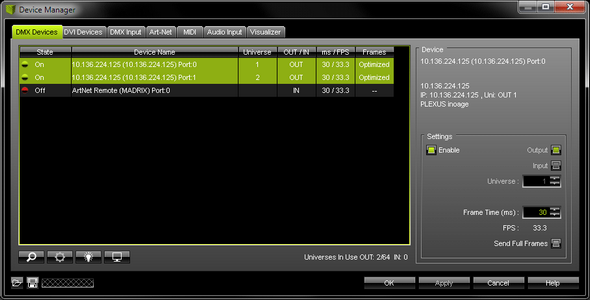
Setting Up The DMX Universe
![]() In the next step, set up the DMX 'Universe' for each DMX port. Simply use the two arrow buttons to adjust the values. Click 'Apply' afterwards.
In the next step, set up the DMX 'Universe' for each DMX port. Simply use the two arrow buttons to adjust the values. Click 'Apply' afterwards.
Make sure that this configuration match the settings of your virtual LED matrix in the Patch.
Further Configuration
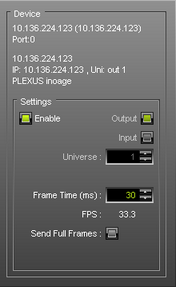
You can also define the 'Frame Time' in ms for each device.
Setting up the frame time can help in different cases. For example, certain LED fixtures might work best with a specific frame rate. Make sure to use the optimal frame rate for your fixtures. Some LED fixtures might have problems with high frame rates. Then, you can increase the frame time and the FPS will be adjusted automatically.
Always click 'Apply' to activate any changes you made.
![]() allows you to set up further settings. For more information, see below.
allows you to set up further settings. For more information, see below.
![]() activates/deactivates the highlight mode for the selected device and universe.
activates/deactivates the highlight mode for the selected device and universe.
Select one or more interfaces and click the button. The corresponding fixtures connected to the selected interface(s) will completely light up white for a better identification. This makes it easier to see them on stage. It considerably speeds up the procedure of programming the selected DMX512/Art-Net interfaces.
In addition, the display of selected PLEXUS devices will flash regularly.
![]() Switches off all built-in status indicators of a device over Art-Net. MADRIX PLEXUS supports this feature.
Switches off all built-in status indicators of a device over Art-Net. MADRIX PLEXUS supports this feature.
![]() Allows the built-in status indicators of a device to operate normally again, after having them switched off.
Allows the built-in status indicators of a device to operate normally again, after having them switched off.
![]()
![]() Open the 'DMX Watcher' to monitor your DMX output or input. 'Watch Universe' will appear when you have selected a list entry. The DMX Watcher will open with the particular DMX Universe already entered.
Open the 'DMX Watcher' to monitor your DMX output or input. 'Watch Universe' will appear when you have selected a list entry. The DMX Watcher will open with the particular DMX Universe already entered.
Click 'OK' when you are finished setting up your devices.
Resizing The Window
If wish to resize the window of the Device Manager to see more devices in the list, simply move your mouse pointer to the bottom of this window. Then, select the border and hold the left mouse button, while moving your mouse downwards.
Monitoring DMX Output Or DMX Input
You can monitor incoming or outgoing DMX values on your device in the PLEXUS menus 'Tools' > 'Monitor DMX 1' and 'Tools' > 'Monitor DMX 2'.
Important Notes
Please make sure to save your MADRIX Setup after the configuration process.
You may want to configure further settings for Art-Net.
![]() This button in the 'Device Manager', tab 'Art-Net' or in the Device Manager, tab 'DMX Devices' allows you to configure further settings.
This button in the 'Device Manager', tab 'Art-Net' or in the Device Manager, tab 'DMX Devices' allows you to configure further settings.
The following window 'Art-Net Device Configuration' will be opened.
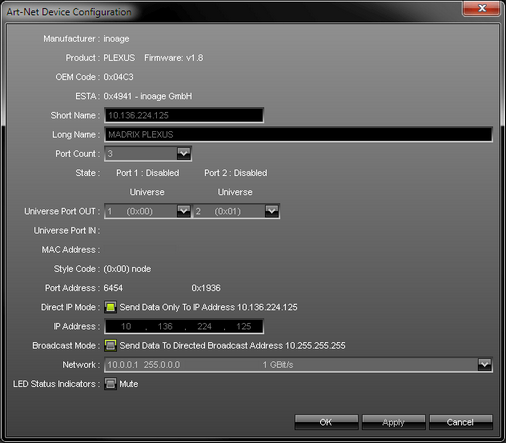
'Broadcast Mode' will send data to all devices in the network.
'Direct IP Mode' will send data only to a specific address and in this way a specific MADRIX PLEXUS.
Sync Mode
![]() An automatic sync mode for Art-Net devices is implemented in MADRIX. In this way you can activate or deactivate the usage of sync packages.
An automatic sync mode for Art-Net devices is implemented in MADRIX. In this way you can activate or deactivate the usage of sync packages.
This Sync Mode is not conform to Art-Net. To work properly it needs to be implemented by the manufacturer. It is recommended to activate it for MADRIX PLEXUS.
Before activating sync, make sure that all activated Art-Net devices are available in your network! Else, the frame rate of Art-Net might drop. If you are not sure, do not enable any sync mode.
In MADRIX, navigate to the menu 'Preferences' > 'Device Manager...' > 'Art-Net'. Click 'Sync...' and a new dialog will open. First, select the correct network in the list. Second, activate 'Enable'. Third, choose if you want to activate sync packages to be sent before data is sent ('Pre-Sync'). Or you can send sync packages after Art-Net data has been sent ('Post-Sync'). Then, click 'OK'.
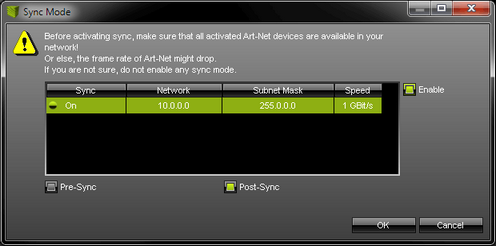
If you want to disable sync mode, click 'Sync' again, select the network, and deactivate 'Enable' again. Then, click 'OK'.
Config By Web
![]() This button allows you to control your device remotely with the help of a web browser.
This button allows you to control your device remotely with the help of a web browser.
For more information, see Remote Control.