This topic includes:
This topic describes how to create and how to set up a new fixture.
This is the most important part when creating a new fixture profile.
1] Load a MADRIX Fixture Library.
2] Create a new fixture or copy an existing profile.
3] Configure all fixture settings.
4] Save the fixture library.
1] Loading A Library
| ▪ | First, make sure to load an existing MADRIX Fixture Library or create a new library. Learn more »Managing Fixture Libraries |
2] Creating Or Copying A Fixture
| ▪ | Create a completely new fixture profile or copy a profile to edit its available settings. Learn more »Managing Fixtures |
3] Setting Up A Profile
| ▪ | Make sure to set up all settings, including Fixture Settings as well as Channel Settings. |
| ▪ | Press Apply and OK to confirm your changes! Learn more below |
4] Saving The Library
| ▪ | Make sure to save your library after making any chances. Learn more »Managing Fixture Libraries |
Overview
Each fixture profile includes two types of settings:
| ▪ | Fixture Settings [Includes data about the fixture in general] |
| ▪ | Channel Settings [Includes detailed data about each DMX channel/color channel] |
Edit Fixture
| ▪ | Go to Fixtures > Edit Fixture in order to be able to edit all settings as described below [Edit mode]. Or Double-click on a fixture in the Fixture Library list. |
Fixture Settings

Set up the following settings:
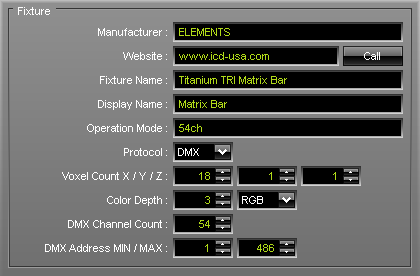
| ▪ | Manufacturer - Enter the name of the manufacturer. |
| ▪ | Website - Enter the website of the manufacturer. Press Call to let Windows automatically open your default web browser and launch the website. |
| ▪ | Fixture Name - Enter the complete name of the fixture. |
| ▪ | Display Name - Enter a short label for the fixture. |
| ▪ | Operation Mode - Fixtures might have several modes or come in different types. Specify the type or mode here [e.g., 54 CH for the 54 DMX channel mode]. |
| ▪ | Protocol - Specify if the fixture is controlled via DMX512 [or DMX-based in general] or via DVI [or DVI-based in general]. DMX-based types include protocols that are based on DMX512 or function similar [e.g., KiNet or Art-Net]. |
| ▪ | Voxel Count X / Y / Z - Specify how many pixels/voxels the fixture has in X [horizontal], Y [vertical], and Z [depth]. |
| ▪ | Color Depth - Specify the color mixing mode of your fixture or in other words how many channels one voxel/pixel of your fixture requires [e.g., RGB fixtures use 3 channels per voxel/pixel, while RGBW fixtures require a color depth of 4.] You can enter the values directly, or you can use the drop-down list to define the color mode: White, RG, RGB, or RGBW |
| ▪ | DMX Channel Count - Is only available for DMX-based fixtures. Enter the total number of DMX channels which the fixture requires [e.g., a 16-pixel RGB fixture usually requires 48 DMX channels per fixture]. |
| ▪ | DMX Address MIN / MAX - Is only available for DMX-based fixtures. Enter the lowest DMX channel address possible for this fixture and power supply/controller [usually 1]. Enter the highest DMX channel address possible for this fixture and power supply/controller [usually 512; but if you have a 150-channels fixture and you can only address one fixture per controller for example, then DMX Address Max should be 150. In this way, you can only add one fixture per controller and DMX universe]. |
Channel Settings

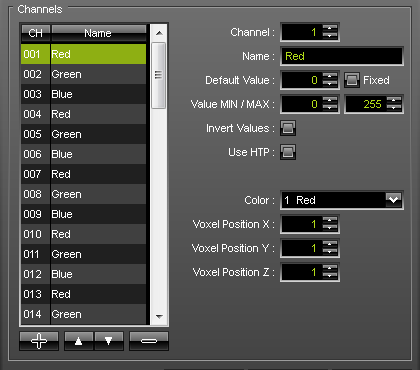
| ▪ | + - Creates a new channel and adds it to the fixture profile. Make sure to correctly set up all settings for this channel as explained below. |
| ▪ | — - Deletes a channel from the list of channels. |
| ▪ |
| ▪ |
| ▪ | OK - Confirms your settings for the fixture profile and leaves Edit mode. |
| ▪ | Apply - Confirms your settings, but you will stay in Edit mode and you can change further settings. |
| ▪ | Cancel - Aborts the process and does not confirm any changes. All changes will be discarded. You will leave Edit mode. |
Set up the following settings:
| ▪ | Channel - Specifies the channel number. Especially, when using DMX-based fixtures, every channel has a specific function. Make sure to set up the channels correctly. |
| ▪ | Name - Allows you to change the name of the channel. This name will be displayed in the list of channels to the left and in the preview to the right. |
| ▪ | Default Value - Specifies the default value for this channel [initial value]. Fixed - Sets the channel always to the Default Value and does not allow any changes to the values, when working with the fixture in MADRIX. [E.g, a fixture might require the master channel to always be 255 in order to work correctly]. |
| ▪ | Value MIN / MAX - Limits the value range with an lower and upper limit. By default, the values of a DMX channel range from 0 to 255. 0 represents Off, while 255 represents Full On. Some fixtures might work with a different range of values or require a certain minimal value to avoid flickering. |
| ▪ | Invert Values - Some fixture might work the other way around [0 = On and 255 = Off]. Activate this option in this case. |
| ▪ | Use HTP - Activates Highest Takes Precedence mode for this channel. [Is a feature only used in special cases. For example, you have 2 fixtures with the same DMX address. But due to their different locations in the MADRIX Patch, they receive different color values. If HTP is activated for these fixtures, the highest color value will be put out onto the LEDs. Otherwise, the position in the patch decides which color value is send out. The latter position wins.] |
| ▪ | Color - Defines which color the channel controls. Choose from Red, Green, Blue, or White [according to the Color Depth]. |
| ▪ | Voxel Position X - Defines the horizontal position of the channel on the fixture. [Fixtures of MADRIX work on a voxel/pixel basis. For example, 1/1/1 for example represents the upper left voxel/pixel.] |
| ▪ | Voxel Position Y - Defines the vertical position of the channel on the fixture. [Fixtures of MADRIX work on a voxel/pixel basis. For example, 1/1/1 for example represents the upper left voxel/pixel.] |
| ▪ | Voxel Position Z - Defines the depth position of the channel on the fixture. [Fixtures of MADRIX work on a voxel/pixel basis. For example, 1/1/1 for example represents the upper left voxel/pixel.] |
Confirming Your Settings
| ▪ | Press Apply and OK to confirm any changes. |