Overview
In this tutorial we are going to set up a matrix with 25 CHAUVET COLORpalette LED fixtures. The aim is get a typical rectangle matrix by positioning 5 units next to each other and 5 units on top of each other. The CHAUVET COLORpalette fixture features 4 pixels in x and 2 pixels in y. This means, as a result we will be able to use 20 pixels in x and 10 pixels in y for light effects.
Step By Step
Please follow the steps described below.
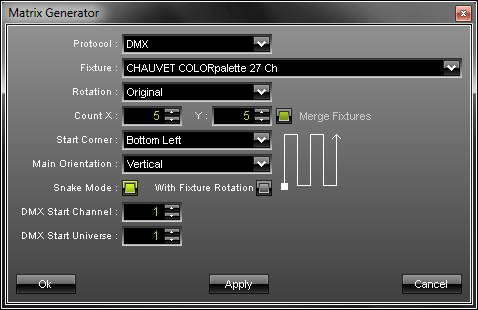
1. Open the "Matrix Generator" by pressing the "F2" key or go to the menu tab "Preferences".

2. Select the fixture "CHAUVET COLORpalette 27 Ch".
3. Leave the orientation as it is. The orientiation of a fixture describes how it is mounted. So for example, it would be possible to mount this fixture in an angle of 90 degrees. This means that if we face the the fixture directly, we would see a usage of 2 pixels in x but 4 pixels in y.
4. Enter '5' for "Count X" and '5' for "Count Y".
5. Next, we will set up the "DMX Start Corner". This function describes the point where the first fixture will ge its DMX signal. For our example we decide to start at the bottom left corner. After changing the DMX start corner, the little graphic on the right side changes and the small rectangle which marks the start point appears in the bottom left.
6. Now, we are going to set up the "Main Orientation". It describes in which direction the next fixture will get the next DMX address. In our example we decide to use the vertical direction.
7. Because of the more simple connection of fixtures, often they are patched in a snake mode, which means after reaching the top end of the first column, the next fixture will be the top most of the next column. To use this mode we select the "Snake Mode" checkbox.
8. Sometimes fixtures have to be rotated about 180 degree to be able to use the snake mode connection. In the case of the CHAUVET COLORpalette this is not necessary. Therefore, we will leave the "With Fixture Rotation" checkbox as it is.
9. Because we want to start the first DMX channel in the first DMX universe, we will leave number one to be our "DMX Start Channel" as well as "DMX Start Universe".
10. Click the "OK" button to apply all changes and to close the "Matrix Generator". Now you should be able to see a 40x10 pixel matrix in the preview windows.
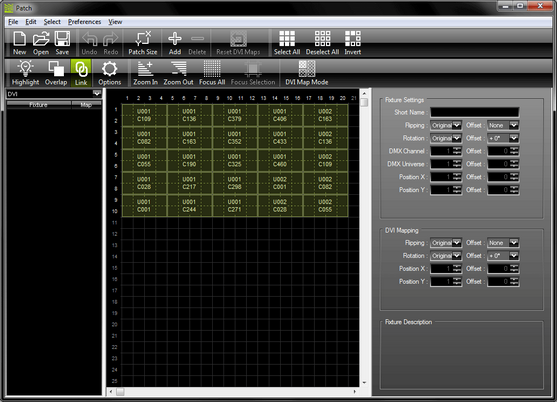
11. Last but not least, open the "Patch" dialog with the "F3" key or go to the menu tab "Preferences". Here you can check how the MADRIX patched the fixtures for us.
