MADRIX PLEXUS Art-Net Configuration

   Print  Previous  Next

The different Art-Net settings of MADRIX PLEXUS are explained in this tutorial.


Date: 10/2014
PLEXUS Firmware Version: 1.7.4369 (Created with)


1.

Please connect MADRIX PLEXUS to power.

2.

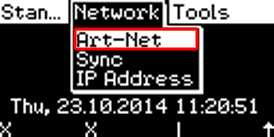
Navigate to Network > Art-Net and open the Art-Net submenu by pressing the OK key.

3.

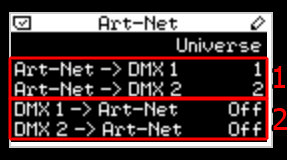
In the Art-Net submenu, you will find two sections:

1

Art-Net -> DMX 1 and Art-Net -> DMX 2: Use this option to change the assignment of Art-Net universes to the DMX 1 and DMX 2 output ports. For instance, you can set that DMX 1 outputs data from Art-Net universe 3.

2

DMX 1 -> Art-Net and DMX 2 -> Art-Net: Use this option to change the assignment of DMX data to a desired Art-Net universe. With this option, you can use the PLEXUS as Art-Net sender.

4.

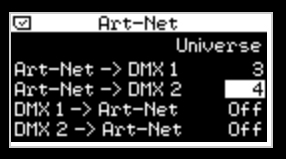
Let us now change the Art-Net assignment of output DMX 1 and output DMX 2.
Please press the OK key for 3 seconds and the value for Universe for DMX 1 will be highlighted in white. You are able to change the Art-Net universe assignment by using the left and right keys. Use the up and down keys to select which option you want to change. In this example, we want to change port DMX 1 to Universe 3 and port DMX 2 to Universe 4. Please confirm the new settings with OK.

The Art-Net universe assignment has now been changed. That means if an lighting console or other Art-Net sender sends Art-Net data to Art-Net universe 3, this data will be put out on DMX 1. If the console sends Art-Net data to Art-Net universe 4, the PLEXUS will send it on DMX 2.

Note: If you want to use the PLEXUS as Art-Net sender, please set Art-Net -> DMX 1 and Art-Net -> DMX 2 to OFF.


Congratulations! You have finished the MADRIX PLEXUS Art-Net configuration tutorial.


MADRIX 3 Tutorials Version 1.9
[Ctrl & +/-] = Zoom In/Out | [Ctrl & 0] = 100%
Print   Previous   Next