Step 5) Converting Files
Overview
Call up the Recording window again. In MADRIX, please go to the menu 'Window' -> 'Recording...' (or 'Ctrl+Alt+R').
First, select your MADRIX Record file (*.mrec) in the list. Please only select one file from the list!
Second, switch to the tab 'PLEXUS Conversion'.

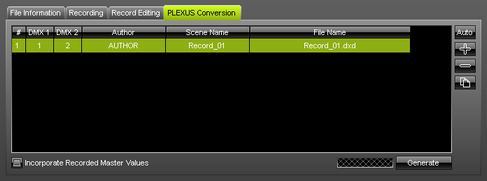
The tab 'PLEXUS Conversion' allows you to prepare the conversion. You can edit and configure how a MADRIX Record file (*.mrec) is converted into a DMX Data file (*.dxd).
Preparing The Conversion
Please make sure that your virtual LED matrix (Patch) is configured correctly before generating DMX Data files (*.dxd).
Note: The PLEXUS Conversion tab only factors in the settings of the Patch and not the settings of the Device Manager in MADRIX.
If your live output via the Device Manager works and you have changed the assignment of DMX universes, please make sure to adjust the settings in the PLEXUS Conversion tab as well!
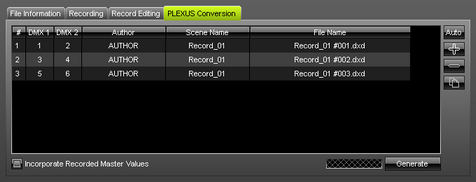
![]() Automatically adds entries to the list. The number of entries will automatically calculated according to the number of DMX universes configured in your Patch. The name of your Windows account will automatically be used for the column 'Author'. The name of the record file will automatically be used for the column 'Scene Name'. The name of the record file and an additional number will automatically be used for the column 'File Name'.
Automatically adds entries to the list. The number of entries will automatically calculated according to the number of DMX universes configured in your Patch. The name of your Windows account will automatically be used for the column 'Author'. The name of the record file will automatically be used for the column 'Scene Name'. The name of the record file and an additional number will automatically be used for the column 'File Name'.
![]() Adds a list item. Do not forget to adjust the item's 'DMX 1' and 'DMX 2' as well as 'Author', 'Scene Name', 'File Name' for each list entry.
Adds a list item. Do not forget to adjust the item's 'DMX 1' and 'DMX 2' as well as 'Author', 'Scene Name', 'File Name' for each list entry.
![]() Removes an item from the list. Select an item in the list first. You can also use the 'Delete' key on your keyboard.
Removes an item from the list. Select an item in the list first. You can also use the 'Delete' key on your keyboard.
![]() Duplicates list items. Select one or several items in the list first. The File Name will automatically be adjusted.
Duplicates list items. Select one or several items in the list first. The File Name will automatically be adjusted.
You may edit the each item.
'Author', 'Scene Name', 'File Name' can be changed. They define how the new DMX Data file will be named after the conversion. Select an entry. Double-click on the particular column and enter the values or characters using the keyboard. Use Enter to apply your changes. Please make sure that your 'File Name' has the ending '*.dxd'.
'DMX 1' defines which DMX universe of your virtual LED matrix (Patch) will be used for the first output port of your PLEXUS. Select an entry. Perform a double-click and simply enter the number of the universe. Use Enter to apply the changes. Select 'No' if the output port should be deactivated.
'DMX 2' defines which DMX universe of your virtual LED matrix (Patch) will be used for the second output port of your PLEXUS. Select an entry. Perform a double-click and simply enter the number of the universe. Use Enter to apply the changes. Select 'No' if the output port should be deactivated.
'Incorporate Recorded Master Values' can be activated if you have used the Master during recording. Then, your converted record will include the brightness levels set by the Master during the recording. Leave the option unchanged if your did not use the Master or do not want to include it.
Please note: If your are using more than 2 DMX universes and more than 1 MADRIX PLEXUS at the same time, please make sure to have a list entry for each PLEXUS (You will need 1 list item for each PLEXUS of your installation).
Example:
We have created a Patch for 6 DMX universes and we are using 3 MADRIX PLEXUS. PLEXUS number 1 should play DMX universe 1 and 2, PLEXUS number 2 should play DMX universe 3 and 4, PLEXUS number 3 should play DMX universe 5 and 6. Then, we need to create 3 list items or use the 'Auto' button.

(We will also have to generate 3 DMX Data files (*.dxd) in the next step.)
Generating DMX Data Files (*.dxd)
Please make sure that your virtual LED matrix (Patch) is configured correctly before generating DMX Data files (*.dxd).
1. Select your MADRIX Record file (*.mrec) in the list. Please only select one file!
2. Open the tab 'Record Editing' to double-check the recording (e.g. check the colors or the length of the effect).
3. Open the tab 'PLEXUS Conversion' and click 'Auto' to quickly proceed. Or configure your list entry or several entries manually.
4. Click 'Generate' to convert the MADRIX Record file (*.mrec) into one or multiple DMX Data files (*.dxd).
5. The newly create DMX Data files (*.dxd) will be added to the above list.
Please note:
| • | Generate DMX Data files (*.dxd) for every single effect (each of your recordings). |
| • | You may create several, different DMX Data files (*.dxd) from one MADRIX Record file (*.mrec). |
| • | Your MADRIX Record file (*.mrec) will not be deleted when a new DMX Data files (*.dxd) is generated. |
| • | When using multiple devices at the same time in one installation, you will need multiple DMX Data files (*.dxd). When using the button 'Generate', all list entries in the tab 'PLEXUS Conversion' will be used to automatically create multiple DMX Data files. |
Warnings:
When generating *.dxd files, you may encounter two messages.
1) As described above, you need to configure your virtual LED matrix (Matrix Size) correctly, before generating DMX Data files. This message box is a reminder to check if your Patch settings are configured correctly. Click 'Yes' if you would like to proceed with your current settings. Click 'No' if you would like to change your settings.

2) As described above, the maximum recommended frame rate for the MADRIX PLEXUS is 40 FPS (a frame time of 25ms). This message box is a reminder to check if your frame rate settings are configured correctly. Click 'Yes' if you would like to continue with your current settings. Click 'No' if you would like to change your settings.
