This topic includes:
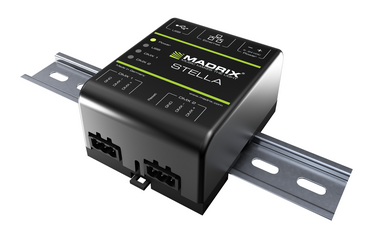
MADRIX STELLA is a 2-port Art-Net node or DMX512 USB interface for solid-state projects.
The MADRIX STELLA is a dedicated control interface for Art-Net and DMX512 that is designed for high quality and practicability in permanent LED installations.
An additional MADRIX KEY [i.e., a software license] is required for usage with MADRIX.
MADRIX STELLA is a standard Art-Net node. Because of this, you can use the device with applications, consoles, desks, or controllers that are compatible with Art-Net to distribute Art-Net data via Ethernet network.
Putting The Device Into Operation
1] Connecting Your LED Fixtures
Please see the MADRIX STELLA Quick Start Guide & Technical Manual on how to connect your LED fixtures to MADRIX STELLA.
»help.madrix.com
2] Connecting To Power And Data
Please see the MADRIX STELLA Quick Start Guide & Technical Manual on how to connect to power and data.
»help.madrix.com
You can mainly use 4 operating modes together with MADRIX:
Notes:
| ▪ | DMX 1 can be configured as either DMX-IN or DMX-OUT. |
| ▪ | DMX 2 can be configured as either DMX-IN or DMX-OUT. |
| ▪ | You can use DMX 1 and DMX 2 at the same time. |
DMX-OUT Via Ethernet Network [Art-Net]
Overview
You can connect the STELLA over Ethernet network to the network card of your computer that runs the MADRIX software. Data is distributed to the STELLA over network cabling [Ethernet] and sent to the two ports [DMX 1 and DMX 2].
1] Initial Configuration
| ▪ | Put MADRIX STELLA into operation by connecting the LED fixtures and supplying power; as described above. Learn more Putting The Device Into Operation |
| ▪ | Connect MADRIX STELLA to your computer using Ethernet network cabling. |
| ▪ | It is highly recommended to use Gigabit Ethernet network components [network card, switches, etc.]. |
2] Windows Network Settings
Art-Net is a network-based protocol. MADRIX will use the network card of your computer to send data.
| ▪ | It is required to set up the correct network settings in Windows, first. |
| ▪ | You must use these IP address and Subnet mask settings. Otherwise, Art-Net might not work! |
| ▪ | The IP addresses of your computer and your MADRIX STELLA devices need to be different. |
| ▪ | Set up an individual IP address in the following IP address range: - 2.0.0.1 ... 2.255.255.254 or - 10.0.0.1 ... 10.255.255.254 |
| ▪ | Set up the corresponding Subnet mask - 255.0.0.0 [Via factory default settings, MADRIX STELLA devices will have an IP address in the 10.x.x.x network range, such as 10.78.0.86, for example]. |
| ▪ | Restart MADRIX, if you have changed the network settings in Windows while MADRIX was running. |
| ▪ | Learn more »Tips [Microsoft Windows / Networks / USB] |
| ▪ | Example for PCs that are running MADRIX: |

3] Fixture Configuration In MADRIX
| ▪ | Start MADRIX. |
| ▪ | Configure the virtual LED matrix using the »Matrix Generator or »Patch Editor |
4] Activating Art-Net
| ▪ | Go to Preferences > Device Manager... > Art-Net [Keyboard shortcut: F4 > Art-Net] |
| ▪ | Activate the checkbox Enable [in the upper, right corner]. |
| ▪ | MADRIX will automatically create the entry ArtNet Remote This device is used only for Remote Control. Learn more DMX-IN Via Ethernet Network [Art-Net Remote] |
5] Adding Devices Automatically
MADRIX can automatically add your MADRIX STELLA devices.
| ▪ | Click [MADRIX will automatically search the network for connected MADRIX STELLA devices. Devices that are found will appear in the list. One entry will be created in the list for each STELLA device.] |
6] Activating Devices
Each of your MADRIX STELLA devices and its ports need to be activated. By default, they are still deactivated.
| ▪ | Go to Preferences > Device Manager... > DMX Devices [Keyboard shortcut: F4] |
| ▪ | Select your devices and their ports in the list. |
| ▪ | Activate Enable |
| ▪ | Output is activated by default. |
| ▪ | Click Apply |
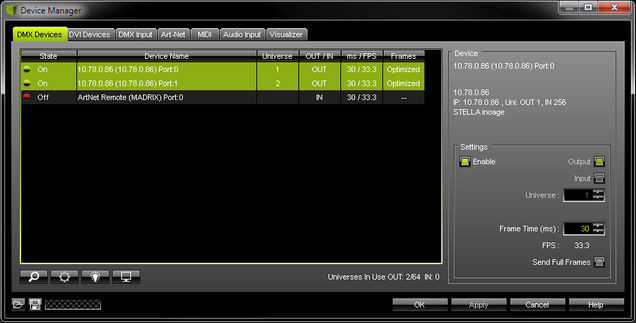
| ▪ | [In the screenshot above, one STELLA is connected. If more devices are connected, please use the different IP addresses of different devices to identify them in the Device Manager. You can also click on Device Name as well as Universe or other columns to sort the list accordingly.] |
7] Configuration Of DMX Output
| ▪ | Make sure that your devices are still selected under Preferences > Device Manager... > DMX Devices |
| ▪ | Set up Universe - Enter the specific DMX universe number. |
| ▪ | This setting assigns a specific DMX universe [of the Patch] to the device or the port of the device. |
| ▪ | Make sure the correct universe is assigned according to your requirements. Learn more »Glossary |
| ▪ | Click Apply |
| ▪ | By default, DMX universe 1 is assigned to DMX 1 and DMX universe 2 is assigned to DMX 2. |
8] Frame Time
| ▪ | Make sure that your device is still selected under Preferences > Device Manager... > DMX Devices |
| ▪ | Set up Frame Time (ms) - The Frame Time affects the Frame Rate. The Frame Rate specifies how fast data is sent to the device or received from it [Frames Per Second; FPS]. - Increase the Frame Time in order to decrease the Frame Rate [e.g., 40ms = 25 FPS]. - Decrease the Frame Time in order to increase the Frame Rate [e.g., 20ms = 50 FPS]. - The default value is 30 ms / 33.3 FPS. - Some LED fixtures might have problems with a high Frame Rate. Then, it is recommended to increase the Frame Time / to decrease the Frame Rate. |
| ▪ | Click Apply |
| ▪ | [When using Art-Net, the Frame Time [ms] can be individually set for each port. But it cannot be set individually for each port, when Sync Mode is activated. Learn more below.] |
9] Optimized Frames Or Full Frames
| ▪ | Make sure that your device is still selected under Preferences > Device Manager... > DMX Devices |
| ▪ | Activate or deactivate Send Full Frames - Per DMX512 standard, MADRIX only sends the number of DMX channels that is configured. For example, if you are using 312 DMX channels on a DMX universe, only 312 DMX channels will be sent with every single frame on this universe [Optimized Frames]. - Activate Send Full Frames if devices should always send full frames on a particular universe, instead of optimized frames. Sending full frames means that always the full 512 DMX channels of a DMX universe will be sent with every frame [even when you are using less than 512 channels]. - Activating Send Full Frames is recommended if problems with the data output on your LEDs occur. |
| ▪ | Click Apply |
| ▪ | In addition, you can activate Full Frames for the device and each MADRIX STELLA port separately. Learn more MADRIX Device Configruation |
MADRIX STELLA can use the special sync mode of MADRIX.
| ▪ | Large LED projects require dependable data distribution. The MADRIX software and STELLA hardware allow you to synchronize data output for all ports and even across multiple devices to get an optimal image on the LEDs. |
| ▪ | When MADRIX Sync mode is activated, MADRIX and MADRIX STELLA will automatically handle the synchronization of data. |
MADRIX Sync Mode is highly recommended for MADRIX STELLA!
|
Sync Mode - Allows you to activate or deactivate the usage of sync packages for Art-Net. |
| ▪ | Before activating sync, make sure that all activated Art-Net devices are available in your network! Else, the frame rate of Art-Net might drop. If you are not sure, do not enable any sync mode. |
| ▪ | Go to Preferences > Device Manager... > Art-Net [Keyboard shortcut: F4 > Art-Net] |
| ▪ | Click Sync... |
| ▪ | A new window will open. |
| ▪ | Select the network for which you want to activate Sync Mode. |
| ▪ | Click Enable to activate the Sync Mode for the selected network. |
| ▪ | A] Choose Pre-Sync to send sync packages before Art-Net data. |
| ▪ | B] Choose Post-Sync to send sync packages after Art-Net data. |
| ▪ | Click OK |

| ▪ | To disable sync mode, click Sync... again, select the correct network, and deactivate Enable. Confirm with OK |
Additional Art-Net Device Settings
It is very important to set up the correct settings for your devices!
Broadcast Mode Or Direct IP Mode
MADRIX can send Art-Net data in 2 ways to your Art-Net devices:
| ▪ | Broadcast Mode - Means that every packet sent from a single transmitter will be received by all recipients in the network. MADRIX will send data to all devices in the network. - Advantage: The same data [e.g., DMX universe 1 and 2] can be made available for different points of your setup. - Disadvantage: A potentially huge number of data packages will be sent over the network. This can reduce the overall network performance and cause data issues or instability. |
| ▪ | Direct IP Mode - Means that the specific data will only be sent to the specified recipient. - Advantage: Data traffic is reduced immensely, which means that a larger number of Art-Net devices can be used in one network. Reduced network traffic increases the performance and stability. - Disadvantage: The network settings of all devices need to be 100% correct. |
Direct IP Mode is recommended in general.
| ▪ | Go to Preferences > Device Manager... > Art-Net [Keyboard shortcut: F4 > Art-Net] |
| ▪ | Select your device in the list. |
| ▪ | Click |
| ▪ | A new window will open. |
| ▪ | A] Choose Direct IP Mode to activate Direct IP mode: - Make sure to enter the correct IP Address of your device that should receive the Art-Net data. When MADRIX STELLA has been automatically found by MADRIX, the IP address will be pre-configured for you. - MADRIX will send the corresponding data only to this device. |
| ▪ | B] Choose Broadcast Mode to activate Broadcast Mode: - Make sure to select the correct Network card of your computer that should send the Art-Net data. When MADRIX STELLA has been automatically found by MADRIX, the correct network will be pre-configured for you. - MADRIX will send data to the whole Art-Net network. |
| ▪ | Click Apply |
More Information About Art-Net
Learn more »Art-Net [DMX Over Ethernet]
Overview
You can connect the STELLA directly over USB to the computer that runs the MADRIX software. Data is distributed to the MADRIX STELLA via USB and sent to the two ports [DMX 1 and DMX 2].
1] Initial Configuration
| ▪ | Put MADRIX STELLA into operation by connecting the LED fixtures and supplying power; as described above. Learn more Putting The Device Into Operation |
| ▪ | Connect MADRIX STELLA to your computer via USB. [Use the provided USB cable.] |
| ▪ | Make sure to check the power management options of Windows. Learn more »PC Power Management |
2] Fixture Configuration In MADRIX
| ▪ | Start MADRIX. |
| ▪ | Configure the virtual LED matrix using the »Matrix Generator or »Patch Editor |
3] Enabling Drivers In MADRIX
| ▪ | Go to Preferences > Options... > Devices USB [Keyboard shortcut: Ctrl+Alt+O > Devices USB] |
| ▪ | Activate MADRIX STELLA |
| ▪ | Click Apply |
| ▪ | Close the window with OK |
")
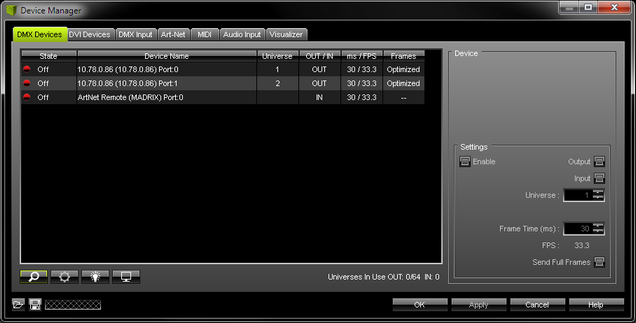
4] Activating Devices
| ▪ | Go to Preferences > Device Manager... > DMX Devices [Keyboard shortcut: F4] |
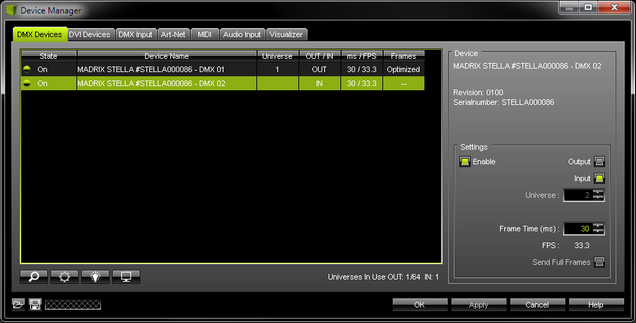
| ▪ | Your STELLA devices and their two ports will appear in the list. |
| ▪ | If your devices are not in the list, click [In the screenshot below, one STELLA is connected.] |
| ▪ | By default, all ports are activated [State On]. |
| ▪ | If your device and ports are not activated, do the following: |
| ▪ | Select the device/port in the list. |
| ▪ | Activate Enable |
| ▪ | Activate Output |
| ▪ | Click Apply |
5] Configuration Of DMX Output
| ▪ | Make sure that your devices are still selected under Preferences > Device Manager... > DMX Devices |
| ▪ | Set up Universe - Enter the specific DMX universe number. |
| ▪ | This setting assigns a specific DMX universe [of the Patch] to the device or the port of the device. |
| ▪ | Make sure the correct universe is assigned according to your requirements. Learn more »Glossary |
| ▪ | Click Apply |
| ▪ | By default, DMX universe 1 is assigned to DMX 1 and DMX universe 2 is assigned to DMX 2. |
6] Frame Time
| ▪ | Make sure that your device is still selected under Preferences > Device Manager... > DMX Devices |
| ▪ | Set up Frame Time (ms) - The Frame Time affects the Frame Rate. The Frame Rate specifies how fast data is sent to the device or received from it [Frames Per Second; FPS]. - Increase the Frame Time in order to decrease the Frame Rate [e.g., 40ms = 25 FPS]. - Decrease the Frame Time in order to increase the Frame Rate [e.g., 20ms = 50 FPS]. - The default value is 30 ms / 33.3 FPS. - Some LED fixtures might have problems with a high Frame Rate. Then, it is recommended to increase the Frame Time / to decrease the Frame Rate. |
| ▪ | Click Apply |
7] Optimized Frames Or Full Frames
| ▪ | Make sure that your device is still selected under Preferences > Device Manager... > DMX Devices |
| ▪ | Activate or deactivate Send Full Frames - Per DMX512 standard, MADRIX only sends the number of DMX channels that is configured. For example, if you are using 312 DMX channels on a DMX universe, only 312 DMX channels will be sent with every single frame on this universe [Optimized Frames]. - Activate Send Full Frames if devices should always send full frames on a particular universe, instead of optimized frames. Sending full frames means that always the full 512 DMX channels of a DMX universe will be sent with every frame [even when you are using less than 512 channels]. - Activating Send Full Frames is recommended if problems with the data output of your devices occur. |
| ▪ | Click Apply |
| ▪ | In addition, you can activate Send Full Frames for the device and each MADRIX STELLA port separately. Learn more MADRIX Device Configuration |
More Information About DMX Output
Learn more »DMX512 [DMX-OUT]
DMX-IN Via Ethernet Network [Art-Net Remote]
Overview
You can connect MADRIX STELLA over Ethernet network to the network card of your computer that runs the MADRIX software. Data is sent to the STELLA via a port and from the STELLA to MADRIX via Ethernet network.
1] Initial Configuration
| ▪ | Connect your external DMX controller to the DMX port of MADRIX STELLA. |
| ▪ | Connect MADRIX STELLA to power. [Please see safety instructions in the MADRIX STELLA Quick Start Guide!] |
| ▪ | Connect MADRIX STELLA to your computer via network cabling. |
| ▪ | It is highly recommended to use Gigabit Ethernet network components [network card, switches, etc.]. |
2] Windows Network Settings
Art-Net is a network-based protocol. MADRIX will use the network card of your computer to send data.
| ▪ | It is required to set up the correct network settings in Windows, first. |
| ▪ | You must use these IP address and Subnet mask settings. Otherwise, Art-Net might not work! |
| ▪ | The IP addresses of your computer and your MADRIX STELLA devices need to be different. |
| ▪ | Set up an individual IP address in the following IP address range: - 2.0.0.1 ... 2.255.255.254 or - 10.0.0.1 ... 10.255.255.254 |
| ▪ | Set up the corresponding Subnet mask - 255.0.0.0 [Via factory default settings, MADRIX STELLA devices will have an IP address in the 10.x.x.x network range, such as 10.78.0.86, for example]. |
| ▪ | Restart MADRIX, if you have changed the network settings in Windows while MADRIX was running. |
| ▪ | Learn more »Tips [Microsoft Windows / Networks / USB] |
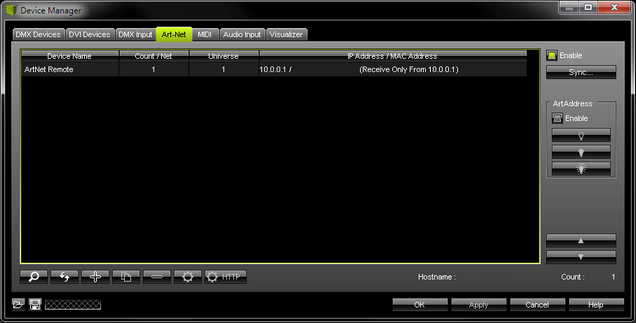
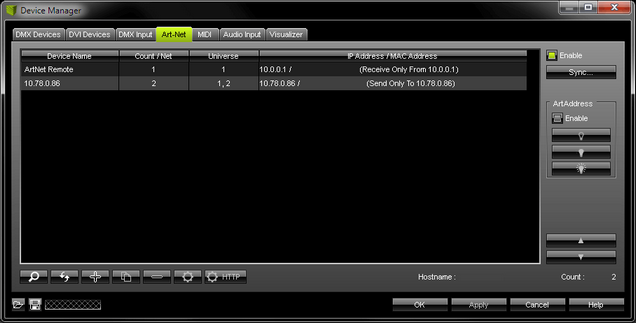
3] Activating Art-Net
| ▪ | Go to Preferences > Device Manager... > Art-Net [Keyboard shortcut: F4 > Art-Net] |
| ▪ | Activate Enable |
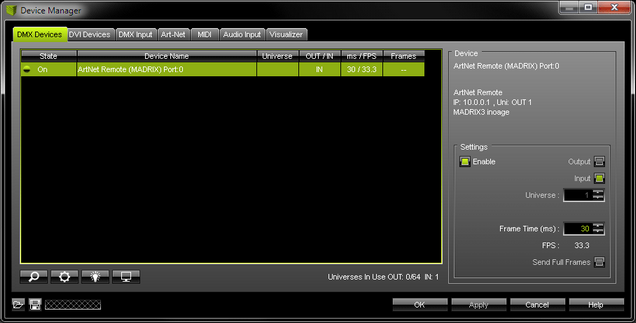
| ▪ | MADRIX will automatically create the entry ArtNet Remote This device is used only for Remote Control. |
4] Configuration Of Art-Net Remote
| ▪ | Select ArtNet Remote in the list. |
| ▪ | Click |
| ▪ | A new window opens [Art-Net Device Configuration]. |
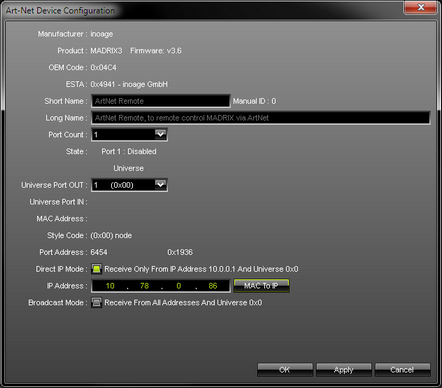
| ▪ | Set Port Count to 2 [if you wish to receive from both ports]. |
| ▪ | Set Universe Port OUT to 256 and 255, which is Art-Net universe 256 and 255. Confirm with Apply [By default, MADRIX STELLA sends DMX-IN data to Art-Net universe 256 from DMX 1 and to Art-Net universe 255 from DMX 2. You can change these settings in the Web Configuration or MADRIX Device Configuration window if required. If you have changed the settings, enter the exact same Art-Net universe here!] |
| ▪ | Activate Direct IP Mode and enter the IP Address of your MADRIX STELLA. Confirm with Apply [E.g., 10.78.0.86] |
| ▪ | [You can also activate Broadcast Mode. In this mode, MADRIX will receive any DMX data that is sent in the network on this particular Art-Net universe.] |
| ▪ | Press OK |
5] Activating Art-Net Remote
You need to activate the Art-Net Remote device. Art-Net Remote is still deactivated.
| ▪ | Go to Preferences > Device Manager... > DMX Devices [Keyboard shortcut: F4] |
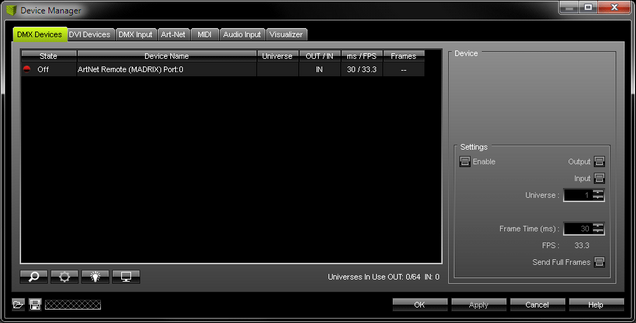
| ▪ | Select ArtNet Remote in the list. |
| ▪ | Activate Enable |
| ▪ | Input is automatically selected. |
| ▪ | Click Apply |
| ▪ | If required, change the Frame Time (ms) - The higher the Frame Time, the lower the FPS will be. The lower the Frame Time, the higher the FPS will be. - The default Frame Time is 33. - Press Apply to confirm. |
6] Activating DMX Input
| ▪ | Go to Preferences > Device Manager... > DMX Input |

| ▪ | Select your preferred DMX Universe in the list. [By default, DMX universe 1 to 8 are listed. If you wish to increase the number of DMX-IN universes, you can change the setting. Learn more »Performance] |
| ▪ | Choose your DMX-IN Device in the section Device. Select ArtNet Remote |
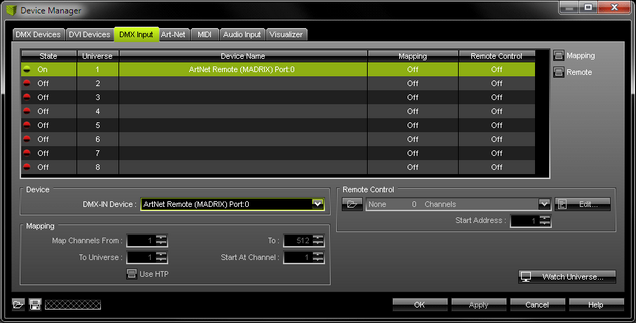
| ▪ | Art-Net Remote is now activated. MADRIX can already receive DMX data. |
| ▪ | Now, choose how to use incoming data. Learn more »Art-Net Remote |
Overview
You can connect the STELLA directly via USB to the computer that runs the MADRIX software. Data is sent to the STELLA via a port and from the STELLA to MADRIX via USB.
1] Initial Configuration
| ▪ | Connect your external DMX controller to the required DMX port of MADRIX STELLA. |
| ▪ | Connect MADRIX STELLA to your computer via USB. [Use the provided USB cable] |
| ▪ | Make sure to check the power management options of Windows. Learn more »PC Power Management |
2] Enabling Drivers In MADRIX
| ▪ | Go to Preferences > Options... > Devices USB [Keyboard shortcut: Ctrl+Alt+O > Devices USB] |
| ▪ | Activate MADRIX STELLA |
| ▪ | Click Apply |
| ▪ | Close the window with OK |
3] Activating Devices
| ▪ | Go to Preferences > Device Manager... > DMX Devices [Keyboard shortcut: F4] |
| ▪ | Your STELLA devices and their two ports will appear in the list. |
| ▪ | If your devices are not in the list, click [In the screenshot below, one STELLA is connected.] |
| ▪ | Select the required port in the list. |
| ▪ | Activate Enable |
| ▪ | Activate Input |
| ▪ | Click Apply |
| ▪ | If required, change the Frame Time (ms) - The higher the Frame Time, the lower the FPS will be. The lower the Frame Time, the higher the FPS will be. - The recommended Frame Time is 33. - Press Apply to confirm. |
6] Activating DMX Input
| ▪ | Go to Preferences > Device Manager... > DMX Input |
| ▪ | Select your preferred DMX Universe in the list. [By default, DMX universe 1 to 8 are listed. If you wish to increase the number of DMX-IN universes, you can change the setting. Learn more »Performance] |
| ▪ | Choose your DMX-IN Device in the section Device. Select MADRIX STELLA |
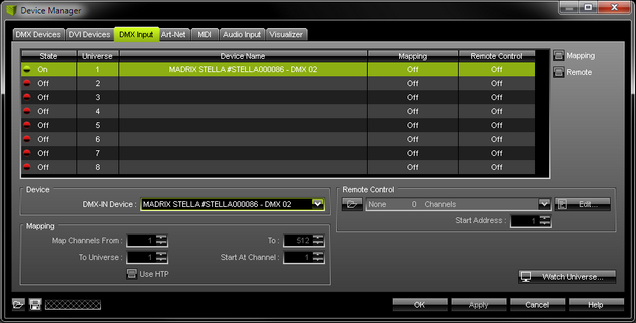
| ▪ | DMX-IN is now activated. MADRIX can already receive DMX data. |
| ▪ | Now, choose how to use incoming data. Learn more »DMX-IN |
Status Indicators [ArtAddress]
In order to use these features, please Enable ArtAddress first.
[Please make sure that your nodes fully support this Art-Net feature, such as MADRIX LUNA, MADRIX NEBULA, MADRIX PLEXUS, MADRIX STELLA. You will also get notified by a message box. Confirm the message with OK or abort via Cancel.]
|
Mute Status Indicators - Switches off and disables all built-in status indicators of a device over Art-Net [ArtAddress > AcLedMute]. |
|
Operate Status LEDs Normally - Allows the built-in status indicators of a device to operate normally again, after having them switched off [ArtAddress > AcLedNormal]. |
|
Highlight Device - Activates the highlight mode [ArtAddress > AcLedLocate]. Select one or more interfaces and click the button. The corresponding status indicators of the selected interfaces will flash for a better identification or tests. This makes it easier to see them on site/stage. It considerably speeds up the procedure of programming or testing the selected interfaces. |
|
DMX Watcher - Opens the DMX Watcher to monitor your DMX output or input under Preferences > Device Manager... > DMX Devices |
Overview
| ▪ | MADRIX STELLA features automatic HTP merging from 2 Art-Net sources. |
[Usually, the first source will be MADRIX. The second source could be a console, for example.]
| ▪ | Data from both source will be merged together and sent out as 1 signal. This happens across all ports and by using the HTP principle. |
| ▪ | HTP - Is the acronym for Highest Takes Precedence. Data from both sources will be compared for each individual channel. The higher value wins per channel. |
| ▪ | Example: We are using an LED fixture with a total of 5 control channels [3 color channels and 2 movement channels]. MADRIX should provide the color data for channels 1 to 3 and the console should provide the movement data for channels 4 and 5. Using the MADRIX Fixture Editor, we could create a corresponding fixture where channel 4 and 5 are set up as Fixed channel using always a value of 0. On the other hand, the console will always send a value of 0 for the first 3 channels of each fixture. This will ensure that the data from the console will always provide the higher value on channels 4 and 5, while MADRIX provides the color data. Due to the automatic HTP merging of the device, the LED fixture will receive correct data from both sources as desired. |
Configuration And Recommendations
1] Correctly set up and enable Art-Net for each source.
2] Make sure to activate Sync Mode for Art-Net in MADRIX. Learn more Sync Mode
3] Make sure that MADRIX has a lower IP address compared to the second source.
[E.g., 2.0.0.1 compared to 2.0.0.20]
4] Always use Direct IP Mode to directly send data to the correct IP addresses of your MADRIX STELLA devices.
[It is not recommend to have any of the two sources or any other source in the network to send data via Broadcast Mode.]
When connected to Ethernet network, you can easily configure MADRIX STELLA using a web configuration interface.
You have 2 options to access the web interface:
A] Open your web browser and enter the IP address of MADRIX STELLA.
[Both, STELLA and your computer, need to be in the same network.]
B] Use MADRIX.
| ▪ | Go to Preferences > Device Manager... > Art-Net [Keyboard shortcut: F4 > Art-Net] |
| ▪ | Select your MADRIX STELLA device in the list. |
| ▪ | Click |
| ▪ | Your default web browser will open. |
| ▪ | Now, you have access to various information and settings. |
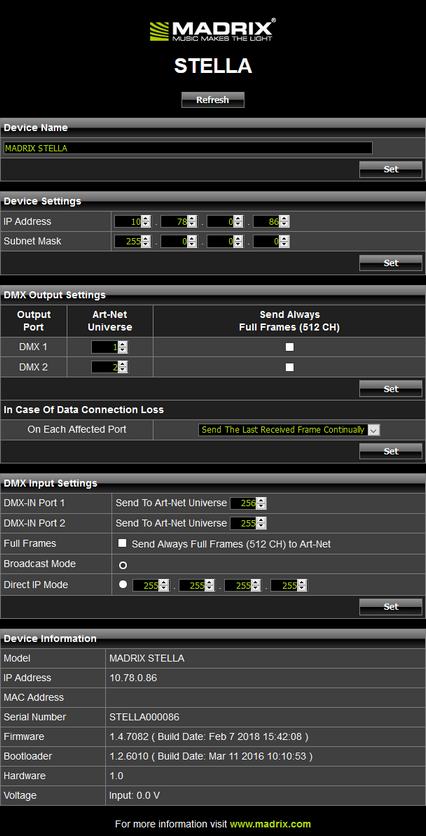
Device Name |
You can change the description of the device. Enter a name and confirm your input with Set. This label is only shown in this web interface. |
||||||||||||||||||
Device Settings |
You can change the IP address and Subnet Mask. Enter the specific addresses and confirm with Set. |
||||||||||||||||||
DMX Output Settings |
This section shows specific settings for the DMX ports for output. If you are broadcasting data for a large number of Universes [using Broadcast Mode instead of using Direct IP Mode] with MADRIX or a 3rd-party controller for example, you can assign different DMX universes to each STELLA device with these settings. Each MADRIX STELLA will then only receive data from the specific Art-Net universe and send it to its specified output port. Example: You can set up that STELLA #1 only listens to Art-Net universe 1 and 2, while STELLA #2 listens to Art-Net universe 3 and 4, and STELLA #3 listens to Art-Net universe 5 and 6, and so on. Send Always Full Frames (512 CH) - Is another specific setting. The DMX port will always send out 512 channels, even if the data sent to STELLA includes less than 512 channels for this port and universe. STELLA automatically sends values of 0 on channels that are not used. In Case Of Data Connection Loss - Is only available in the web configuration tool. Allows you to specify the output settings of the LUNA should the device not receive data anymore for a specified DMX universe. Choose from the following options:
|
||||||||||||||||||
DMX Input Settings |
This section allows you to specify settings for the DMX ports for input. STELLA can receive 512 channels per port. Use Send To Art-Net Universe to specify on which Art-Net universe those 512 channels are sent. By default, 256 is selected for DMX 1 and 255 for DMX 2. Valid values range from 1 to 256. Send Always Full Frames (512 CH) To Art-Net - Is another specific setting. The STELLA will always send out 512 channels, even if the data received by STELLA includes less than 512 channels for this port and universe. STELLA automatically sends values of 0 on channels that are not used. Additionally, choose to how MADRIX STELLA sends the data into the network:
|
||||||||||||||||||
Device Information |
This section displays various details about the device, including:
|
You can access the information and settings of the web configuration in MADRIX using the MADRIX Device Configuration window.
| ▪ | In MADRIX, go to Tools > MADRIX Device Configuration... [Keyboard shortcut: Ctrl+Alt+L] |

|
|
||
|
|
||
|
|
||
|
|
||
|
|
||
|
|
||
|
|
Learn more Web Configuration
The following tables describe the LED status codes of the device.
STATUS |
POWER |
Powered off |
Power not connected. ’ The device has no power. |
Permanently green |
Connected to power. ’ The power is on. |
Blinking green |
Bootloader activated. ’ Reset the device to factory default settings. |
STATUS |
USB |
Powered off |
USB not connected. |
Red + |
Communicating over USB. |
Fading between |
Connected to USB; Drivers installed correctly. |
Orange |
Connected to USB; No drivers installed. |
STATUS |
DMX 1 |
DMX 2 |
Powered off |
No data is sent. |
No data is sent. |
Blinking green |
Sending or receiving data. |
Sending or receiving data. |
STATUS |
ETHERNET |
Green off |
10 MBit/s connected. |
Green on |
100 MBit/s connected. |
Orange on |
Network connected. |
Orange blinking |
Sending or receiving data. ’ The Ethernet port works. |
Reset To Factory Default Settings
In rare cases you might need to do a reset to factory default settings, for example to reset to the device to its default IP address as shown on the side of the device:
Reset Via Reset Button
1] Disconnect all connections from the device [power, data, DMX].
2] Use a suitable tool to press the reset button [between DMX 1 and DMX 2].
3] Continue to press the reset button and supply power again over 'Power' or USB.
4] Continue to press the reset button and wait until all status LEDs of the device flash repeatedly or wait 10 seconds.
[Simply repeat these steps should the process fail.]
It is highly recommended to update the firmware of the device should a new firmware version become available. You can do so in different ways.
Update Via USB
1] Connect MADRIX STELLA to your computer over USB.
[Use the provided USB cable.]
2] Start the MADRIX software.
3] Open the MADRIX Device Configuration window. Go to Tools > MADRIX Device Configuration...
4] Click ![]() to search for connected devices and your device will appear in the list.
to search for connected devices and your device will appear in the list.
5] Select your device in the list and click Firmware
6] Wait for the process to end [usually it takes only seconds].
7] Disconnect MADRIX STELLA from USB and power. Afterwards, connect it again.
Update Via Ethernet
| ▪ | Connect MADRIX STELLA to power. |
| ▪ | Connect MADRIX STELLA to your computer over Ethernet network. |
| ▪ | In MADRIX, go to Preferences > Device Manager... > Art-Net |
| ▪ | Activate Art-Net |
| ▪ | Click Learn more DMX-OUT Via Ethernet Network [Art-Net] |
| ▪ | Select the device in the list. Click |
| ▪ | Click Firmware The update process will starts. |
| ▪ | Wait for the process to end [usually it takes only seconds]. |
| ▪ | Disconnect MADRIX STELLA from USB and power. Afterwards, connect it again. |
Available Firmware Updates
STELLA Firmware |
MADRIX Version |
Release Date |
Highlights |
||||||||
1.0.6127 |
MADRIX 3.6 RC |
May 2016 |
|
||||||||
1.1.6147 |
MADRIX 3.6 |
May 2016 |
|
||||||||
1.1.6168 |
MADRIX 3.6a |
July 2016 |
|
||||||||
1.2.6346 |
MADRIX 3.6d |
December 2016 |
|
||||||||
1.2.7035 |
MADRIX 3.6f |
May 2017 |
|
||||||||
1.4.7082 |
MADRIX 3.6h |
February 2018 |
|
||||||||
1.7.7165 |
MADRIX 3.6j |
September 2019 |
|